Zone configuration on Cisco MDS

This post covers the commands used to display zone configuration, activate/deactivate zones, create/delete aliases for fibre attached devices, create/delete zones and create/delete zonesets and copying the configuration to the running configuration.

By default 3 VSANS in MDS Switches
show vsan         -3 zones, 1 (active), 4079 (evfp_isolatied_vsan), 4094 (isolated_vsan)

Enter configuration mode
config t
vsan database
vsan 1 suspend

Create new VSAN
vsan 100
Give it a name
vsan 100 name ProdVSAN100
exit
exit
show vsan

You can see VSAN100 is in active state
Add physical interface
config t
vsan database
vsan 100 interface fc1/1    (Add individual interface)
vsan 100 interface fc1/2-16  (Adds range of interfaces)
exit
exit

Enable Interfaces/Ports
config t
interface fc1/1   (exit and Repeat for other interfaces)
no shut    (Enables interface – shut disables)
exit

ZONING
ZONE CREATE
show flogi database            (Check what wwn’s have flogged in)
show fcns database vsan 100   (State of VSAN100)

Disable the default zone
no zone default-zone permit vsan 100

Create the FC-Alias for Zone
conf
fcalias name SUN_HBA1 vsan 100
member pwwn 10:00:00:00:c9:b0:b9:8e

fcalias name Win_HBA1 vsan 100
member pwwn 10:00:00:00:c9:b0:b9:8e

fcalias name VNX_SPA vsan 100
member pwwn 50:06:01:6b:08:60:10:07

end
CTRL-Z
show fcalias

Create the Zone
conf
zone name WIN_HBA1_VNX_SPA vsan 100
member fcalias VNX_SPA
member fcalias Win_HBA1
zone name SUN_HBA1_VNX_SPA vsan 100
member fcalias VNX_SPA
member fcalias SUN_HBA1
end
show zone

Create the Zoneset
conf
zoneset name Cloud_Zone vsan 100
member WIN_HBA1_VNX_SPA
member SUN_HBA1_VNX_SPA
end

Activate the Zoneset
zoneset activate name Cloud_Zone vsan 100

Save the configuration
copy running-config startup-config

Validate the Zone configuration and show the active zone
show zoneset            (Displays Zoneset, with Zones inside and aliases inside)
show zoneset active     (Displays same but connection status indicated also)

DELETE A ZONE
Deactivate the zoneset
conf
no zoneset activate name Cloud_Zone vsan 100

Delete the zoneset
no zoneset name Cloud_Zone vsan 100

Delete the zones
no zone name WIN_HBA1_VNX_SPA vsan 100
no zone name SUN_HBA1_VNX_SPA vsan 100

Delete the Aliases
no fcalias name SUN_HBA1 vsan 100
no fcalias name Win_HBA1 vsan 100
no fcalias name VNX_SPA vsan 100
end

show zone   (Zone not present)
show fcalias (Alias not present)

Did you like this?
Tip cyberfella with Cryptocurrency

Donate Bitcoin to cyberfella

Scan to Donate Bitcoin to cyberfella
Scan the QR code or copy the address below into your wallet to send some bitcoin:

Donate Bitcoin Cash to cyberfella

Scan to Donate Bitcoin Cash to cyberfella
Scan the QR code or copy the address below into your wallet to send bitcoin:

Donate Ethereum to cyberfella

Scan to Donate Ethereum to cyberfella
Scan the QR code or copy the address below into your wallet to send some Ether:

Donate Litecoin to cyberfella

Scan to Donate Litecoin to cyberfella
Scan the QR code or copy the address below into your wallet to send some Litecoin:

Donate Monero to cyberfella

Scan to Donate Monero to cyberfella
Scan the QR code or copy the address below into your wallet to send some Monero:

Donate ZCash to cyberfella

Scan to Donate ZCash to cyberfella
Scan the QR code or copy the address below into your wallet to send some ZCash:

Share all subfolders as individual hidden shares

Continuing on from my previous post about setting permissions on all migrated users home directories here…

Re-permissioning Users Home Directories

Re-permission each users subdirectory so only their user account has access (note that the homedir name and username must match),

for /f %%f IN (‘dir /ad /b E:\MigratedData\homedirs\’) DO cacls E:\MigratedData\homedirs\%%f /e /p %%f:F

It is also possible to share each migrated home directory (or any other set of subfolders) as its own hidden share, without the repetitious click, click,click of the share wizard and copious amounts of your time (that you’ll never get back).  Let the command line take the strain!  And the best bit?  You don’t even need PowerShell to do it!


Create a hidden share for each users home directory (Note: home directory must have appropriate NTFS security in place)

for /f %%f IN (‘dir /ad /b E:\MigratedData\homedirs\’) DO net share %%f$=E:\MigratedData\homedirs\%%f /GRANT:Everyone,FULL

You could tighten up the share security only allowing the user themselves to have full control (in terms of share permissions – the underlying NTFS perms to that effect should already be in place), by changing /GRANT:Everyone,FULL to /GRANT:%%f,FULL

Note that double %% is necessary for using these commands in a batch file,  If you want to run them straight on the command line, you’ll need to drop one of the % e.g. for /f %f IN…


Did you like this?
Tip cyberfella with Cryptocurrency

Donate Bitcoin to cyberfella

Scan to Donate Bitcoin to cyberfella
Scan the QR code or copy the address below into your wallet to send some bitcoin:

Donate Bitcoin Cash to cyberfella

Scan to Donate Bitcoin Cash to cyberfella
Scan the QR code or copy the address below into your wallet to send bitcoin:

Donate Ethereum to cyberfella

Scan to Donate Ethereum to cyberfella
Scan the QR code or copy the address below into your wallet to send some Ether:

Donate Litecoin to cyberfella

Scan to Donate Litecoin to cyberfella
Scan the QR code or copy the address below into your wallet to send some Litecoin:

Donate Monero to cyberfella

Scan to Donate Monero to cyberfella
Scan the QR code or copy the address below into your wallet to send some Monero:

Donate ZCash to cyberfella

Scan to Donate ZCash to cyberfella
Scan the QR code or copy the address below into your wallet to send some ZCash:

Installing Dropbox on ElementaryOS (Freya)

ElementaryOS is the closest thing to Mac OS-X in terms of consistency and minimalism of it’s desktop environment interface.  Unlike other Linux distro’s it’s released when the developers think it’s ready, rather than a 6 month rolling cycle.  It’ll take a lot to turn my head away from Linux Mint but Elementary has got a lot of things going for it to be quite honest and I’ll leave you to discover them yourself.  I’m only interested in problems, and the first one I ran into was installing Dropbox.  Installing it from the Software Centre doesn’t work.


They way to sort it, is to install git using sudo apt-get install git

Once git is installed, then run the following commands

git clone https://github.com/zant95/elementary-dropbox /tmp/elementary-dropbox
bash /tmp/elementary-dropbox/install.sh

dropbox-inst-elementary

Dropbox will then open, asking for your account username and password, and the Dropbox sync icon will appear in WingPanel.

References:

https://github.com/zant95/elementary-dropbox

Did you like this?
Tip cyberfella with Cryptocurrency

Donate Bitcoin to cyberfella

Scan to Donate Bitcoin to cyberfella
Scan the QR code or copy the address below into your wallet to send some bitcoin:

Donate Bitcoin Cash to cyberfella

Scan to Donate Bitcoin Cash to cyberfella
Scan the QR code or copy the address below into your wallet to send bitcoin:

Donate Ethereum to cyberfella

Scan to Donate Ethereum to cyberfella
Scan the QR code or copy the address below into your wallet to send some Ether:

Donate Litecoin to cyberfella

Scan to Donate Litecoin to cyberfella
Scan the QR code or copy the address below into your wallet to send some Litecoin:

Donate Monero to cyberfella

Scan to Donate Monero to cyberfella
Scan the QR code or copy the address below into your wallet to send some Monero:

Donate ZCash to cyberfella

Scan to Donate ZCash to cyberfella
Scan the QR code or copy the address below into your wallet to send some ZCash:

Finding SIDs that haven’t changed after SetACL

This post follows on from a previous post sidmaps and setacl describing how you can use SetACL with a SID map generated using dsquery to translate sidHistory attributes to primarySIDs for migrated groups used in the permissions on your data.  It is used in the final stages of a domain migration so cut the reliance on the continued existence of the old domain controllers in order to verify that the sidHistory attributes of migrated groups in the new domain still correspond with a valid object in the old domain (often referred to as ‘lookback’ or ‘reachback’).

Before an old domain can be decommissioned, the SIDs securing the NTFS folders need to be switched to use only the primary SIDs of the migrated groups.

Once a first pass of SetACL with a sidmap has been run, you’ll need to check that there are no legacy SIDs still being used to secure any folders.

To achieve this, I re-run an export of the security using a command similar to

icacls E:\rootfolder /save H:\exports\E_export.txt 

then split the potentially large log file up into 10Mb pieces using a free filesplitter such as the one available here filesplitter.org

I open each file and re-save in ANSI encoded format using Notepad++ available here Notepad++ This is necessary for the subsequent pattern matching steps to work correctly.

I make sure I have GNUWin32 utilities installed available here GNUWin32 so that I can use powerful command line utilities such as cut, sort and uniq ordinarily only available in Linux/UNIX, in Windows.

The following command is then used to strip the old sids from the files and create a new unique list of old SIDs

cut -d; -f6 file_01(10).txt | cut -d) -f1 | findstr S-1-5-1-123456789 | sort | uniq >> sidlist.txt      

(can use | wc -l to just count lines)

I repeat the command on the first file of the set of ten split files i.e file_01(10).txt, for the following fields (we’ve already done field 6 i.e. -f6)

11, 16, 21, 26, 31, 36, 41, 46, 51, 56 and so on (increments of 5) until I get nothing more out for file_01(10).txt before moving on and repeating the process for file 2 i.e file_02(10).txt and so on until I’ve exhausted all 10 files.  This doesn’t take as long as it sounds.  It’s even quicker if you put it in a loop like this…

REM Requires GNUWin32 installed as a prereq.
REM Use fsplit.exe to break large icacls exports into 10MB pieces.
REM Usage Example: extractsids.bat exportfile_01(16).txt 1552345678
SET /a i=6
:loop
IF %i%==56 GOTO END
echo Extracting sids matching %2 from field %i% in %1…
cut -d; -f%i% %1 | cut -d) -f1 | findstr %2 | sort | uniq >> %1_sidsextracted.txt
SET /a i=%i%+5
GOTO LOOP
:end
sort %1_sidsextracted.txt | uniq > %1_%2_extractedsids.txt
if exist %1_sidsextracted.txt | uniq > %1_%2_extractedsids.txt
if exist %1_sidsextracted.txt (
del %1_sidsextracted.txt
) else (
echo “Somethings gone wrong.
)
echo Done! Extracted sids written to %1_extractedsids.txt

I then re-sort and unique the list again to end up with my final list of SIDs that were not changed as part of the initial Re-ACL process. (Step is included in batch file above).

sort sidlist.txt | uniq > unchanged_sids.txt

If I need to identify what users or groups these unique SIDs correspond to in AD, then I can use the free tool available here sidtoname.exe in conjunction with the following batch file that I’ll call get_names.bat

@echo off
REM Usage:  From a command line…
REM groupnames.bat unchanged_sids.txt > names.txt
REM Dependencies: sidtoname.exe
for /f %%a in (%1) do (
sidtoname.exe %%a
)

And there you have it.  A list of groups whose SID’s were not changed after an initial pass of SetACL with a sidmap.  You now need to take the list of sids or the list of groups and determine the sidHistory and primarySIDs of them, then append them to your original sidmap before re-running another pass of SetACL.  Note that the groups listed in names.txt could be user names as well as group names (or aliases too).  They will be conveniently prepended with a label of User, Group or Alias accordingly.


Did you like this?
Tip cyberfella with Cryptocurrency

Donate Bitcoin to cyberfella

Scan to Donate Bitcoin to cyberfella
Scan the QR code or copy the address below into your wallet to send some bitcoin:

Donate Bitcoin Cash to cyberfella

Scan to Donate Bitcoin Cash to cyberfella
Scan the QR code or copy the address below into your wallet to send bitcoin:

Donate Ethereum to cyberfella

Scan to Donate Ethereum to cyberfella
Scan the QR code or copy the address below into your wallet to send some Ether:

Donate Litecoin to cyberfella

Scan to Donate Litecoin to cyberfella
Scan the QR code or copy the address below into your wallet to send some Litecoin:

Donate Monero to cyberfella

Scan to Donate Monero to cyberfella
Scan the QR code or copy the address below into your wallet to send some Monero:

Donate ZCash to cyberfella
Scan to Donate ZCash to cyberfella
Scan the QR code or copy the address below into your wallet to send some ZCash:

Using Linux commands on WIndows

Wouldn’t it be nice if you could pipe the output from windows commands into non-windows commands like grep, cut, awk, sort etc that are available to you on alternative unix-based operating systems?


Download and install GNUWin32 from here and the CoreUtils package here and Grep here that should do it.  There are more packages available though here

Once installed, add the path to the bin directory to your Windows System Environment Variable Path

Environment_variables Path

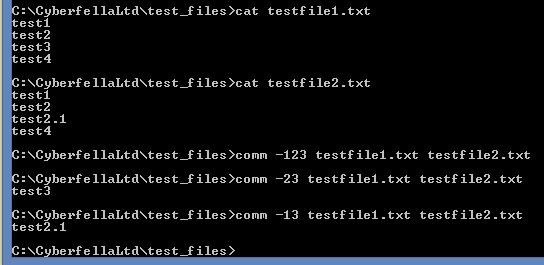
A few useful commands will now be available on the command line.  My favourite is comm which compares files and can be quite flexible with the output with the -1 -2 or -3 switches to suppress lines that appear in file1, file2 or both files respectively.   You can also combine them e.g. -12 -23, 13 to affect the output, so that only the desired output is achieved.  This takes a bit of playing around with, but is very powerful and very simple.  So much so, that it is my number 1 go to tool for file comparison.  Examples shown the in the screenshots below.

comm-helpcomm-3 comm_windows

Note:  Some Windows tools such as icacls export text to a format other than ANSI.  When viewed using Notepad or Notepad++, all appears fine, but if you cat them , you’ll see there are effectively spaces between each character, meaning grep won’t work.  Such text files will need to be saved in ANSI format first.  You can do this using Notepad++.  After selecting Encode in ANSI, save it, then retry grep for a more successful pattern match!

ANSI


Did you like this?
Tip cyberfella with Cryptocurrency

Donate Bitcoin to cyberfella

Scan to Donate Bitcoin to cyberfella
Scan the QR code or copy the address below into your wallet to send some bitcoin:

Donate Bitcoin Cash to cyberfella

Scan to Donate Bitcoin Cash to cyberfella
Scan the QR code or copy the address below into your wallet to send bitcoin:

Donate Ethereum to cyberfella

Scan to Donate Ethereum to cyberfella
Scan the QR code or copy the address below into your wallet to send some Ether:

Donate Litecoin to cyberfella

Scan to Donate Litecoin to cyberfella
Scan the QR code or copy the address below into your wallet to send some Litecoin:

Donate Monero to cyberfella

Scan to Donate Monero to cyberfella
Scan the QR code or copy the address below into your wallet to send some Monero:

Donate ZCash to cyberfella

Scan to Donate ZCash to cyberfella
Scan the QR code or copy the address below into your wallet to send some ZCash:

Comparing text files using Notepad++

Notepad++ is my favourite text editor for Windows.  It’s great, it’s free and you should use it.  I’ll leave you to discover it’s cool little features, including themes under Style Configurator.  My favourite theme is khaki for its ease on the eyes when trawling through logs.  black on white gets pretty tiresome.  Syntax colour highlighting according to your coding language is a nice touch too, for spotting those elusive typos tripping up your code.

http://notepad-plus-plus.org/download/v6.7.5.html

It used to include a plugin called Compare, that you could use to compare different files and highlight their differences, but this was removed due to compatibility issues.  Hopefully it’ll return.  In the meantime, it is possible to download the plugin separately, and copy it to the plugins folder under Program Files (x86)\Notepad++\plugins

http://sourceforge.net/projects/npp-compare/?source=typ_redirect

Expand the zip file and copy the .dll into place…

Compare-plugin

Restart Notepad++ (it conveniently opens whatever files were open before it was closed – another nice feature).  The plugins menu now has the Compare plugin…

notepad_compare

Files are compared and differences highlighted…

notepad_compare2

There is also a convenient navigation pane on the right hand side (not shown) that shows all the red and green areas (mismatches and differences) in the files.

Enjoy the best free text editor and file comparison functionality all in the same app and ask yourself why in 2015 Microsoft’s own Notepad bundled with Windows still doesn’t have any of these essential features built in.

Did you like this?
Tip cyberfella with Cryptocurrency

Donate Bitcoin to cyberfella

Scan to Donate Bitcoin to cyberfella
Scan the QR code or copy the address below into your wallet to send some bitcoin:

Donate Bitcoin Cash to cyberfella
Scan to Donate Bitcoin Cash to cyberfella
Scan the QR code or copy the address below into your wallet to send bitcoin:

Donate Ethereum to cyberfella

Scan to Donate Ethereum to cyberfella
Scan the QR code or copy the address below into your wallet to send some Ether:

Donate Litecoin to cyberfella

Scan to Donate Litecoin to cyberfella
Scan the QR code or copy the address below into your wallet to send some Litecoin:

Donate Monero to cyberfella

Scan to Donate Monero to cyberfella
Scan the QR code or copy the address below into your wallet to send some Monero:

Donate ZCash to cyberfella

Scan to Donate ZCash to cyberfella
Scan the QR code or copy the address below into your wallet to send some ZCash:

Re-ACL of inter-domain migrated data

When migrating from one domain to another (usually new) domain, the users and groups are migrated so as to retain their historical SID.  This is so that the migrated account in the new domain can still access resources in the old domain that were secured against that users unique SID or groups to which that user was once a member.  When a user account is migrated, a new account is effectively created with a new, unique SID, but the old SID is also retained.

This is convenient so that everything continues to “hang together” in terms of newly migrated users being able to access new data and old data pending its inevitable migration to file servers or NAS in the new domain.

Once the data is migrated to the new domain, then the ACL’s will still likely contain ACE’s of user and group SIDs from the legacy domain.  The migrated users will still be able to access this data provided the old domain continues to exist for the purposes of authenticating old SIDs but at some point, the old domain will likely be scheduled for decomissioning to free up money and space associated with cooling, electricity and ongoing support overheads.  Another option would be to virtualize an old DC and have done with it.

The legacy user and group SID’s contained in the ACE’s will need to be translated to the primary SIDs of the new migrated users and groups to remove the need for legacy DC’s to remain in the new environment.  This can be done using SetACL – the freely available tool mentioned in other posts such as Removing Orphaned SIDs.

The following prose is a combination of my own notes and those found on the Helge Klein website where SetACL can be downloaded.

Migration – the Flexible Way

SetACL 3 comes with a more flexible way of handling permissions migrations. Its enhanced migration engine can be used to migrate intra-domain, inter-domain or any mix of the two. To start a migration using the flexible model use a command line similar to the following:

SetACL -on D:\Data -ot file -actn trustee -trst csv:C:\temp\mappings.csv;ta:repltrst -rec cont

This instructs SetACL to copy permissions between individual users or groups for the D:\Data directory tree. Which accounts the migration is performed for is read from a simple CSV file, mappings.csv in the example, whose contents might look like this:

MyOldDomain\Joe,MyNewDomain\Peter
MyOldDomain\Mary,MyNewDomain\Mary
MyOldDomain\DG-OldDom-HelpDesk,MyNewDomain\DG-NewDom-HelpDesk
MyOtherDom\Fred,MyNewDomain\Fred

or like this… (both formats are supported, I prefer this one i.e. sddl format)

S-1-5-21-1552345877-4092344333-3107638942-187127,S-1-5-21-3615417180-1828292988-6264
S-1-5-21-1552345877-4092344333-3107638942-187157,S-1-5-21-3615417180-1828292988-6294
S-1-5-21-1552345877-4092344333-3107638942-187177,S-1-5-21-3615417180-1828292988-6394

As you can see, the system is flexible, powerful and easy to use. All you have to do is create a mapping table pairing old account with new account. If you do not want to do that or if you think it is just too much bother: the simpler method presented above still works and is still considered useful in many scenarios.

Command reference
https://helgeklein.com/setacl/documentation/command-line-version-setacl-exe

Working example

Back up directory security first.  Always use a starting folder, not the root of the drive.  The restores do not work to the root of a drive as the export file has an empty first line that upsets the restore process.  This means you may need to back up each top level folder individually so that your restores would work or you can just delete the first empty line (but be aware you’ll not recover its permissions and applying them manually will cause them to subsequently ripple down through the tree (no)thanks to Windows’ behaviour.)

icacls D:\sourcedata /save ACL_Dep.txt /T /C    (Traverse and continue on errors )

backups of acl’s can be restored as follows:

icacls D:\ /restore ACL_Dep.txt /c   (continue on errors such as missing files)

Map files can be created as follows.
Dump SID + SID history to a file for Migrated Groups: (change the OU path with the correct one for your AD)

dsquery * “OU=Groups,OU=MigratedGroups,OU=Cromford,OU=UK,OU=DEV,OU=VMFARM,DC=cyberfella,DC=co,DC=uk” -filter “(&(objectClass=Group)(sidHistory=*))” -attr sidHistory ObjectSID -limit 20000 > Sidmapping.txt

Check if –limit option is set large enough given the number of groups in your domain. Perform necessary edits to the sidmapping.txt file until it’s format looks like this (below).

S-1-5-21-2121000310-530922351-1601650009-38709,S-1-5-21-1477100029-3748294062-1861910009-37469
S-1-5-21-2121000310-530922351-1601650009-171643,S-1-5-21-1477100029-3748294062-1861910009-37983
S-1-5-21-2121000310-530922351-1601650009-67673,S-1-5-21-1477100029-3748294062-1861910009-38089
S-1-5-21-2121000310-530922351-1601650009-67965,S-1-5-21-1477100029-3748294062-1861910009-38585
S-1-5-21-2121000310-530922351-1601650009-68256,S-1-5-21-1477100029-3748294062-1861910009-38867
S-1-5-21-2121000310-530922351-1601650009-54379,S-1-5-21-1477100029-3748294062-1861910009-39244
S-1-5-21-2121000310-530922351-1601650009-127676,S-1-5-21-1477100029-3748294062-1861910009-39397

Re-ACL Migrated Group ACE’s from the historical SIDs currently securing the data to the primary object SIDs in the new domain using the freely available SetACL tool.

setacl -on D:\destinationdata -ot file -actn trustee -trst csv:sidmapping.txt;ta:repltrst -rec cont_obj –log reacl_log.txt

The following command will delete any orphaned SIDs (ACE’s that to don’t resolve to any group in AD and thus serve no purpose)

setacl -on D:\destinationdata -ot file -actn delorphanedsids -rec cont_obj

EXAMPLE TIMINGS

(Obviously your results may vary depending on many variables such as number of folder, files, rows in sid map csv, disk speed, cpu speed, etc)

Exporting ACLs for 128GB filesystem consisting of 30,000 files in 2,750 folders on an HP ProBook CORE i5 laptop took 15 seconds.and processed every file successfully although problems are generally encountered if files have been created using file explorer run as administrator (the ownership changes from the logged on user to admnistrators).

5 new groups were added to the acl’s at the top of the tree and re-exporting the security took 17 seconds (a further 3 seconds)

Re-ACLing the filesystem using a SID Map containing 5 rows to translate ALL ACE’s referencing the newly added groups to a single new group, took 5 minutes, 45 seconds.

Copying the folder structure only but leaving all files behind (create duplicate empty folder structure with security using emcopy), took 14 seconds.

Re-ACLing the empty folder structure (2,750 folders), avoiding the overhead of scanning and re-acling 30,000 files took 25 seconds.

It is therefore recommended that re-acling take place on a duplicate empty folder structure and data (files) are subsequently copied into it using emcopy with the /nosec switch.

For large filesystems, say over 1TB, you may want to process each top level folder as its own individual job, looping through all top level folders sequentially.  It’s definitely my preferred approach with pretty much everything, not just setacl.  You can use a for loop to do this, e.g.

for /f %%f in (‘dir s:\ /ad /b’) DO setacl.exe -on “d:\root\%%f”  -ot file -actn trustee -trst csv:sidmap.txt;ta:repltrst -rec cont_obj

INHERITANCE PROTECTION ISSUE

As is often the case, the real-world (the source of all my blog posts) presents some unforseen issues around the use of these complex tools, and setacl appears to have an issue whereby re-acling using the trustee action above (the same method as documented on Helge Klein’s website) also performs a reset on the inheritance attribute, potentially opening up hardened subfolders where the original inherited ace’s have been partially retained and inheritance turned off.

The following sequence of commands appear to correct the issue by re-breaking inheritance, removing inherited ace’s, applying specific permissions to the subfolder before turning inheritance back on on the parent.

Consider the following structure.  T:\level 1\level 2\level 3  where level 2 inherits from level 1 but level 3 stops inheriting and has its own permissions set.  If these permissions were originally ace’s that were inherited, then re-permissioning can reset inheritance.  The following sequence of commands seems to correct it.  Your mileage may vary.

setacl -on “t:\level 1\level 2” -ot file -actn setprot -op “dacl:p_nc;sacl:p_nc”          (Protection, No Copy Inherited ACEs)

setacl -on “t:\level 1\level 2\level 3” -ot file -actn ace -ace “n:S-1-5-21-12345-12345-12345-1234;p:full” -ace “n:S-1-5-21…. and so on.

setacl -on “t:\level 1\level 2\level 3” -ot file -actn setprot -op “dacl:p_nc;sacl:p_nc”  (Protection, Remove Inherited ACEs)

setacl -on “t:\level 1\level 2” -ot file -actn setprot -op “dacl:np;sacl:np”                  (No Protection)

Did you like this?
Tip cyberfella with Cryptocurrency

Donate Bitcoin to cyberfella

Scan to Donate Bitcoin to cyberfella
Scan the QR code or copy the address below into your wallet to send some bitcoin:

Donate Bitcoin Cash to cyberfella

Scan to Donate Bitcoin Cash to cyberfella
Scan the QR code or copy the address below into your wallet to send bitcoin:

Donate Ethereum to cyberfella

Scan to Donate Ethereum to cyberfella
Scan the QR code or copy the address below into your wallet to send some Ether:

Donate Litecoin to cyberfella

Scan to Donate Litecoin to cyberfella
Scan the QR code or copy the address below into your wallet to send some Litecoin:

Donate Monero to cyberfella

Scan to Donate Monero to cyberfella
Scan the QR code or copy the address below into your wallet to send some Monero:

Donate ZCash to cyberfella

Scan to Donate ZCash to cyberfella
Scan the QR code or copy the address below into your wallet to send some ZCash:

View Windows Permissions / ACLs

There are many GUI and command line tools kicking around that can be used to list, export, change permissions on Windows file systems.  Here are my three favourites with some useful command line examples used to view windows permissions.


DumpACL Export Directory Security using a simple but flexible GUI in a concise format suitable for Wxcel (only non-inherited permissions listed in readable (group names, not SID) format.


SetACL Probably the most flexible and well documented tool for listing and changing ACLs.  Useful in migrating data from one domain to another.  Lots of options.  Easy to use once oriented.

setacl -on C:\MyFolder -ot file -actn list -lst “f:tab;w:d;i:n;s:n”  -display permissions (non-inherited, human friendly group names)

setacl -on C:\MyFolder -ot file -actn list -lst “f:tab;w:d;i:n;s:y”  -display permissions (non-inherited actual SIDs)

The setacl command is made up of three parts or four if you require recursion.

-on (Object Name) – can be the path to a folder

-ot (Object Type)  -can be file, reg, printer or other objects

-actn (Action)   -can be one or more actions to apply such as list, clear, setowner, setgroup, domain and many others such as delorphanedsids to delete orphaned sids.

-rec (Recursive) is a fourth option used to carry on for specific container object children.  As such it can take values of cont, obj or cont_obj to specify folder, files or both respectively.

Some actions come with their own additional options.  E.g. the -lst part after the list action -actn list is optional, but it provides the greatest control over the output format of the list actions functionality.

f: (Format) – can be sddl, csv or tab

w: (What) – can be d s o or g (dacl, sacl, owner or group)

i: (Inherited) – can be y or n (yes or no to display inherited perms or not)

s: (SID)  -can be y or n (yes for SIDs, no for Group Names, or b for both)

Full documentation here

A recoverable backup of security dacls can be performed using the -bckp function (not -log), but the format must be sddl (sids only).

icacls Windows Command Line Built-in.  simple and easy to use.

icacls C:\MyFolder      -displays permissions of folder.  Doesn’t require command line to be run as administrator unlike its deprecated predecessor cacls and is quicker and easier than equivalent SetAcl command (above) to provide a quick list of permissions from the command line.

Did you like this?
Tip cyberfella with Cryptocurrency

Donate Bitcoin to cyberfella

Scan to Donate Bitcoin to cyberfella
Scan the QR code or copy the address below into your wallet to send some bitcoin:

Donate Bitcoin Cash to cyberfella

Scan to Donate Bitcoin Cash to cyberfella
Scan the QR code or copy the address below into your wallet to send bitcoin:

Donate Ethereum to cyberfella

Scan to Donate Ethereum to cyberfella
Scan the QR code or copy the address below into your wallet to send some Ether:

Donate Litecoin to cyberfella

Scan to Donate Litecoin to cyberfella
Scan the QR code or copy the address below into your wallet to send some Litecoin:

Donate Monero to cyberfella

Scan to Donate Monero to cyberfella
Scan the QR code or copy the address below into your wallet to send some Monero:

Donate ZCash to cyberfella

Scan to Donate ZCash to cyberfella
Scan the QR code or copy the address below into your wallet to send some ZCash:

Delete orphaned SIDs in ACLs

As users and groups get deleted from Active Directory, so files and folders that were once secured to allow those users and groups access will be left with “orphaned SIDS” appearing in their ACLs (or Discretionary Access Control Lists to be precise).

These orphaned SIDs would have once resolved to the name of a user or group, but since that object has been removed from the AD, that is no longer possible, leaving behind all sorts of harmless untidyness to annoy the more obsessive compulsive sysadmins amongst us.

There is a very powerful free tool available called SetACL to delete orphaned sids

https://helgeklein.com/setacl/documentation/command-line-version-setacl-exe

which can perform all kinds of clever functions against security access control lists of all sorts of objects, not just folders and files.  It is concisely well documented too, so I won’t even attempt writing a full overview of it’s capabilities in one post.  I’ll very likely write many posts with working examples that achieve common difficult tasks though, so look forward to those.

Back to those orphans though.  using SetACL, they can be quickly and easily removed, leaving your DACLs nice and tidy once more.

setacl_deleteorphanedsids

setacl -on myfolder -ot file -actn delorphanedsids -rec cont_obj

The setacl command is essentially made up of three parts,

-on (object name),

-ot (object type)

-actn (action)

with the option of -rec (recurse) to carry on “down the tree” applying actions to cont, cont_obj or obj (folders, folders & files or files) as it goes, or turned off with no.  More than one action can be specified if you’re particularly ambitious.  Object types can be file (folders and files), or printers, registry keys and other objects too.

It can also be used to replace ACE’s for one user/group with another, and also users and groups in one domain with another using a csv file (to be covered in a later post).

setacl_completed

Did you like this?
Tip cyberfella with Cryptocurrency

Donate Bitcoin to cyberfella

Scan to Donate Bitcoin to cyberfella
Scan the QR code or copy the address below into your wallet to send some bitcoin:

Donate Bitcoin Cash to cyberfella

Scan to Donate Bitcoin Cash to cyberfella
Scan the QR code or copy the address below into your wallet to send bitcoin:

Donate Ethereum to cyberfella

Scan to Donate Ethereum to cyberfella
Scan the QR code or copy the address below into your wallet to send some Ether:

Donate Litecoin to cyberfella

Scan to Donate Litecoin to cyberfella
Scan the QR code or copy the address below into your wallet to send some Litecoin:

Donate Monero to cyberfella

Scan to Donate Monero to cyberfella
Scan the QR code or copy the address below into your wallet to send some Monero:

Donate ZCash to cyberfella

Scan to Donate ZCash to cyberfella
Scan the QR code or copy the address below into your wallet to send some ZCash:

Excel Password Breaker

For my 100th post on my blog here at cyberfella.co.uk I shall tell you how to recover the passwords used to protect the cells, worksheets and workbooks in Microsoft Excel.  Unlike every other post on my blog, I cannot claim that the vbscript used in the macro editor shown below is my own work.  If I knew the original author I’d gladly credit them, so let me know via the comments if you know who came up with this little gem and once I’ve verified that they are indeed the original author, then due credit will be awarded here!

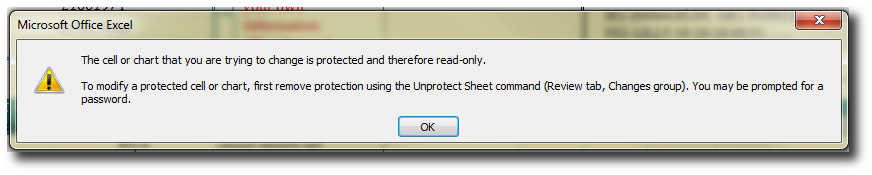
So, you’re working to a deadline which is fast approaching and you’ve attempted to change the contents of a cell, and received the highly annoying message…

The cell or chart that you are trying to change is protected and therefore read-only

protected


Subsequent attempts at unprotecting the spreadsheet results in you being prompted for a password that you have no idea of and neither does anyone else.

No problem.   You’re still gonna make that deadline.

Hit Alt F11 to open the Macro Editor, double click the sheet giving you a problem and paste the following vbscript code into the empty code pane.  

Note below that the tabs in your spreadsheet may not actually appear in the order that they were originally created in, so be sure you click the correct sheet/tab name.

click-sheet


WordPress is frankly terrible at formatting code in posts whether they be in quotes or not and syntax can be easily messed up resulting in code that then doesn’t work.

Click on the link below to go to a separate html page where the code will be properly formatted for you to cut and paste into your macro – and is guaranteed to work.

excel-password-breaker-macro


excel-password-breaker

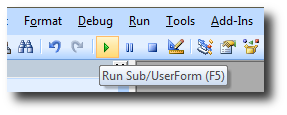
Now run the macro by clicking on the “Play” button on the toolbar (shown below).

macro

There may be a delay of up to a minute or more but the likelihood is that within a few seconds a message box will appear and you’ll be presented with the password.  Make a note of it if you like, but in practice the cells in my spreadsheet were also automatically unlocked.


Did you like this?
Tip cyberfella with Cryptocurrency

Donate Bitcoin to cyberfella

Scan to Donate Bitcoin to cyberfella
Scan the QR code or copy the address below into your wallet to send some bitcoin:

Donate Bitcoin Cash to cyberfella

Scan to Donate Bitcoin Cash to cyberfella
Scan the QR code or copy the address below into your wallet to send bitcoin:

Donate Ethereum to cyberfella

Scan to Donate Ethereum to cyberfella
Scan the QR code or copy the address below into your wallet to send some Ether:

Donate Litecoin to cyberfella

Scan to Donate Litecoin to cyberfella
Scan the QR code or copy the address below into your wallet to send some Litecoin:

Donate Monero to cyberfella

Scan to Donate Monero to cyberfella
Scan the QR code or copy the address below into your wallet to send some Monero:

Donate ZCash to cyberfella

Scan to Donate ZCash to cyberfella
Scan the QR code or copy the address below into your wallet to send some ZCash: