
RecoverPoint Journal LUN sizing

The Journal size is a question of the required protection window (a Business requirement) and the incoming write rate of the production application.  Whilst the Recovery Point Objective might be known, the incoming write rate of a newly deployed app may not be, making sizing of journal LUNs a bit “finger in the air”.  EMC provide a guideline value of 20% in this instance, but it has no real foundation.

The basic calculation is ( protection window in seconds * write rate in seconds ) / 0.7
The division by 0.7 is because roughly 70% of the journal is used for replication images.

For example, if the business requires 1 day of images and the average write rate by the application is 1MB/s you will need a minimum of about 125GB journal to support it.  RecoverPoint supports automatic journal LUN creation during configuration of a Consistency Group if you don’t have enough information to manually size the journal LUN up front.

During a recent deployment of RecoverPoint to support replication of LUNs to remote storage, solely for the purposes of failover, EMCs response was as follows.  Please note that in this scenario, there was no requirement for the “killer functionality” of RecoverPoint, namely point in time recovery using the journaled changes in Consistency Groups.  That’s not to say it won’t become a requirement later on however.

The Raid group in question would definitely be adequate to start replication, but whether it is enough to meet the business requirements, we cannot say.

Sizing aside, remember that it is very important to use a dedicated Storage Pool/RAID Group of physical disks that is entirely separate to ones used for your data LUNs and RecoverPoint Repository LUN.

Did you like this?
Tip cyberfella with Cryptocurrency

Donate Bitcoin to cyberfella

Scan to Donate Bitcoin to cyberfella
Scan the QR code or copy the address below into your wallet to send some bitcoin:

Donate Bitcoin Cash to cyberfella

Scan to Donate Bitcoin Cash to cyberfella
Scan the QR code or copy the address below into your wallet to send bitcoin:

Donate Ethereum to cyberfella

Scan to Donate Ethereum to cyberfella
Scan the QR code or copy the address below into your wallet to send some Ether:

Donate Litecoin to cyberfella

Scan to Donate Litecoin to cyberfella
Scan the QR code or copy the address below into your wallet to send some Litecoin:

Donate Monero to cyberfella

Scan to Donate Monero to cyberfella
Scan the QR code or copy the address below into your wallet to send some Monero:

Donate ZCash to cyberfella

Scan to Donate ZCash to cyberfella
Scan the QR code or copy the address below into your wallet to send some ZCash:

Solaris Zones Essentials

Solaris Zones (aka Containers) are Solaris virtual machines (Non-Global Zones) running on an underlying Solaris host (The Global Zone), i.e.

-NON-GLOBAL ZONE-       -Can be a “Spars Root”, “Whole root”, or “Branded” zone.
—-GLOBAL ZONE—–       -The host OS
——HARDWARE——       -The “tin”

A NON-GLOBAL ZONE is a virtual machine and can be a “Spars Root”, “Whole root”, or “Branded” zone.
A SPARS ROOT ZONE shares parts of the GLOBAL zone (host’s) filesystem, usually in a read-only manner, i.e. if you patch the GLOBAL ZONE, you’ll patch the spars root zones too.
A WHOLE ROOT ZONE takes 100% copy of GLOBAL zone and is therefore 100% independent of it.
A BRANDED ROOT ZONE allows for an entirely different version of Solaris to be installed, and is also 100% independent and different to the GLOBAL zone running on the underlying hardware.

PREPARATION

ifconfig      -List network cards and decide what ones you want to use for the non-global zone

CONFIGURATION OF A NEW ZONE

zonecfg -z <zone-name>      -Configure system for new zone and write configuration file to /etc/zones/ on GLOBAL zone.
“No such zone configured, use create to create zone”
zonecfg:appserv3> create
zonecfg:appserv3> set zonepath=/zone2/appserver2
zonecfg:appserv3> add net
zonecfg:appserv3:net> set physical=el1000g0      -Use ifconfig to choose from list of NICs.
zonecfg:appserv3:net> set address=192.168.1.101
zonecfg:appserv3:net> end
zonecfg:appserv3> info               -Lists all input settings, including names of settings not specified.
zonecfg:appserv3> verify            -Verify settings are viable
zonecfg:appserv3> commit        -Save changes to /etc/zones/<zone-name>.xml
zonecfg:appserv3> exit               -Exit zonecfg

INSTALL NEW ZONE

zoneadm -z <zone name> install      -Install new zone.  Takes a while.

DISPLAY INFO ABOUT ZONES

zoneadm list -cvi     -List info about zones installed on system.

FIRST BOOT

zoneadm -z <zone-name> boot      -Boot new zone

FIRST LOGIN

login -z login -C -e [ <zone-name>      -Login to zone, Provide system info (C)onsole. Escap(e) character [
zlogin -C -e [ <zone-name>                   -Alternative login command.
“Console is already in use by PID ####” -kill -9 ####

KILL STUCK/TRAPPED TERMINAL SESSION

It’s possible to get trapped in the zone if you select the wrong terminal type.

To overcome this, start another session to the GLOBAL zone, attempt to log back into the NON-GLOBAL zone
and it’ll tell you the PID of the session. Kill that session. kill -9 <PID>

UNINSTALLING A NON-GLOBAL ZONE

zoneadm list -vci                                       -List all non-global zones
zoneadm -z <zone-name> halt              -Shut down the non-global zone
zoneadm -z <zone-name> uninstall     -Uninstall the non-global zone
zonecfg -z <zone-name> delete             -Delete the non-global zone


Did you like this?
Tip cyberfella with Cryptocurrency

Donate Bitcoin to cyberfella

Scan to Donate Bitcoin to cyberfella
Scan the QR code or copy the address below into your wallet to send some bitcoin:

Donate Bitcoin Cash to cyberfella

Scan to Donate Bitcoin Cash to cyberfella
Scan the QR code or copy the address below into your wallet to send bitcoin:

Donate Ethereum to cyberfella

Scan to Donate Ethereum to cyberfella
Scan the QR code or copy the address below into your wallet to send some Ether:

Donate Litecoin to cyberfella

Scan to Donate Litecoin to cyberfella
Scan the QR code or copy the address below into your wallet to send some Litecoin:

Donate Monero to cyberfella

Scan to Donate Monero to cyberfella
Scan the QR code or copy the address below into your wallet to send some Monero:

Donate ZCash to cyberfella

Scan to Donate ZCash to cyberfella
Scan the QR code or copy the address below into your wallet to send some ZCash:

Cisco MDS Cheat Sheet

A more complete set of commands for use on MDS switches, with a useful set of commands at the top for exporting useful information (by logging session output of PuTTY terminal).  Note that using a ? after any command will show possible commands.

Export useful information

show switchname (display hostname on network)

show flogi database (shows wwn of fc connected hosts logged in to the switch ports)

—————————————————————————
INTERFACE VSAN FCID PORT NAME NODE NAME
—————————————————————————
fc1/1      60      0xad04d1       50:05:07:61:13:61:a6:33 51:01:07:63:11:20:a6:33
fc1/2      60     0xad0012       50:05:07:63:12:13:51:37 50:01:07:61:12:03:55:37

show interface description (shows description field for each physical port)

show interface brief (shows ports in errDisabled state)

——————————————————————————-
Interface Description
——————————————————————————-
fc1/1         L5500_CyberfellaTD1_1_A
fc1/2        L5500_CyberfellaTD2_1_A

show vsan (display vsans configured)

show zone vsan 10 (display zones in vsan)

show zoneset vsan 10 (display zoneset, zonenames and wwns in zones)

show fcalias vsan 10 (display human friendly alias for each wwn in all zones in vsan 10)

ENABLE A NEW PORT

Before you can create your zones, the device connected to the fc switch will need to flog in so you can see its wwn.  Before it can do that, the port itself will need to be opened/enabled.

conf t

interface fc1/21       (where 21 is the port number)

no shutdown           (obviously!)

exit

more here

ZONING

If you have to do some CISCO zoning at the command line here are a few of my favorite commands;

original cisco doc here

To create an alias:

conf t
fcalias name {alias_name} vsan {vsan number}
member pwwn {wwid}
exit

To create a zone:
conf t
zone name {zone _name} vsan {vsan_number}
member {alias_name}
member {alias_name}
.
.
exit

To add it to the zoneset:
conf t
zoneset name {zoneset_name} vsan {vsan_number}
member {zone_name}
.
.
exit

To activate the zone/zoneset:
conf t
zoneset activate name {zoneset_name} vsan {vsan_number}
exit

Save the configuration
copy running-config startup-config

Displaying Zone Information

You can view any zone information by using the show command. If you request information for a specific object (for example, a specific zone, zone set, VSAN, alias, or even a keyword like brief or active), only information for the specified object is displayed. If you do not request specific information, all available information is displayed. Table 4-1 lists the show commands and the information they display.

Table 4-1 show zone and show zoneset Commands

show Command
Description
show zone

Displays zone information for all VSANs.

show zone vsan 1

Displays zone information for a specific VSAN.

show zoneset vsan 1

Displays information for the configured zone set.

show zoneset vsan 2-3

Displays configured zone set information for a range of VSANs.

show zone name Zone1

Displays members of a zone.

show fcalias vsan 1

Displays fcalias configuration.

show zone member pwwn 21:00:00:20:37:9c:48:e5

Displays membership status.

show zone statistics

Displays zone statistics.

show zone statistics read-only-zoning

Displays read-only zoning statistics.

show zoneset active

Displays active zone sets.

show zoneset brief

Displays brief descriptions of zone sets.

show zone active

Displays active zones.

show zone status

Displays zone status.

show zone

Displays zone statistics.

show running

Displays the interface-based zones.

[paypal-donation]

Did you like this?
Tip cyberfella with Cryptocurrency

Donate Bitcoin to cyberfella

Scan to Donate Bitcoin to cyberfella
Scan the QR code or copy the address below into your wallet to send some bitcoin:

Donate Bitcoin Cash to cyberfella

Scan to Donate Bitcoin Cash to cyberfella
Scan the QR code or copy the address below into your wallet to send bitcoin:

Donate Ethereum to cyberfella

Scan to Donate Ethereum to cyberfella
Scan the QR code or copy the address below into your wallet to send some Ether:

Donate Litecoin to cyberfella

Scan to Donate Litecoin to cyberfella
Scan the QR code or copy the address below into your wallet to send some Litecoin:

Donate Monero to cyberfella

Scan to Donate Monero to cyberfella
Scan the QR code or copy the address below into your wallet to send some Monero:

Donate ZCash to cyberfella

Scan to Donate ZCash to cyberfella
Scan the QR code or copy the address below into your wallet to send some ZCash:

Adding a blocklist to Transmission torrent client on Linux

When using a torrent client on Windows such as utorrent, it’s not a bad idea to run peer block to protect your computer from inbound connections from a maintained list of known ip addresses.


Linux comes with a torrent client built in, usually Transmission, although Deluge is a bit more like utorrent, i.e. shows more info on the screen, has a few more options etc.  Transmission works perfectly well though and ticks the minimalist box if that’s your thing.  Both are available via the repositories using the built in package manager.

Peer Block isnt available for Linux.  Transmission however, supports the use of blocklists, so increasing your level of protection has actually never been simpler.

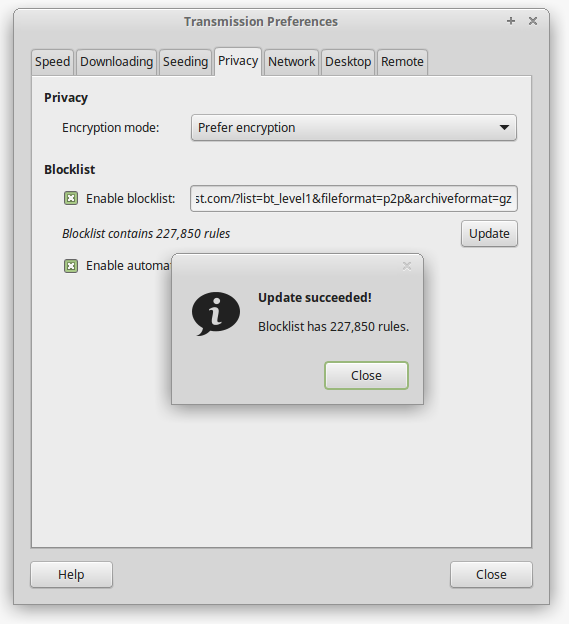
In Preferences, just add the following url to the Blocklist field and click Update.  Done.

http://list.iblocklist.com/?list=bt_level1&fileformat=p2p&archiveformat=gz

transmission

To provide system-wide protection, you should install ufw from the package manager.

  gufw is a GUI that can be used to enable ufw and configure rules.

ufw is installed by default in Linux Mint but is not turned on.

firewall

Did you like this?
Tip cyberfella with Cryptocurrency

Donate Bitcoin to cyberfella

Scan to Donate Bitcoin to cyberfella
Scan the QR code or copy the address below into your wallet to send some bitcoin:

Donate Bitcoin Cash to cyberfella

Scan to Donate Bitcoin Cash to cyberfella
Scan the QR code or copy the address below into your wallet to send bitcoin:

Donate Ethereum to cyberfella

Scan to Donate Ethereum to cyberfella
Scan the QR code or copy the address below into your wallet to send some Ether:

Donate Litecoin to cyberfella

Scan to Donate Litecoin to cyberfella
Scan the QR code or copy the address below into your wallet to send some Litecoin:

Donate Monero to cyberfella

Scan to Donate Monero to cyberfella
Scan the QR code or copy the address below into your wallet to send some Monero:

Donate ZCash to cyberfella

Scan to Donate ZCash to cyberfella
Scan the QR code or copy the address below into your wallet to send some ZCash:

Deleting Windows data where the path length exceeds 260 characters

After migrating Windows data, it can be a royal pain cleaning up the source data using del *.* /s /q /f, especially when the path length exceeds 260 (or thereabouts) characters.  You can manually shorten the folder names and keep trying, but this may be time consuming, tiring and ultimately futile.

The simplest way I’ve found to reliably delete data, irrespective of path length, is to use robocopy.

  1. cd into the directory that you want to empty
  2. create a new empty subdirectory called empty
  3. rename all other adjacent folders 1, 2, 3, 4 etc if possible
  4. robocopy empty 1 /mir /r:1 /w:1
  5. repeat for each adjacent folder, 2, 3, 4 etc.


Did you like this?
Tip cyberfella with Cryptocurrency

Donate Bitcoin to cyberfella

Scan to Donate Bitcoin to cyberfella
Scan the QR code or copy the address below into your wallet to send some bitcoin:

Donate Bitcoin Cash to cyberfella

Scan to Donate Bitcoin Cash to cyberfella
Scan the QR code or copy the address below into your wallet to send bitcoin:

Donate Ethereum to cyberfella

Scan to Donate Ethereum to cyberfella
Scan the QR code or copy the address below into your wallet to send some Ether:

Donate Litecoin to cyberfella

Scan to Donate Litecoin to cyberfella
Scan the QR code or copy the address below into your wallet to send some Litecoin:

Donate Monero to cyberfella

Scan to Donate Monero to cyberfella
Scan the QR code or copy the address below into your wallet to send some Monero:

Donate ZCash to cyberfella

Scan to Donate ZCash to cyberfella
Scan the QR code or copy the address below into your wallet to send some ZCash:

Robocopy leaves some NTFS permissions behind?

And so does emcopy and icacls /save & /restore doesn’t work either…

Googling doesn’t help – every solution that promises to work, doesn’t.

Solution?

ALWAYS USE THE /B SWITCH!

Sorry for shouting, but I’m really rather excited to have cracked this major show stopper for my clients data migration.  The /B switch uses the Backup right to perform the copy.  That’s presumably running with system level privs, rather than my meager admin account in cmd run as administrator.  Magic.  Data integrity restored!  Professional reputation saved!

Note: Use /TIMFIX with /B to correct non-copying of datestamps on files, resulting in 02/01/1980 datestamps on all files copied with /B Backup rights.

Did you like this?
Tip cyberfella with Cryptocurrency

Donate Bitcoin to cyberfella

Scan to Donate Bitcoin to cyberfella
Scan the QR code or copy the address below into your wallet to send some bitcoin:

Donate Bitcoin Cash to cyberfella

Scan to Donate Bitcoin Cash to cyberfella
Scan the QR code or copy the address below into your wallet to send bitcoin:

Donate Ethereum to cyberfella

Scan to Donate Ethereum to cyberfella
Scan the QR code or copy the address below into your wallet to send some Ether:

Donate Litecoin to cyberfella

Scan to Donate Litecoin to cyberfella
Scan the QR code or copy the address below into your wallet to send some Litecoin:

Donate Monero to cyberfella

Scan to Donate Monero to cyberfella
Scan the QR code or copy the address below into your wallet to send some Monero:

Donate ZCash to cyberfella

Scan to Donate ZCash to cyberfella
Scan the QR code or copy the address below into your wallet to send some ZCash:

Find ACL’s that don’t match parent with AccessEnum

When data begins its life, the permissions are invariably set at one of the top two or three levels, Some examples of some types of data you wouldn’t want everyone to get their hands on in a given company might be…

X:\Payroll\Cost Centre 1\Salaries

X:\Human_Resources\Cost Centre 2\Disciplinaries

X:\Pensions\Cost Centre 3\Compulsory Redundancy Quotes

All users would have to have access to the top level share, then all users might still have access to the Human Resources, Payroll and Pensions folders too.   There may or may not be a cost centre folder to aid the business in understanding what parts of what department are consuming the most storage space (for internal billing), then there will be the “parent” folders (top level in terms of the point where specific permissions are set) whereby only certain individuals in a global group will have access.  ABE (Access Based Enumeration) might be enabled also, preventing users who don’t have access to certain folders from even seeing that the folder exists in the first place.

For the purposes of data migration and reporting, the IT department should have some kind of data admins global group that has full control from the top, all the way down.  Backup admins will also need modify access in order to perform file recoveries back to their original locations.

Over time, chunks of data get moved about as a result of departmental “tidy ups” and restructuring.  The effect this has on permissions is that when data is “copied” it inherits the security of the parent folders on the destination side, however when it is “moved” it takes its permissions with it – sort of.  I say “sort-of” because although it takes the security ACE’s with it, it also takes the attribute that says those ACE’s were originally inherited from the parent.

I say “sort-of” because although it takes the security ACE’s with it, it also takes the attribute that says those ACE’s were originally inherited from the parent.  And therein lies a problem for subsequent data migrations.

The effect this has, is to cause the folders on the migrated side (where a copy operation has been used) to subsequently re-inherit their permissions from their new parent.  Only non inherited permissions and inheritance attributes are ever copied, so these permissions that were once inherited but can no longer be inherited are likened to “ghosts” and are lost during any kind of copy operation (data migration operation using emcopy/robocopy or some other method).

I’d like to use “orphans” to describe these children with no matching parent permissions but the term is already taken to describe SIDs in ACEs that no longer resolve to a group in AD (occurs when a folder is secured then the group subsequently deleted), so I’ve come up with “ghosts” to describe them.  I can’t use “zombies” as that is taken to refer to a child process on a UNIX system that has completed execution but remains in the process table so until its parent process can read its exit status.  “Ghosts” is quite apt as they are not tangible and vanish when you migrate the data.

Technically, the copy operation is correcting anomalies but in the real world, that means loss of access, or worse, open access, depending on the nature of the change of permissions on the new parent.

The best way to deal with these ghosts is at source, but you need to know about them first, in order to deal with them.  Sysinternals accessenum GUI tool is a neat way to scan filesystems looking for children where the security differs from that of its parent.  Be sure to set the options accordingly.

accessenum

Did you like this?
Tip cyberfella with Cryptocurrency

Donate Bitcoin to cyberfella

Scan to Donate Bitcoin to cyberfella
Scan the QR code or copy the address below into your wallet to send some bitcoin:

Donate Bitcoin Cash to cyberfella

Scan to Donate Bitcoin Cash to cyberfella
Scan the QR code or copy the address below into your wallet to send bitcoin:

Donate Ethereum to cyberfella

Scan to Donate Ethereum to cyberfella
Scan the QR code or copy the address below into your wallet to send some Ether:

Donate Litecoin to cyberfella

Scan to Donate Litecoin to cyberfella
Scan the QR code or copy the address below into your wallet to send some Litecoin:

Donate Monero to cyberfella

Scan to Donate Monero to cyberfella
Scan the QR code or copy the address below into your wallet to send some Monero:

Donate ZCash to cyberfella

Scan to Donate ZCash to cyberfella
Scan the QR code or copy the address below into your wallet to send some ZCash:

Powershell and the NTFSSecurity Module

The powershell NTFSSecurity module provides cmdlets to export and import security.  Unlike icacls which sticks to using sddl format (for a 10 fold increase in speed exporting security for large filesystems), powershell will resolve the SIDs in sddl format into human friendly names by chatting to the DC as it goes.  Some useful commands are noted below.

Download from here
NTFSSecurity Module for Powershell

Installation
Just create the folder “NTFSSecurity” in the folder set according to the environment variable %PSModulePath%

The module should now be listed in “Get-Module -ListAvailable” and can be imported using “Import-Module NTFSSecurity“.

For example, all the files in the zip file have to be in “%SystemRoot%\system32\WindowsPowerShell\v1.0\Modules\NTFSSecurity\“.
If you did this then the module should be listed in “Get-Module -ListAvailable” and can be imported using “Import-Module NTFSSecurity“.

Note that running Windows Powershell Modules (look for the powershell icon with the admin shield in the corner in your start menu), will automatically load the module upon CLI startup.

USAGE EXAMPLES
BACKUP AND RESTORE PERMISSIONS USING POWERSHELL
#to backup permissions just pipe what Get-Ace returns to Export-Csv
get-childitem -Recurse | Get-Ace -ExcludeInherited | Export-Csv permissions.csv

#to restore the permissions pipe the imported data to Add-Ace
#As the imported data also contains the path you do not need to specify the item
Restore: Import-Csv .\permissions.csv | Add-Ace

FIND ALL FOLDERS WITH INHERITANCE TURNED ON
get-childitem -Recurse | get-inheritance | export-CSV C:\inheritanceon.csv -NoTypeInformation

FIND ALL ACES INHERITED OR NOT ON FOLDERS ONLY
get-childitem -recurse -exclude *.* | get-ace | export C:\migrationscripts\incinherited.csv -notypeinformation

Did you like this?
Tip cyberfella with Cryptocurrency

Donate Bitcoin to cyberfella

Scan to Donate Bitcoin to cyberfella
Scan the QR code or copy the address below into your wallet to send some bitcoin:

Donate Bitcoin Cash to cyberfella

Scan to Donate Bitcoin Cash to cyberfella
Scan the QR code or copy the address below into your wallet to send bitcoin:

Donate Ethereum to cyberfella

Scan to Donate Ethereum to cyberfella
Scan the QR code or copy the address below into your wallet to send some Ether:

Donate Litecoin to cyberfella

Scan to Donate Litecoin to cyberfella
Scan the QR code or copy the address below into your wallet to send some Litecoin:

Donate Monero to cyberfella

Scan to Donate Monero to cyberfella
Scan the QR code or copy the address below into your wallet to send some Monero:

Donate ZCash to cyberfella

Scan to Donate ZCash to cyberfella
Scan the QR code or copy the address below into your wallet to send some ZCash:

Dell BIOS updates w/o Windows

If like me, you have a Dell laptop running linux and you want to bring your firmware up to date, you’ll realise that the executables downloadable from Dell’s support site require Windows OS to run.  Or do they?  The good new is No.  They don’t.

OK, so they won’t run on Linux either, but they will run from a FreeDOS command line.

Long story short,  download SystemRescueCD

Create a bootable USB Stick using THESE instructions…

mkdir -p /tmp/cdrom

sudo mount -o loop,exec ~/Downloads/systemrescuecd-x86-4.5.4.iso         #your version maybe newer!

plug in the usb stick      #be prepared to loose everything on it!

cd /tmp/cdrom

sudo bash ./usb_inst.sh

Create a folder on the USB stick called Dell for example, and copy the BIOS update for your computer into it.

Boot the computer with the USB stick and choose the FreeDOS option (it can be found in one of the menus), otherwise it’ll boot into the default linux command line environment, and you don’t want that for this.

At the FreeDOS command prompt A:> change to C:> and type dir to view the files on the USB stick.

You should see the Dell directory you created.  cd into the Dell directory and run the executable BIOS upgrade program.

Reboot into your Linux OS.  The following commands show the firmware level and other info for your computer.

You may need to install libsmbios first

sudo apt-get install libsmbios-bin

dell-fw-commands


Did you like this?
Tip cyberfella with Cryptocurrency

Donate Bitcoin to cyberfella

Scan to Donate Bitcoin to cyberfella
Scan the QR code or copy the address below into your wallet to send some bitcoin:

Donate Bitcoin Cash to cyberfella

Scan to Donate Bitcoin Cash to cyberfella
Scan the QR code or copy the address below into your wallet to send bitcoin:

Donate Ethereum to cyberfella

Scan to Donate Ethereum to cyberfella
Scan the QR code or copy the address below into your wallet to send some Ether:

Donate Litecoin to cyberfella

Scan to Donate Litecoin to cyberfella
Scan the QR code or copy the address below into your wallet to send some Litecoin:

Donate Monero to cyberfella

Scan to Donate Monero to cyberfella
Scan the QR code or copy the address below into your wallet to send some Monero:

Donate ZCash to cyberfella

Scan to Donate ZCash to cyberfella
Scan the QR code or copy the address below into your wallet to send some ZCash:

ISL configuration on Cisco MDS

Assign hostname to switch

switchname <hostname>

Create Inter-Site Links (join two switches together to share zones)

conf t
trunk protocol enable #to enable trunking protocol
conf t
no trunk protocol enable #to disable trunking protocol

trunk protocol auto #to set trunking in auto mode . The preferred conf for CISCO MDS switches is (on) (auto) – one switch enabled, second is auto.

1. Connect 2 switches with FC cable on ANY port
2. In each switch, change port mode to TE:
show interface fc1/1
or
show running-config interface 1/1 # to see a current configuration
config t
interface fc1/1
switchport mode auto /on /off #will automatically set the port in TE mode in case it was previously set in another mode

3. Trunking ports should remain in VSAN1
4. Create new VSAN (same name and number) on both switches.
5. On both switches, run:
config t
interface fc1/1
switchport trunk allowed vsan 2-4 (To configure an allowed-active list of VSANs for an interface)
switchport trunk allowed vsan add 6 (Expands the specified VSAN 6 to the new allowed list)
no switchport trunk allowed vsan 2-4 (Disallow VSANS from being trunked)
no switchport trunk allowed vsan 5

One important note: you should create a VSANs BEFORE you allowing trunking on them –
otherwise trunking port will be automatically disabled due to VSAN mismatch.
Same problem can occur, if trunking interfaces are located in different VSANs
(for example, fc1/1 on switch A is in VSAN 2, while fc1/9 on switch B is in VSAN 3).

Did you like this?
Tip cyberfella with Cryptocurrency

Donate Bitcoin to cyberfella

Scan to Donate Bitcoin to cyberfella
Scan the QR code or copy the address below into your wallet to send some bitcoin:

Donate Bitcoin Cash to cyberfella

Scan to Donate Bitcoin Cash to cyberfella
Scan the QR code or copy the address below into your wallet to send bitcoin:

Donate Ethereum to cyberfella

Scan to Donate Ethereum to cyberfella
Scan the QR code or copy the address below into your wallet to send some Ether:

Donate Litecoin to cyberfella

Scan to Donate Litecoin to cyberfella
Scan the QR code or copy the address below into your wallet to send some Litecoin:

Donate Monero to cyberfella

Scan to Donate Monero to cyberfella
Scan the QR code or copy the address below into your wallet to send some Monero:

Donate ZCash to cyberfella

Scan to Donate ZCash to cyberfella
Scan the QR code or copy the address below into your wallet to send some ZCash: