Applying user specific NTFS permissions to all home directories using CLI

There are lots of useful command line tools for listing and modifying NTFS permissions such as cacls, icacls, subinacl, setacl and System Tools’ dumpsec and I will continue to enhance this post with useful real-world examples of each in time.

I’ll start with using cacls in a for loop to process a bunch of home directories, granting full control to each home directory for the specific user.  This can be useful after migrating home directories between domains, or just as a working example of a loop to process files or directories in some way.

for /f %f IN (‘dir /ad /b X:\homedirs\u*’) DO cacls X:\homedirs\%f /e /p %f:F

(Use %%f in place of %f in batch files)

The dir /ad /b command can also be written as dir /A:D /B and has the effect of listing only names of only directories.  This prevents files being processed, limiting the application of permissions to just the directories.  For additional safety, I’ve also used u* to only list directories beginning with u (this may vary in your own environment).

The cacls command simply adds username:F (username:Full Control) to the DACL on the folder, assuming that the username and directory names match (which they almost certainly do in any Windows environment).

If the command is successful, you should see “Processed dir: X:\homedirs\<foldername>“.  Check the permissions to see the new ACE.

As with all complex commands, test on some dummy data first.

A more detailed account of migrating home directories to emc VNX using the VNX Home Directory functionality can be found here http://www.cyberfella.co.uk/2014/07/30/vnx_homedirectory/

Note: This note was written hosting home directories on a NAS, however if you need to share individual home directories as their own hidden shares on an actual Windows Server, then this additional command will save you hours of repetitiously clicking the wizard over and over again…

Create a hidden share for each users home directory (Note: home directory must have appropriate NTFS security in place)

for /f %%f IN (‘dir /ad /b E:\MigratedData\homedirs\’) DO net share %%f$=E:\MigratedData\homedirs\%%f /GRANT:Everyone,FULL

Did you like this?
Tip cyberfella with Cryptocurrency

Donate Bitcoin to cyberfella

Scan to Donate Bitcoin to cyberfella
Scan the QR code or copy the address below into your wallet to send some bitcoin:

Donate Bitcoin Cash to cyberfella

Scan to Donate Bitcoin Cash to cyberfella
Scan the QR code or copy the address below into your wallet to send bitcoin:

Donate Ethereum to cyberfella

Scan to Donate Ethereum to cyberfella
Scan the QR code or copy the address below into your wallet to send some Ether:

Donate Litecoin to cyberfella

Scan to Donate Litecoin to cyberfella
Scan the QR code or copy the address below into your wallet to send some Litecoin:

Donate Monero to cyberfella

Scan to Donate Monero to cyberfella
Scan the QR code or copy the address below into your wallet to send some Monero:

Donate ZCash to cyberfella

Scan to Donate ZCash to cyberfella
Scan the QR code or copy the address below into your wallet to send some ZCash:

Migrating home directories to VNX

Installation and Configuration

The emc CelerraCIFSManagement snap-in for Microsoft Management Console can be used to set up VNX Home Directory.  It’s a nightmare to find unless you still have your CD’s that came with your Celerra/VNX but see my previous post on CAVA for a possible working link to it, assuming you already have a powerlink account with emc (free to set up).

emc Home Directory is a very neat piece of functionality whereby you change the users home directory path in AD to read \\cifsserver\home and upon hitting the home share on cifsserver the user will be automatically dropped into the subfolder containing their home directory files.  If a home directory folder doesn’t already exist, it can (and will by default) create one.

You don’t need to create a home share on the VNX upfront, and if you do, HomeDirectory won’t actually start.  You will need a filesystem though.  You start the homedirectory feature from the CelerraCIFSManagement snap in, but remember to do a custom install and untick UNIX Users and CAVA if you have no intention of using them, since Unix Users will attempt to change your AD schema (but will fail if you’re account is not a schema admins member).  You can always add the other features later by re-installing and HomeDirectory will not be affected.

Once the snap in is installed, you can enable Home Directory.  It’ll warn that theres currently no database and that one should be created.  Once this is created, all you need to do is create a rule for users * with a path to your filesystem\<d>\<u> whereby <d> is the domain name they’ve logged in on and <u> is their username.  This is what controls what folder they get dropped off at and/or the folder structure that needs to be created for them if there’s no pre-existing home directory for that user.

The default security is that the users home directory is fully secured so that only they can get to it.  This can be changed by setting domain admins full control on a top level folder for the domain, and making a registry change to the emc Home Directory settings in HKLM\Software\emc\homedirectory and setting 0 to 1 which turns on inheritance.

The full official doc can be read here  HomeDirectory , but that is the basic gist of it, and I found it worked first time, so it’s pretty straightforward to get installed and running and makes subsequent adminstration of home directories a cinch.

Migrating users Home Directories

You can view my previous post on using robocopy or emcopy to migrate data.  Note that since existing home directories are each individually shared in their own right, you may feel the desire to use sharedup to migrate the shares to the VNX – This is not required since each user maps the same share and the datamover paths them through to their own subfolder.  You may want to set up an adminstrative hidden share on the root of the filesystem though, so that you can get to ALL the home directories for the purpose of deleting old users, dealing with any support problems.

There is another issue which will affect your ability to migrate users home dirs (possibly) and that is that Windows 7 et al, tend to display a users home directory as “My Documents” occasionally.  This is due to the desktop.ini file misbehaving and can easily be fixed by simply deleting it without consequence.  Obviously desktop.ini would need to be deleted for all users, and this can be done using this example forfiles script.


forfiles /p x:\homedirs /s /m desktop.ini /c “cmd /c attrib -h -s @path”

forfiles /p x:\homedirs /s /m desktop.ini /c “cmd /c del @path”

Or alternatively, exclude desktop.ini from your robocopy or emcopy using /XF desktop.ini in the command line, e.g.

emcopy \\sourcesvr\homedirs\username \\destsvr\homedirs\username *.* /s /nosec /o /a /i /d /c /xf desktop.ini /th 32 /r:5 /w:3

robocopy \\sourcesvr\homedirs\username \\destsvr\homedirs\username *.* /e /fft /np /xf desktop.ini /r:5 /w:3

If a migrated user logs on and is directed to a non-existent home directory hosted on VNX using VNX HomeDirectory, then one will automatically be created and the permissions automatically secured so that only that user can access it*

*default behaviour assuming registry flag on cifs server is still set to 0 and the rule in cifsmanagement snapin home directory settings is set to autocreate

For all other users being directed by homedirectory to their migrated home directories, the security will be inherited from the root of the filesystem*

*assuming the root has everyone full control, or has specific perms set and the registry flag for home directory on the cifs server is set to 1 to inherit all the way to the users home directory

To subsequently secure migrated home directories, we need to list each home directory and then set the permissions for the user on each one*

*assuming the home directory has the same name as the user – probable scenario given the emc HomeDirectory rules use of the <u> variable to represent the users username when creating their homedirectory.

The following command has been used successfully to add a specific Access Control Entry to the permissions on the users home directory, allowing them Full Control.

for /f %f IN (‘dir /ad /b X:\homedirs\’) DO cacls X:\homedirs\%f /e /p %f:F

Note that to execute this command in a batch file, you need to replace %f with %%f

If your filesystem fills up and you want to move, say all users beginning with u6 to a separate filesystem, then the following command is a working example.  robocopy doesn’t allow you do only copy folders matching a wildcard pattern (although it does allow you to copy all folders, excluding certain patterns).

for /f “delims=” %f IN (‘dir u:\u6* /ad /b’) DO robocopy u:\%f j:\%f /MIR /R:1 /W:1 /B /TIMFIX

Update: 28/2/2017  Real World Example: Two passes, two different approaches.  One does inital copy of just usernames beginning with u5, the second generates a list of missing users after the first pass and does a second pass targeting the missing users.

for /f “delims=” %%f IN (‘dir s:\root\u5* /ad /b/ o’) DO robocopy s:\root\%%f t:\root\%%f /COPYALL /R:1 /W:1 /B /TIMFIX /NP /FFT /LOG+d:\mattb\u5mig.log (does first pass on all u5 users)

dir /ad /b /o s:\root\u5* | tr ‘[:upper:]’ ‘[:lower:]’ | tee t:\src.txt | wc –l      (counts 2113 and writes list of all u5 users to src.txt)

dir /ad/b /o t:\root\u5* | tr ‘[:upper:]’ ‘[:lower:]’ | tee t:\dest.txt | wc –l    (counts 2113 and writes list of all u5 users to dest.txt)

comm -23 t:\src.txt t:\dest.txt | tee t:\missing.txt | wc –l  (counts 0 differences and writes list of any missing u5 users to missing.txt)

for /f “delims=” %%f IN (cat t:\missing.txt) DO robocopy s:\root\%%f t:\root\%%f /COPYALL /R:1 /W:1 /B /TIMFIX /NP /FFT /LOG+d:\mattb\u5mig.log (does 2nd pass on any missing users only)

Note: Use /TIMFIX with /B to correct non-copying of datestamps on files, resulting in 02/01/1980 datestamps on all files copied with /B Backup rights.

Did you like this?
Tip cyberfella with Cryptocurrency

Donate Bitcoin to cyberfella

Scan to Donate Bitcoin to cyberfella
Scan the QR code or copy the address below into your wallet to send some bitcoin:

Donate Bitcoin Cash to cyberfella

Scan to Donate Bitcoin Cash to cyberfella
Scan the QR code or copy the address below into your wallet to send bitcoin:

Donate Ethereum to cyberfella

Scan to Donate Ethereum to cyberfella
Scan the QR code or copy the address below into your wallet to send some Ether:

Donate Litecoin to cyberfella

Scan to Donate Litecoin to cyberfella
Scan the QR code or copy the address below into your wallet to send some Litecoin:

Donate Monero to cyberfella

Scan to Donate Monero to cyberfella
Scan the QR code or copy the address below into your wallet to send some Monero:

Donate ZCash to cyberfella

Scan to Donate ZCash to cyberfella
Scan the QR code or copy the address below into your wallet to send some ZCash:

Configuring Link Aggregation Devices on VNX

If you intend migrating data to CIFS on VNX, then the networking should be set up to be resistant to failure.  This is achieved by creating virtual lacp (link aggregation) or fsn (fail safe network) devices on the vnx and then assigning your IP addresses to those virtual network devices instead of physical ones.  The virtual network devices use two or more underlying physical network devices for resilience, and be aware that lacp needs to be set up on the switch ports for it to all work too.

The main difference to be aware of regarding lacp and/or fsn devices is that lacp devices can move between multiple active datamovers, whereas fsn’s live on only one datamover.  You also run into trouble later on if you create an fsn out of multiple lacp devices which are connected to different vlans.

Personally, I’m yet to use an fsn device, and seem to usually end up just creating interfaces (assigning IP addresses) to multiple, separate lacp devices in practice.

Another gotcha, and hence the reason for this blog post, is that Unisphere will let you create lacp devices on active datamovers, but not on your standby datamover, yet if you want lacp devices configuration to failover to a standby, the networking configuration has to be the same!

So, in summary, the safest way to set things up correctly, is to use the command line.

In this example, I’m specificly configuring an lacp device on a standby datamover.  You can tweak the syntax accordingly to create devices on active datamovers or use unisphere.

Log onto VNX via SSH

List all Devices (Physical and Virtual)

server_sysconfig server_4 -pci

Create lacp Device

server_sysconfig server_4 -virtual -name lacp-3 -create trk -option “device=cge-2-0,cge-2-1 protocol=lacp lb=ip”

Check device exists and LACP is up

Either refresh Unisphere or use the command

server_ssyconfig server_4 -virtual -info lacp-3

If LACP column shows Down, then lacp has not been configured on the physical ports on the switch.

Delete the device if necessary

Compare the config of the device with that of an lacp device on your primary datamover to check the correct load balancing mode has been used (mac/ip/tcp).  If you need to delete the device and start over, use Unisphere or the command

server_sysconfig server_4 -virtual -delete lacp-3

Assigning IP address to the lacp device

Beyond the scope of this blog post, but logically the next step would be to assign an IP address to the new network device on your primary active datamover.  This can be done easily creating an Interface using Unisphere.  Subsequently, when you create a CIFS Server, you’d then choose this interface as it’s connection to the network, safe in the knowledge it has more than one underlying physical connection.  Needless to say, the ports on any single set of ports on the datamover should go off to a different blade on the switch.


Did you like this?
Tip cyberfella with Cryptocurrency

Donate Bitcoin to cyberfella

Scan to Donate Bitcoin to cyberfella
Scan the QR code or copy the address below into your wallet to send some bitcoin:

Donate Bitcoin Cash to cyberfella

Scan to Donate Bitcoin Cash to cyberfella
Scan the QR code or copy the address below into your wallet to send bitcoin:

Donate Ethereum to cyberfella

Scan to Donate Ethereum to cyberfella
Scan the QR code or copy the address below into your wallet to send some Ether:

Donate Litecoin to cyberfella

Scan to Donate Litecoin to cyberfella
Scan the QR code or copy the address below into your wallet to send some Litecoin:

Donate Monero to cyberfella

Scan to Donate Monero to cyberfella
Scan the QR code or copy the address below into your wallet to send some Monero:

Donate ZCash to cyberfella

Scan to Donate ZCash to cyberfella
Scan the QR code or copy the address below into your wallet to send some ZCash:

Configure Control Station Alias Address on VNX

If you have more than one Control Station (for failover) on your VNX system, then you can configure an alias IP address which will connect you through to whichever control station is available, rather than connecting directly to either control station.

ssh to your control station as nasadmin, then su to root user.

Check existing IP alias configuration if any.

$ /nas/sbin/nas_config -IPalias -list

Create the IP alias address, same address range and subnet:

$ /nas/sbin/nas_config -IPalias -create 0

Do you want slot_0 IP address <xxx.xxx.xxx.1> as your alias? [yes or no]: no
Please enter an IP address to use as an alias: xxx.xxx.xxx.3
done

Repeat first command above to see it in the list, and you can also check the IP alias appears in network settings under eth3:0.  You can also check IP addresses assigned to your control stations eth1:0 and eth2:0 using this command.

# /sbin/ifconfig eth3:0 

Finally, start a new ssh session and attempt to connect to the VNX via the alias IP address.


Did you like this?
Tip cyberfella with Cryptocurrency

Donate Bitcoin to cyberfella

Scan to Donate Bitcoin to cyberfella
Scan the QR code or copy the address below into your wallet to send some bitcoin:

Donate Bitcoin Cash to cyberfella

Scan to Donate Bitcoin Cash to cyberfella
Scan the QR code or copy the address below into your wallet to send bitcoin:

Donate Ethereum to cyberfella

Scan to Donate Ethereum to cyberfella
Scan the QR code or copy the address below into your wallet to send some Ether:

Donate Litecoin to cyberfella

Scan to Donate Litecoin to cyberfella
Scan the QR code or copy the address below into your wallet to send some Litecoin:

Donate Monero to cyberfella

Scan to Donate Monero to cyberfella
Scan the QR code or copy the address below into your wallet to send some Monero:

Donate ZCash to cyberfella

Scan to Donate ZCash to cyberfella
Scan the QR code or copy the address below into your wallet to send some ZCash:

Configure and Test NTP on emc VNX

All computers on a network need to be in sync.  Things can go awry when data is perceived to be arriving in the wrong order.

If you use a NAS and have CIFS Servers, the same rules apply – they have to be in sync.  You’ll certainly experience problems joining a Windows Domain if the CIFS Server (datamover) doesn’t have it’s watch synchronised with the Domain Controllers.

The easiest way to test and if necessary, reconfigure this (ntp client on emc vnx), is to ssh to the control station and log in as nasadmin,

The most useful NTP Commands run as nasadmin are…

Configure and add NTP Server: 

server_date server_2 timesvc start ntp <ip1>,<ip2>,<ip3>

replacing <ip> with the IP addresses of contactable NTP servers.  If in doubt, try the IP address of your local domain controller as this worked well for me, particularly on satellite sites.  You can add more than one IP address too, separated with commas.

Remove existing NTP configuration:

server_date server_2 timesvc delete ntp

To remove the existing ntp source IP address, don’t edit a file and restart services, just type this command.

Force an update of the time, rather than wait:

server_date server_2 timesvc update ntp

When you’ve configured the correct IP address for your time source, don’t delay, sync right away.

Get NTP Stats to check success:

server_date server_2 timesvc stats ntp

date

Check that the sync was successful and that the time was actually updated.


Official document downloadable from here

Rather than have a separate post, I’m going to include this next section here so that all VNX NTP related info is in the one place.

Setting the date and time on the Management Control Station

Display the current date and time.

# /nas/http/webui/bin/datetime.pl -g
2017-03-09T23:17:10

Set the date and time to the correct values usign the format YYYY-MM-DDTHH:MM:SS.

# /nas/http/webui/bin/datetime.pl -s 2017-03-09T11:19:00

Confirm the date and time are correct:

# /nas/http/webui/bin/datetime.pl -g
2017-03-09T11:19:02

Manually set the time if NTP not available

In the event that NTP is not available to you, then you can set the time manually on the datamovers

server_date ALL 1703151440

where 17 is the year, 03 is the month, 15 is the day, 14:40 is the time.

Did you like this?
Tip cyberfella with Cryptocurrency

Donate Bitcoin to cyberfella

Scan to Donate Bitcoin to cyberfella
Scan the QR code or copy the address below into your wallet to send some bitcoin:

Donate Bitcoin Cash to cyberfella

Scan to Donate Bitcoin Cash to cyberfella
Scan the QR code or copy the address below into your wallet to send bitcoin:

Donate Ethereum to cyberfella

Scan to Donate Ethereum to cyberfella
Scan the QR code or copy the address below into your wallet to send some Ether:

Donate Litecoin to cyberfella

Scan to Donate Litecoin to cyberfella
Scan the QR code or copy the address below into your wallet to send some Litecoin:

Donate Monero to cyberfella

Scan to Donate Monero to cyberfella
Scan the QR code or copy the address below into your wallet to send some Monero:

Donate ZCash to cyberfella

Scan to Donate ZCash to cyberfella
Scan the QR code or copy the address below into your wallet to send some ZCash:

Reset sysadmin password on VNX

If the sysadmin password is lost or unknown, but you can ssh to the control station and log on as nasadmin, then you can run the following commands to view any additional admin accounts (if any were created).

/nas/sbin/navicli -h spa security -list -type

If there is another admin account on the system, try using the username as the password and see if that works.

If not, then you can create a temporary administrator account using the following command

/nas/sbin/navicli -h spa security -adduser -user tempadmin -password tempadmin -scope 0 -role administrator

This will allow you to log into the Unisphere global scope at the control stations IP address as tempadmin, where you can then reset the sysadmin password on VNX.


After verifying that you can now log back in to Unisphere as sysadmin, don’t forget to delete the tempadmin account from Settings, Global Users in Unisphere.

Official emc video available here https://community.emc.com/videos/5642

[paypal-donation]

Did you like this?
Tip cyberfella with Cryptocurrency

Donate Bitcoin to cyberfella

Scan to Donate Bitcoin to cyberfella
Scan the QR code or copy the address below into your wallet to send some bitcoin:

Donate Bitcoin Cash to cyberfella

Scan to Donate Bitcoin Cash to cyberfella
Scan the QR code or copy the address below into your wallet to send bitcoin:

Donate Ethereum to cyberfella

Scan to Donate Ethereum to cyberfella
Scan the QR code or copy the address below into your wallet to send some Ether:

Donate Litecoin to cyberfella

Scan to Donate Litecoin to cyberfella
Scan the QR code or copy the address below into your wallet to send some Litecoin:

Donate Monero to cyberfella

Scan to Donate Monero to cyberfella
Scan the QR code or copy the address below into your wallet to send some Monero:

Donate ZCash to cyberfella

Scan to Donate ZCash to cyberfella
Scan the QR code or copy the address below into your wallet to send some ZCash:

Recursively delete zero-byte files (WIndows)

A common problem with data migration at the file level is that you can end up with users complaining of zero-length files.  The problems come when you re-run the copy in the hope that the zero-byte files in the destination folder structure are updated with healthy ones from the source.  Since the zero-byte files will have a newer time stamp than the source data, they become impossible to “fix” without potentially affecting surrounding files.

The best solution I’ve found is to identify and delete any files that are zero-bytes in length before re-running another copy.

To recursively delete zero-byte files in your folder structure, use the following command

for /r %F in (*) do if %~zF==0 del “%F”

If you wish to include the command in a batch file, you’ll need to double up on the % characters,

for /r %%F in (*) do if %%~zF==0 del “%%F”

This will remove the zero-byte files, allowing you to subsequently re-copy the now missing files from the source

robocopy.exe “%source%” “%dest%” *.* /S /XO /FFT /MT:10

Note: to set your source and destination paths in a batch file, use the following syntax

SET “source=R:\MOVED\Mydata”
SET “dest=T:\Mydata”

To simply find zero-byte files and append their full pathnames to a logfile, use

for /r %F in (*) do if %~zF==0 echo “%F” > e:\logs\zerobytefiles.log

Did you like this?
Tip cyberfella with Cryptocurrency

Donate Bitcoin to cyberfella

Scan to Donate Bitcoin to cyberfella
Scan the QR code or copy the address below into your wallet to send some bitcoin:

Donate Bitcoin Cash to cyberfella

Scan to Donate Bitcoin Cash to cyberfella
Scan the QR code or copy the address below into your wallet to send bitcoin:

Donate Ethereum to cyberfella

Scan to Donate Ethereum to cyberfella
Scan the QR code or copy the address below into your wallet to send some Ether:

Donate Litecoin to cyberfella

Scan to Donate Litecoin to cyberfella
Scan the QR code or copy the address below into your wallet to send some Litecoin:

Donate Monero to cyberfella

Scan to Donate Monero to cyberfella
Scan the QR code or copy the address below into your wallet to send some Monero:

Donate ZCash to cyberfella

Scan to Donate ZCash to cyberfella
Scan the QR code or copy the address below into your wallet to send some ZCash:

Data Migration using robocopy

As a compliment to my recent post “Data Migration using emcopy”

http://www.cyberfella.co.uk/2014/05/02/emcopy/

I thought it only fair to follow up with an equivalent post for good ol’ robocopy.  This has mainly come about having discovered an annoying bug in emcopy whereby it doesn’t ignore the directories specified by more than one /xd exclusion – it always excludes the last one specified, but none of the others?!

Robocopy on the other hand, does allow exclusion of more than one directory, each one specified using the /xd switch and can be a full path (to exclude very specific directories) or just one word (to exclude any directories with that name anywhere in the directory tree).

The switch worth mentioning the most though, is the /FFT switch.  Update:  AND THE /B SWITCH (use backup rights). Uh, and come to think of it, the /XO switch too (especially if you’re running a repeated backup of data to a USB HDD).

Note: Use /TIMFIX with /B to correct non-copying of datestamps on files, resulting in 02/01/1980 datestamps on all files copied with /B Backup rights.

When migrating data into a Celerra/VNX/NetApp CIFS Server, the act of copying data from a NTFS volume on a Windows Server to a Linux based Filesystem on a NAS is enough to throw the timestamps on the files out just enough to make robocopy think that the source file is newer, even when it’s not.  This means that subsequent copies of the changed files take just as long as the initial copy.

By appending /FFT to the long list of switches used in your robocopy command, it allows for a discrepancy of up to 2 seconds – enough to provide a convenient workaround to this problem.

In practice, this brought down troublesome 36 hour copy operations requiring a weekend cut-over to be arranged, down to just over 1 hour – cue cliche  – saving time and money.

An example command is given below…

robocopy d:\source e:\dest *.* /xd “System Volume Information” d:\Migration homedirs profiles wtsprofiles /e /np /fft /xo /r:1 /w:1

There are many more switches available in robocopy, including the ability to use multiple threads in newer versions (highly recommended).  Just type robocopy /? from the Windows command line to see the other options.

In practice I found emcopy to be inconsistent with copying ACE’s across to large filesystems, completely skipping some folders when creating an empty folder structure using the /xf * /create method.  This means that file data (and the missing subfolders) subsequently copied into place with /nosec would be forced to inherit the parent permissions.  Most likely not a problem, but if the data has lots of bespoke permissions then it becomes a huge problem as data is generally more “open” at the parent levels.

To re-sync permissions, the following command was useful.

for /f “delims=” %%f IN (‘dir g:\root\ /ad /b’) DO robocopy /E /Copy:S /IS /IT q:\%%f g:\root\%%f

This has since been updated.  To re-sync folder perms between source and dest trees, this works…

robocopy s:\ d:\ /lev:3 /MIR /SEC /SECFIX /V /B /TIMFIX /xo /xn /xc /r:1 /w:1

Due to folders being missed, I never deal with a file system using a single command.  I always break it up and handle each top level folder as an individual job by placing the command in a for loop as shown above.

Alternatively use the following to replicate changed files and their security, and also set the security on unchanged files.  The /V shows the unchanged files being fixed.

for /f “delims=” %%f IN (‘dir g:\root\ /ad /b’) DO robocopy q:\ g:\root\ /MIR /SEC /SECFIX /V /B /TIMFIX /r:1 /w:1

I found myself fighting for a day or two with an apparent intermittent problem copying NTFS security when robocopying data from NAS to NAS.  Despite using all the methods described above, sometimes the NTFS permissions just weren’t being copied across.  I have since discovered that using the /B switch with every other method mentioned already, fixes this annoying problem and the ACE’s come across perfectly.

I’ve since encountered odd behaviour using for loops that has resulted in a mistrust of them.  So, I code each top level folder as an individual line in a batch file.  The problems were encountered where there were spaces in the folder names irrespective of using “delims=”, robocopy didn’t always get it right thereafter.

Robocopy doesn’t let you copy certain folders.  It lets you exclude certain folders but that’s not much use if you only want to copy folders starting with u6* for example.  In this situation, e.g. migrating all users whose usernames begin with u6 to a separate filesystem, you need to use the for loop.

for /f “delims=” %f IN (‘dir s:\root\u5* /ad /b’) DO robocopy s:\root\%f t:\root\%f /COPYALL /R:1 /W:1 /ZB /NP /L /FFT /LOG+:D:\cyberfellaltd\u6mig.log

Update: 28/2/2017  Real World Example: Migration of a subset of users to new filesystem.  Two passes, two different approaches.  One does initial copy of just usernames beginning with u5, the second generates a list of missing users after the first pass and does a second pass targeting the missing users.  Note that this is a hybrid Bash/Batch script and requires the installation of GNUWin32 on Windows in order to work.  This is covered here.

for /f “delims=” %%f IN (‘dir s:\root\u5* /ad /b/ o’) DO robocopy s:\root\%%f t:\root\%%f /COPYALL /R:1 /W:1 /ZB /NP /FFT /LOG+d:\mattb\u5mig.log (does first pass on all u5 users)

dir /ad /b /o s:\root\u5* | tr ‘[:upper:]’ ‘[:lower:]’ | tee t:\src.txt | wc –l      (counts 2113 and writes list of all u5 users to src.txt)

dir /ad/b /o t:\root\u5* | tr ‘[:upper:]’ ‘[:lower:]’ | tee t:\dest.txt | wc –l    (counts 2113 and writes list of all u5 users to dest.txt)

comm -23 t:\src.txt t:\dest.txt | tee t:\missing.txt | wc –l  (counts 0 differences and writes list of any missing u5 users to missing.txt)

for /f “delims=” %%f IN (cat t:\missing.txt) DO robocopy s:\root\%%f t:\root\%%f /COPYALL /R:1 /W:1 /ZB /NP /FFT /LOG+d:\mattb\u5mig.log (does 2nd pass on any missing users only)

If you have folders containing ampersand characters in the name, your copies can fail.  This post here covers a way to deal with it using variables.

Did you like this?
Tip cyberfella with Cryptocurrency

Donate Bitcoin to cyberfella

Scan to Donate Bitcoin to cyberfella
Scan the QR code or copy the address below into your wallet to send some bitcoin:

Donate Bitcoin Cash to cyberfella

Scan to Donate Bitcoin Cash to cyberfella
Scan the QR code or copy the address below into your wallet to send bitcoin:

Donate Ethereum to cyberfella

Scan to Donate Ethereum to cyberfella
Scan the QR code or copy the address below into your wallet to send some Ether:

Donate Litecoin to cyberfella

Scan to Donate Litecoin to cyberfella
Scan the QR code or copy the address below into your wallet to send some Litecoin:

Donate Monero to cyberfella

Scan to Donate Monero to cyberfella
Scan the QR code or copy the address below into your wallet to send some Monero:

Donate ZCash to cyberfella

Scan to Donate ZCash to cyberfella
Scan the QR code or copy the address below into your wallet to send some ZCash:

Administrative users in Ubuntu

When you install Ubuntu Linux or one of its derivatives (Xubuntu, Kubuntu, Lubuntu), the first user you add to the system during installation will automatically be made an Administrative user.  This is necessary so that the user can configure the system.  Like most UNIX based operating systems, any privileged operation requires the user to elevate their system privileges via the sudoers mechanism.

Rather than logging in as an administrative user using a password that can be intercepted, the sudoers mechanism prompts the non-privileged user for their own password which authenticates that user as being genuine before looking in the /etc/sudoers file to verify whether or not that user is permitted to elevate their privileges to that of root status.

The sudoers file can be edited using the visudo command and more granular privileges assigned to groups of sudo users to provide more control over precisely what commands a non-privileged user is permitted to run.  For the most part though, the default sudoers file simply permits any users in the systems sudo group in /etc/group to run any command by simply preceding that command with sudo.

For example, installing additional software on the system is in itself, a privileged operation, so to install say the vlc media player, one would need to type sudo apt-get install vlc.  Typing apt-get install vlc by any user other that root will not work.  A non-privileged user can change to the root user without knowing the root users password by using the sudo su – command and entering their own password – provided they are a member of the sudo group on the system.  In fact it is entirely unnecessary and more common than not to not know the root users actual password, even if you installed the operating system yourself!

So thats how Linux protects itself, explained in files and command line terms, but most desktop Linux users don’t use the command line, preferring to turn to the convenient GUI’s provided by the Settings Manager, which brings me to the point of this post.

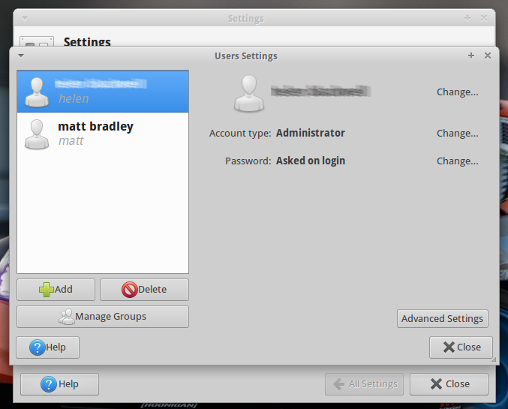
If you make additional users on your Ubuntu desktop system an “Administrator” so that they can install software, connect to networks, wifi and printers etc, then you may expect them to be able to actually do all those things once you change them to “Admnistrator” status.  I would.  But we’d be wrong.  In all honesty, I don’t know what purpose that GUI actually serves other than being able to easily add more users without mastering the adduser or useradd command.

xfce-administrators


Any extra users don’t get added to the systems sudo group – the very thing they need to be members of in order to do anything administrative?!

So you’ll need to add them manually by using sudo vi /etc/group and appending a comma followed by their username to the line beginning with sudo in /etc/group

Assuming you’re not familiar with vi, you can make life easier by using sudo gedit /etc/group or sudo mousepad /etc/group commands instead.

xubuntu-sudoers

Did you like this?
Tip cyberfella with Cryptocurrency

Donate Bitcoin to cyberfella

Scan to Donate Bitcoin to cyberfella
Scan the QR code or copy the address below into your wallet to send some bitcoin:

Donate Bitcoin Cash to cyberfella

Scan to Donate Bitcoin Cash to cyberfella
Scan the QR code or copy the address below into your wallet to send bitcoin:

Donate Ethereum to cyberfella

Scan to Donate Ethereum to cyberfella
Scan the QR code or copy the address below into your wallet to send some Ether:

Donate Litecoin to cyberfella

Scan to Donate Litecoin to cyberfella
Scan the QR code or copy the address below into your wallet to send some Litecoin:

Donate Monero to cyberfella

Scan to Donate Monero to cyberfella
Scan the QR code or copy the address below into your wallet to send some Monero:

Donate ZCash to cyberfella

Scan to Donate ZCash to cyberfella
Scan the QR code or copy the address below into your wallet to send some ZCash:

Data Migration using emcopy

emc’s emcopy (part of emc’s rather elusive but freely downloadable if you can find it CIFS_Tools.zip package) is akin to Microsoft’s own robocopy, only faster with extra benefits.  The command syntax is much like robocopy so if you’re familar with that, then using emcopy will be easy.


emcopy lets you copy a file or directory (and included subdirectories) from and to an
NTFS partition, keeping security the same on the copy as on the original.
It allows you to back up the file and directory security—ACLs, owner information,
and audit information—from a source directory to a destination directory without copying
the file data.  It defaults to 64 threads but can be told to use up to 256 threads, massively speeding up copy operations.

In practice, emcopy vs robocopy – I have found it to be much faster than robocopy.

Download it from here…

https://download.emc.com/downloads/DL32449_CIFS_Tools.zip.zip

Official documentation here…

https://mydocs.emc.com/VNXDocs/CIFS_Environment_Utilities.pdf

Working examples of emcopy commands below, with differences highlighted.

emcopy_v4.14.exe “S:\My Source Folder” D:\My_Dest_Folder *.*  /s /secfix /o /a /i /d /c /th 32 /r:5 /w:3

emcopy_1


emcopy_v4.14.exe “S:\My Source Folder” D:\My_Dest_Folder *.* /s /nosec /o /a /i /d /c /th 256 /r:5 /w:3

emcopy_2


A more elaborate example showing how to exclude multiple directories specified by full path or just as a name

emcopy_v4.14.exe “S:\My Source Folder” D:\My_Dest_Folder *.* /xd “System Volume Information” homedirs profiles wtsprofiles /s /secfix /o /a /i /d /c /th 32 /r:5 /w:3

I personally prefer to deal with each top level folder as a separate emcopy run, using a for loop as follows…

I have found issues using for loops with robocopy that may similarly affect emcopy whereby top level folders containing spaces still prove problematic despite the use of “delims=” in the for loop.

for /f “delims=” %%f in (‘dir S:\ /ad /b’) DO emcopy.exe “s:\%%f” “d:\%%f” *.* /nosec /a /o /s /i /de /c /th 16 /r:1 /w:1

You may want to create the top level of folders first before adopting this technique to perform the subsequent folder structure creation and or file copy…

for /f “delims=” %%f in (‘dir S:\ /ad /b) DO emcopy.exe “s:\” “d:\root\” /s /xf * /create /r:1 /w:1

Note I omitted the use of /secfix as in practice I found not using /secfix has less problems than using it.  It appears to force re-inheritance from parents which can create as many problems as it promises to fix.

emcopy is just one of a handful of adjacent tools in the CIFS_Tools.zip pack, lgcopy can be used to migrate local groups from Windows to a CIFS Server so that emcopy’s /secfix switch can do it’s thing and there are other useful tools such as sharedup for copying CIFS shares from one NAS to another.  More detailed information is available in the emc documentation.

It’s worth reading this post too…

http://www.cyberfella.co.uk/2014/05/22/data-migration-using-robocopy/

…especially if you want to exclude more than one folder, or are experiencing issues with timestamps when migrating to a NAS.

Copying an empty directory structure using emcopy

If you need to copy just the folder structure, but leave the old security behind, then this command works a treat.

emcopy s: d: /s /xf * /nosec /create

If you want to create a duplicate folder structure including ACL’s for subsequent re-ACL’ing using SetACL, leave out /nosec but don’t use /secfix.

emcopy s: d: /s /xf * /create /r:1 /w:1  

This is useful as part of a data migration to a new domain, where the security exported using SystemTools DumpACL can then be tweaked and reapplied to the new empty directory structure using icacls, prior to an emcopy of the data including files without security afterward.

icacls “C:\CYBERFELLA_LTD\PermsTestACLFolder” /grant “CYBERFELLALTD\GlobalGroup1”:(OI)RX

If you need to re-sync folder security between source and destination data, then robocopy can be used to achieve this.  See here

[paypal-donation]

Did you like this?
Tip cyberfella with Cryptocurrency

Donate Bitcoin to cyberfella

Scan to Donate Bitcoin to cyberfella
Scan the QR code or copy the address below into your wallet to send some bitcoin:

Donate Bitcoin Cash to cyberfella

Scan to Donate Bitcoin Cash to cyberfella
Scan the QR code or copy the address below into your wallet to send bitcoin:

Donate Ethereum to cyberfella

Scan to Donate Ethereum to cyberfella
Scan the QR code or copy the address below into your wallet to send some Ether:

Donate Litecoin to cyberfella

Scan to Donate Litecoin to cyberfella
Scan the QR code or copy the address below into your wallet to send some Litecoin:

Donate Monero to cyberfella

Scan to Donate Monero to cyberfella
Scan the QR code or copy the address below into your wallet to send some Monero:

Donate ZCash to cyberfella

Scan to Donate ZCash to cyberfella
Scan the QR code or copy the address below into your wallet to send some ZCash: