Best file manager on Linux? Dolphin.

Need a powerful file manager on Linux?  Minimalism is so last decade.  Functionality is king and it needn’t look ugly either.  Look no further than Dolphin.  KDE’s file manager and it’s an absolute cracker of a file manager.  It’s nothing new as it’s been about a while.

My favourite feature, other than the split screen and integrated command line panel (so long as you install konsole as well as dolphin), is being able to pause multiple, individual in-flight IO operations.  This is great if you’re making multiple copies to a USB stick and want to queue up the individual copy requests so they’ll ultimately complete quicker.

It’s quite simply the best file manager I’ve ever seen.  All about functionality.

sudo apt-get install dolphin konsole

Did you like this?
Tip cyberfella with Cryptocurrency

Donate Bitcoin to cyberfella

Scan to Donate Bitcoin to cyberfella
Scan the QR code or copy the address below into your wallet to send some bitcoin:

Donate Bitcoin Cash to cyberfella

Scan to Donate Bitcoin Cash to cyberfella
Scan the QR code or copy the address below into your wallet to send bitcoin:

Donate Ethereum to cyberfella

Scan to Donate Ethereum to cyberfella
Scan the QR code or copy the address below into your wallet to send some Ether:

Donate Litecoin to cyberfella

Scan to Donate Litecoin to cyberfella
Scan the QR code or copy the address below into your wallet to send some Litecoin:

Donate Monero to cyberfella

Scan to Donate Monero to cyberfella
Scan the QR code or copy the address below into your wallet to send some Monero:

Donate ZCash to cyberfella

Scan to Donate ZCash to cyberfella
Scan the QR code or copy the address below into your wallet to send some ZCash:

Notepad++ for Linux (Notepadqq)

Add yours and my favourite text editor (Notepad++) to your preferred Linux distribution (Linux Mint) using the following commands…

sudo add-apt-repository ppa:notepadqq-team/notepadqq
sudo apt-get update
sudo apt-get install notepadqq

Did you like this?
Tip cyberfella with Cryptocurrency

Donate Bitcoin to cyberfella

Scan to Donate Bitcoin to cyberfella
Scan the QR code or copy the address below into your wallet to send some bitcoin:

Donate Bitcoin Cash to cyberfella

Scan to Donate Bitcoin Cash to cyberfella
Scan the QR code or copy the address below into your wallet to send bitcoin:

Donate Ethereum to cyberfella

Scan to Donate Ethereum to cyberfella
Scan the QR code or copy the address below into your wallet to send some Ether:

Donate Litecoin to cyberfella

Scan to Donate Litecoin to cyberfella
Scan the QR code or copy the address below into your wallet to send some Litecoin:

Donate Monero to cyberfella

Scan to Donate Monero to cyberfella
Scan the QR code or copy the address below into your wallet to send some Monero:

Donate ZCash to cyberfella

Scan to Donate ZCash to cyberfella
Scan the QR code or copy the address below into your wallet to send some ZCash:

Protect your Linux system by jailing your web browser

Your Linux system is inherently less vulnerable to attack than Microsoft Windows for a number of reasons.

  1. You’re less of a target to virus attack by being in the minority (Only 2.18% of people run Linux as their desktop operating system with most of those running a Debian derivative, the most popular being Linux Mint).
  2. You execute user processes as a non-privileged user (Remote code executing in your browser is not running in the context of a local Administrator account so has much less privileges to do potentially damaging things to your computer and data).
  3. Your Linux system is built entirely from packages obtained and installed from known, trusted repositories (No dodgy software downloaded from goodness-knows-where that may or may not be what you think it is.  The code of any given package undergoes constant scrutiny and improvements by the open source community.)
  4. There’s no marketing, advertising, ransom-ware or hidden agendas lurking in the operating system or the applications that are ultimately built by the people, for the people, and distributed to the people for free (feel the love).

Despite all these advantages, we live in the (dis)information age, and that means that the way to reach your users is through their web browsers.  So this next part should interest you.

…we live in the disinformation age, and that means the way to reach you is through your web browser.  So this next part should interest you.

How do I protect my web browser? (Firefox is the default web browser on Linux Mint -my OS and browser of choice)

firewall

  1. Enable the firewall (above)
  2. Once a new installation of Linux Mint is complete, I reboot, log on, Install all pending updates by typing sudo apt-get update && sudo apt-get dist-upgrade in a terminal window.
  3. Connect to my WiFi network, open Firefox and install the AdBlock Plus and uBlock Origin plugins.

And that’s it.  Or at least it has been until now, and in fairness it’s kept me safe since 2005.  I’ve never installed anti-virus software and never had a problem in over a decade.  AV products on Linux such as clam are usually for the benefit of Windows users on the same network or mail attachment scanning on Linux mail servers, neither of which is applicable in my home network environment.

Today though, I learned about something else.  The existence of firejail, -a program that “jails” certain other programs, and I really like what I see.

Like most Linux programs, it’s super quick to install with a quick sudo apt-get install firejail command in a terminal window and as easy to “use”.  In firejail’s case, you just edit the shortcuts of your existing launchers and pre-pend the command firejail

e.g. firefox %u becomes firejail firefox %u

firejail

By jailing the firefox process, it prevents the web browser from being able to access your system, quite literally.  Kind of like a firewall for processes rather than TCP/UDP ports, that only allows certain interactions with the rest of the operating system through.

For example, look what happens when trying to upload a picture I’ve saved to my Desktop to this very blog post…

desktop

The Desktop looks empty.  Nothing.  Blank.  No files or subfolders.  Yet my Desktop folder contains loads of images and other files and subfolders, as does my Pictures folder – same again, blank.  This is because firefox is jailed.  It can’t get out and into your filesystem.  Brilliant – and only a little inconvenient as it can still access my Downloads folder.  So if I want to upload a file, I just have a make a copy into my Downloads folder first using my File manager caja (which isn’t jailed).  Uploading to my Dropbox account using the web based interface would be a bit of a pain, but the Dropbox daemon running on my computer does all my file syncing anyway, so it doesn’t present a problem.  I don’t actually need to use Dropbox’ web interface.

This all works in accordance with the application profile in /etc/firejail/firefox.profile -there’s loads of them, not just for firefox but other internet/vulnerable programs like filezilla, transmission etc too.

Filezilla’s firejail profile on the other hand seems to be a lot more lenient and allows access to your home directory where you might wish to upload an entire folder structure to your web server.  You could always edit the filezilla.profile to harden it yourself I guess.

Whilst I found firejail in my repositories, I didn’t find the accompanying firetools package – a simple launcher that sits on your desktop.  It’s not really needed if you’ve edited your launchers to your favourite apps already and just allows you to add some additional programs to it and shows any running jailed processes if you’re interested in seeing that.  It places a convenient icon in your systray area too, for easy recall.

firetoolsfiretools-trayfiretools-processes


Did you like this?
Tip cyberfella with Cryptocurrency

Donate Bitcoin to cyberfella

Scan to Donate Bitcoin to cyberfella
Scan the QR code or copy the address below into your wallet to send some bitcoin:

Donate Bitcoin Cash to cyberfella

Scan to Donate Bitcoin Cash to cyberfella
Scan the QR code or copy the address below into your wallet to send bitcoin:

Donate Ethereum to cyberfella

Scan to Donate Ethereum to cyberfella
Scan the QR code or copy the address below into your wallet to send some Ether:

Donate Litecoin to cyberfella

Scan to Donate Litecoin to cyberfella
Scan the QR code or copy the address below into your wallet to send some Litecoin:

Donate Monero to cyberfella

Scan to Donate Monero to cyberfella
Scan the QR code or copy the address below into your wallet to send some Monero:

Donate ZCash to cyberfella

Scan to Donate ZCash to cyberfella
Scan the QR code or copy the address below into your wallet to send some ZCash:

Install hevc codec for .mkv video on Linux Mint

Given how complete Linux Mint is out of the box, I’m surprised to have experienced this problem even after installing all extra codecs from the repositories after initial installation.


Upon attempting to play the latest .mkv episode of Silicon Valley, I received the following error in VLC Media Player.

“unable to decode hevc, there’s nothing you can do about this error”

Or words to that effect.  I’d include a screen-shot of the error but I’ve fixed it now, so am sharing the fix with you instead.  I’ll keep it succinct.

sudo apt-add-repository ppa:strukturag/libde265

sudo apt-get update

sudo apt-get install gstreamer0.10-libde265

sudo apt-get install gstreamer1.0-libde265

sudo apt-get install vlc-plugin-libde265

Did you like this?
Tip cyberfella with Cryptocurrency

Donate Bitcoin to cyberfella

Scan to Donate Bitcoin to cyberfella
Scan the QR code or copy the address below into your wallet to send some bitcoin:

Donate Bitcoin Cash to cyberfella

Scan to Donate Bitcoin Cash to cyberfella
Scan the QR code or copy the address below into your wallet to send bitcoin:

Donate Ethereum to cyberfella

Scan to Donate Ethereum to cyberfella
Scan the QR code or copy the address below into your wallet to send some Ether:

Donate Litecoin to cyberfella

Scan to Donate Litecoin to cyberfella
Scan the QR code or copy the address below into your wallet to send some Litecoin:

Donate Monero to cyberfella

Scan to Donate Monero to cyberfella
Scan the QR code or copy the address below into your wallet to send some Monero:

Donate ZCash to cyberfella

Scan to Donate ZCash to cyberfella
Scan the QR code or copy the address below into your wallet to send some ZCash:

Adding a blocklist to Transmission torrent client on Linux

When using a torrent client on Windows such as utorrent, it’s not a bad idea to run peer block to protect your computer from inbound connections from a maintained list of known ip addresses.


Linux comes with a torrent client built in, usually Transmission, although Deluge is a bit more like utorrent, i.e. shows more info on the screen, has a few more options etc.  Transmission works perfectly well though and ticks the minimalist box if that’s your thing.  Both are available via the repositories using the built in package manager.

Peer Block isnt available for Linux.  Transmission however, supports the use of blocklists, so increasing your level of protection has actually never been simpler.

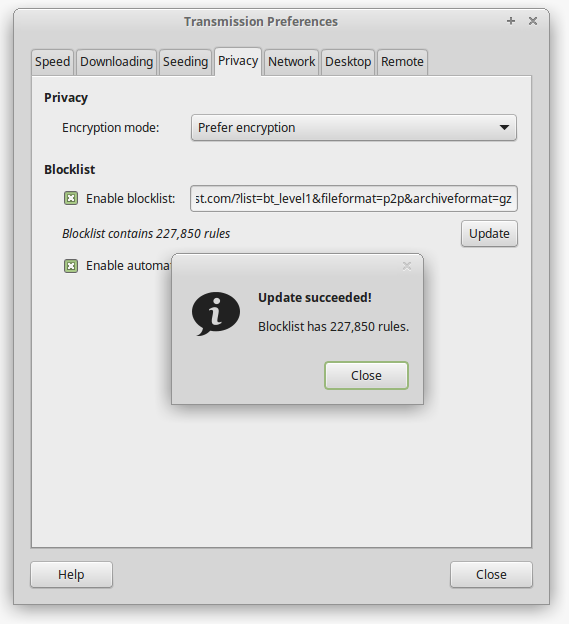
In Preferences, just add the following url to the Blocklist field and click Update.  Done.

http://list.iblocklist.com/?list=bt_level1&fileformat=p2p&archiveformat=gz

transmission

To provide system-wide protection, you should install ufw from the package manager.

  gufw is a GUI that can be used to enable ufw and configure rules.

ufw is installed by default in Linux Mint but is not turned on.

firewall

Did you like this?
Tip cyberfella with Cryptocurrency

Donate Bitcoin to cyberfella

Scan to Donate Bitcoin to cyberfella
Scan the QR code or copy the address below into your wallet to send some bitcoin:

Donate Bitcoin Cash to cyberfella

Scan to Donate Bitcoin Cash to cyberfella
Scan the QR code or copy the address below into your wallet to send bitcoin:

Donate Ethereum to cyberfella

Scan to Donate Ethereum to cyberfella
Scan the QR code or copy the address below into your wallet to send some Ether:

Donate Litecoin to cyberfella

Scan to Donate Litecoin to cyberfella
Scan the QR code or copy the address below into your wallet to send some Litecoin:

Donate Monero to cyberfella

Scan to Donate Monero to cyberfella
Scan the QR code or copy the address below into your wallet to send some Monero:

Donate ZCash to cyberfella

Scan to Donate ZCash to cyberfella
Scan the QR code or copy the address below into your wallet to send some ZCash:

Dell BIOS updates w/o Windows

If like me, you have a Dell laptop running linux and you want to bring your firmware up to date, you’ll realise that the executables downloadable from Dell’s support site require Windows OS to run.  Or do they?  The good new is No.  They don’t.

OK, so they won’t run on Linux either, but they will run from a FreeDOS command line.

Long story short,  download SystemRescueCD

Create a bootable USB Stick using THESE instructions…

mkdir -p /tmp/cdrom

sudo mount -o loop,exec ~/Downloads/systemrescuecd-x86-4.5.4.iso         #your version maybe newer!

plug in the usb stick      #be prepared to loose everything on it!

cd /tmp/cdrom

sudo bash ./usb_inst.sh

Create a folder on the USB stick called Dell for example, and copy the BIOS update for your computer into it.

Boot the computer with the USB stick and choose the FreeDOS option (it can be found in one of the menus), otherwise it’ll boot into the default linux command line environment, and you don’t want that for this.

At the FreeDOS command prompt A:> change to C:> and type dir to view the files on the USB stick.

You should see the Dell directory you created.  cd into the Dell directory and run the executable BIOS upgrade program.

Reboot into your Linux OS.  The following commands show the firmware level and other info for your computer.

You may need to install libsmbios first

sudo apt-get install libsmbios-bin

dell-fw-commands


Did you like this?
Tip cyberfella with Cryptocurrency

Donate Bitcoin to cyberfella

Scan to Donate Bitcoin to cyberfella
Scan the QR code or copy the address below into your wallet to send some bitcoin:

Donate Bitcoin Cash to cyberfella

Scan to Donate Bitcoin Cash to cyberfella
Scan the QR code or copy the address below into your wallet to send bitcoin:

Donate Ethereum to cyberfella

Scan to Donate Ethereum to cyberfella
Scan the QR code or copy the address below into your wallet to send some Ether:

Donate Litecoin to cyberfella

Scan to Donate Litecoin to cyberfella
Scan the QR code or copy the address below into your wallet to send some Litecoin:

Donate Monero to cyberfella

Scan to Donate Monero to cyberfella
Scan the QR code or copy the address below into your wallet to send some Monero:

Donate ZCash to cyberfella
Scan to Donate ZCash to cyberfella
Scan the QR code or copy the address below into your wallet to send some ZCash:

Installing Dropbox on ElementaryOS (Freya)

ElementaryOS is the closest thing to Mac OS-X in terms of consistency and minimalism of it’s desktop environment interface.  Unlike other Linux distro’s it’s released when the developers think it’s ready, rather than a 6 month rolling cycle.  It’ll take a lot to turn my head away from Linux Mint but Elementary has got a lot of things going for it to be quite honest and I’ll leave you to discover them yourself.  I’m only interested in problems, and the first one I ran into was installing Dropbox.  Installing it from the Software Centre doesn’t work.


They way to sort it, is to install git using sudo apt-get install git

Once git is installed, then run the following commands

git clone https://github.com/zant95/elementary-dropbox /tmp/elementary-dropbox
bash /tmp/elementary-dropbox/install.sh

dropbox-inst-elementary

Dropbox will then open, asking for your account username and password, and the Dropbox sync icon will appear in WingPanel.

References:

https://github.com/zant95/elementary-dropbox

Did you like this?
Tip cyberfella with Cryptocurrency

Donate Bitcoin to cyberfella

Scan to Donate Bitcoin to cyberfella
Scan the QR code or copy the address below into your wallet to send some bitcoin:

Donate Bitcoin Cash to cyberfella

Scan to Donate Bitcoin Cash to cyberfella
Scan the QR code or copy the address below into your wallet to send bitcoin:

Donate Ethereum to cyberfella

Scan to Donate Ethereum to cyberfella
Scan the QR code or copy the address below into your wallet to send some Ether:

Donate Litecoin to cyberfella

Scan to Donate Litecoin to cyberfella
Scan the QR code or copy the address below into your wallet to send some Litecoin:

Donate Monero to cyberfella

Scan to Donate Monero to cyberfella
Scan the QR code or copy the address below into your wallet to send some Monero:

Donate ZCash to cyberfella

Scan to Donate ZCash to cyberfella
Scan the QR code or copy the address below into your wallet to send some ZCash:

Using Linux commands on WIndows

Wouldn’t it be nice if you could pipe the output from windows commands into non-windows commands like grep, cut, awk, sort etc that are available to you on alternative unix-based operating systems?


Download and install GNUWin32 from here and the CoreUtils package here and Grep here that should do it.  There are more packages available though here

Once installed, add the path to the bin directory to your Windows System Environment Variable Path

Environment_variables Path

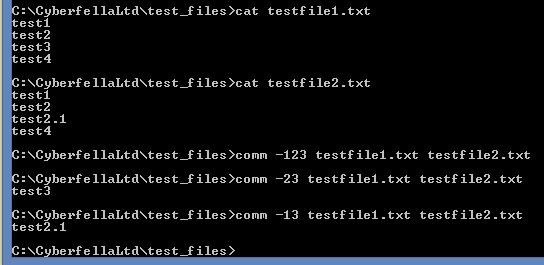
A few useful commands will now be available on the command line.  My favourite is comm which compares files and can be quite flexible with the output with the -1 -2 or -3 switches to suppress lines that appear in file1, file2 or both files respectively.   You can also combine them e.g. -12 -23, 13 to affect the output, so that only the desired output is achieved.  This takes a bit of playing around with, but is very powerful and very simple.  So much so, that it is my number 1 go to tool for file comparison.  Examples shown the in the screenshots below.

comm-helpcomm-3 comm_windows

Note:  Some Windows tools such as icacls export text to a format other than ANSI.  When viewed using Notepad or Notepad++, all appears fine, but if you cat them , you’ll see there are effectively spaces between each character, meaning grep won’t work.  Such text files will need to be saved in ANSI format first.  You can do this using Notepad++.  After selecting Encode in ANSI, save it, then retry grep for a more successful pattern match!

ANSI


Did you like this?
Tip cyberfella with Cryptocurrency

Donate Bitcoin to cyberfella

Scan to Donate Bitcoin to cyberfella
Scan the QR code or copy the address below into your wallet to send some bitcoin:

Donate Bitcoin Cash to cyberfella

Scan to Donate Bitcoin Cash to cyberfella
Scan the QR code or copy the address below into your wallet to send bitcoin:

Donate Ethereum to cyberfella

Scan to Donate Ethereum to cyberfella
Scan the QR code or copy the address below into your wallet to send some Ether:

Donate Litecoin to cyberfella

Scan to Donate Litecoin to cyberfella
Scan the QR code or copy the address below into your wallet to send some Litecoin:

Donate Monero to cyberfella

Scan to Donate Monero to cyberfella
Scan the QR code or copy the address below into your wallet to send some Monero:

Donate ZCash to cyberfella

Scan to Donate ZCash to cyberfella
Scan the QR code or copy the address below into your wallet to send some ZCash:

Administrative users in Ubuntu

When you install Ubuntu Linux or one of its derivatives (Xubuntu, Kubuntu, Lubuntu), the first user you add to the system during installation will automatically be made an Administrative user.  This is necessary so that the user can configure the system.  Like most UNIX based operating systems, any privileged operation requires the user to elevate their system privileges via the sudoers mechanism.

Rather than logging in as an administrative user using a password that can be intercepted, the sudoers mechanism prompts the non-privileged user for their own password which authenticates that user as being genuine before looking in the /etc/sudoers file to verify whether or not that user is permitted to elevate their privileges to that of root status.

The sudoers file can be edited using the visudo command and more granular privileges assigned to groups of sudo users to provide more control over precisely what commands a non-privileged user is permitted to run.  For the most part though, the default sudoers file simply permits any users in the systems sudo group in /etc/group to run any command by simply preceding that command with sudo.

For example, installing additional software on the system is in itself, a privileged operation, so to install say the vlc media player, one would need to type sudo apt-get install vlc.  Typing apt-get install vlc by any user other that root will not work.  A non-privileged user can change to the root user without knowing the root users password by using the sudo su – command and entering their own password – provided they are a member of the sudo group on the system.  In fact it is entirely unnecessary and more common than not to not know the root users actual password, even if you installed the operating system yourself!

So thats how Linux protects itself, explained in files and command line terms, but most desktop Linux users don’t use the command line, preferring to turn to the convenient GUI’s provided by the Settings Manager, which brings me to the point of this post.

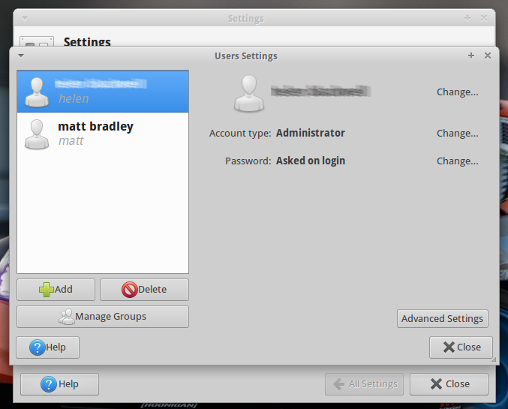
If you make additional users on your Ubuntu desktop system an “Administrator” so that they can install software, connect to networks, wifi and printers etc, then you may expect them to be able to actually do all those things once you change them to “Admnistrator” status.  I would.  But we’d be wrong.  In all honesty, I don’t know what purpose that GUI actually serves other than being able to easily add more users without mastering the adduser or useradd command.

xfce-administrators


Any extra users don’t get added to the systems sudo group – the very thing they need to be members of in order to do anything administrative?!

So you’ll need to add them manually by using sudo vi /etc/group and appending a comma followed by their username to the line beginning with sudo in /etc/group

Assuming you’re not familiar with vi, you can make life easier by using sudo gedit /etc/group or sudo mousepad /etc/group commands instead.

xubuntu-sudoers

Did you like this?
Tip cyberfella with Cryptocurrency

Donate Bitcoin to cyberfella

Scan to Donate Bitcoin to cyberfella
Scan the QR code or copy the address below into your wallet to send some bitcoin:

Donate Bitcoin Cash to cyberfella

Scan to Donate Bitcoin Cash to cyberfella
Scan the QR code or copy the address below into your wallet to send bitcoin:

Donate Ethereum to cyberfella

Scan to Donate Ethereum to cyberfella
Scan the QR code or copy the address below into your wallet to send some Ether:

Donate Litecoin to cyberfella

Scan to Donate Litecoin to cyberfella
Scan the QR code or copy the address below into your wallet to send some Litecoin:

Donate Monero to cyberfella

Scan to Donate Monero to cyberfella
Scan the QR code or copy the address below into your wallet to send some Monero:

Donate ZCash to cyberfella

Scan to Donate ZCash to cyberfella
Scan the QR code or copy the address below into your wallet to send some ZCash:

Mounting Samsung Galaxy Note 3 via USB on Linux

There are two players in the modern smartphone arena as I see it.  Apple and Samsung.  I’d like to say Apple IOS and Google Android but it’s really only the very top end Android handsets that can honesty compete with the bespoke slickness of Apple’s IOS for one very good reason – the consistent hardware platform underneath IOS makes it easier for Apple to “get it right”.


I don’t buy into Apple’s walled garden because I choose to operate my devices one layer down from the top Application layer whenever possible.  By that I mean that I use the command line in preference to an over simplified or over complicated and wholly unnecessary graphical user interfaces, and not for some kind of geek badge of honour but purely for speed of results.  In fact the only gui I can’t live without is a decent file manager such as KDE’s Dolphin.  I say can’t live without.  I could live without it actually.  Hmm.

Anyway, the reason for this post is to provide an answer to the one annoying feature of Samsungs Android phones when connecting them to a PC running Linux via the USB cable.  I don’t expect it of Apple, but I do expect it of Samsung and that is automatic mounting of the internal storage devices using standard protocols.  Android is Linux, Linux is Linux.  When I plug in my Note 3, I absolutely do not expect to be given a choice of presenting the storage via Microsofts MTP protocol or as a camera whereby only jpg files show up.  Grrrr.  That really grips my, well you can see why right?  Just mount the damn thing like a USB storage device for goodness sake!  Microsoft protocols have absolutely no place here.

The open source community has already come to the rescue with the requisite packages to mount an MTP device into the Linux filesystem – mtpfs and mtp-tools.  It’s a little bit back to front but it gets the job done without having to mess about with the phone’s functionality.

1. Install mtp filesystem support and tools using the commands numbered 39 through 43 in my history shown below…

2. Connect the phone via the usb cable and run mtp-detect

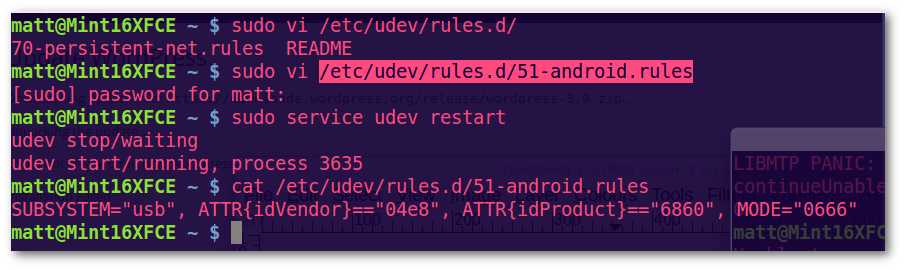
3. Write a udev rule to handle mounting of the phone’s specific MTP device automatically when connected via USB in future.

4. Relax and enjoy automatic mounting of the phones MTP device as if it were mounting the internal storage as a regular USB storage device!

install-mtpsupport


mtp-detect


Use the VID and PID (Vendor and Product ID) to construct the udev rule /etc/udev/rules.d/51-android.rules as shown below, then restart udev.

udev_rule


[paypal-donation]

Did you like this?
Tip cyberfella with Cryptocurrency

Donate Bitcoin to cyberfella

Scan to Donate Bitcoin to cyberfella
Scan the QR code or copy the address below into your wallet to send some bitcoin:

Donate Bitcoin Cash to cyberfella

Scan to Donate Bitcoin Cash to cyberfella
Scan the QR code or copy the address below into your wallet to send bitcoin:

Donate Ethereum to cyberfella

Scan to Donate Ethereum to cyberfella
Scan the QR code or copy the address below into your wallet to send some Ether:

Donate Litecoin to cyberfella

Scan to Donate Litecoin to cyberfella
Scan the QR code or copy the address below into your wallet to send some Litecoin:

Donate Monero to cyberfella

Scan to Donate Monero to cyberfella
Scan the QR code or copy the address below into your wallet to send some Monero:

Donate ZCash to cyberfella

Scan to Donate ZCash to cyberfella
Scan the QR code or copy the address below into your wallet to send some ZCash: