
Printing PDF’s in Ubuntu/Xubuntu/Mint

Nobody likes that sinking feeling when your favourite OS lets you down, but the truth of the matter is Linux, Printing and PDF’s don’t get on.  A vanilla install of Linux Mint on a Dell XPS laptop and Xubuntu on a hp desktop confirms that out of the box you could well find yourself having problems printing – especially PDF’s.  What really annoys me is that I specifically bought an hp Laserjet printer for it’s simplicity and supposed compatibility with Ubuntu (albeit via the hplip – HP Linux Printing Libraries package conveniently available in the Ubuntu Repositories).

hplip on it’s own isn’t enough though.  You’ll get your test page out but thats about it.  Anything else is a lottery and with PDF’s you’re out of luck.  This frustration will be accentuated by the reasons for printing a PDF in the first place – in this day and age of electronic communication, its usually a rare requirement in order to sign a form prior to scanning it and sending it back to someone.  Yep, printing pdf’s is usually for something really important and thats exactly when “favourite OS” will let you down.  Grr.

So, this is how to sort it (if you find yourself having problems).

sudo apt-get install hplip hplip-gui

sudo apt-get install cups-pdf

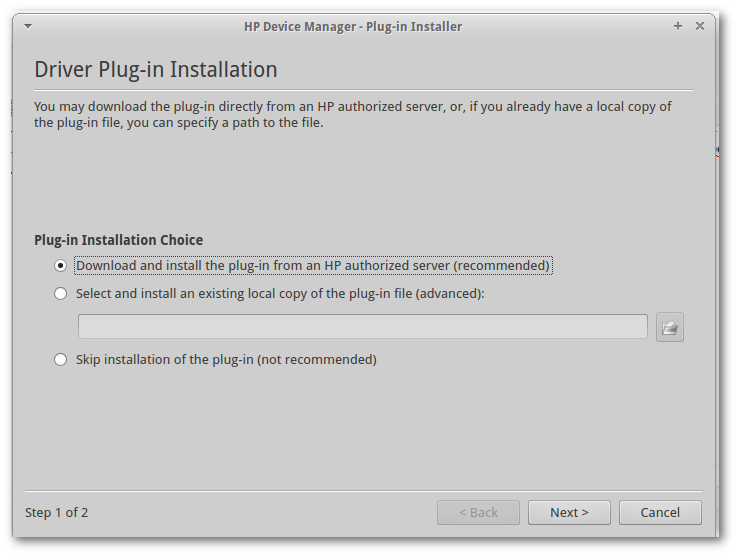
sudo hp-plugin
hp-plugin


Note that the cups-pdf package isn’t actually for printing PDF’s via CUPS (Common Unix Printing System) as such.  It’s actually for printing a file to a PDF (as opposed to paper).  Irrespective of this, I can assure you that printing PDF’s (PDF files to paper) did not work until this package was installed.  Being able to print to a PDF file instead of paper is also a great feature to add to your linux desktop.  It should be installed as part of the base install.  Folks shouldn’t be expected to figure this stuff out.  It’s the sort of non-functionality that drives people away from Linux, sadly sending them running back to Windows with their tails between their legs.

hp-plugin provides a convenient GUI to download a mysterious binary package from HP that once installed, everything works beautifully.

Be aware of this apparent bug in Xubuntu though http://www.cyberfella.co.uk/2014/05/02/ubuntu-admin-users/ whereby any users other than the first user cannot run sudo hp-plugin to fix their own printing woes, even if they appear to be an admin user according to the Settings Manager, Users and Groups utility.

Did you like this?
Tip cyberfella with Cryptocurrency

Donate Bitcoin to cyberfella

Scan to Donate Bitcoin to cyberfella
Scan the QR code or copy the address below into your wallet to send some bitcoin:

Donate Bitcoin Cash to cyberfella

Scan to Donate Bitcoin Cash to cyberfella
Scan the QR code or copy the address below into your wallet to send bitcoin:

Donate Ethereum to cyberfella

Scan to Donate Ethereum to cyberfella
Scan the QR code or copy the address below into your wallet to send some Ether:

Donate Litecoin to cyberfella

Scan to Donate Litecoin to cyberfella
Scan the QR code or copy the address below into your wallet to send some Litecoin:

Donate Monero to cyberfella

Scan to Donate Monero to cyberfella
Scan the QR code or copy the address below into your wallet to send some Monero:

Donate ZCash to cyberfella

Scan to Donate ZCash to cyberfella
Scan the QR code or copy the address below into your wallet to send some ZCash:

Low Colour Depth running Xubuntu on HP D530 SFF PC

I prefer to buy old hardware, fix it up a little, install and tune my preferred Linux desktop OS (can’t help but keep coming back to Xubuntu), then run my desktop PC’s into the ground.  Even when I do finally replace them, it’s usually with something I picked up from ebay for under £100.  I don’t send the old ones to the dumpster though.  They get a fresh rebuild and are gifted to the parents, who despite their unhealthy obsession with purchasing technology (a trait they didn’t inherit from me), love the rapid performance, simple looks, and “it just works” nature of Xubuntu.  Despite consulting in I.T. and knowing far more than any mortal should have to know just to get my stuff working well, I find as I get older and busier, I get less and less tolerant to tech that doesn’t work.  Especially when I’ve paid good money for it.  Luckily Xubuntu is free, so when I hit a snag, I am a little more tolerant and the open source community always provides some quick, convenient, command line solution.

Since Apple is proprietary hardware and software, consumers would be right to expect it to work perfectly.  Most hardware is made with Windows PC’s in mind so once the drivers are installed, consumers would be right to expect a half way decent level of performance too.  Many people are quick to blame Linux when something doesn’t quite work properly, but I never see Linux itself being the root cause of the problem.  It’s either the Broadcom wireless chipset that’s the problem, as it’s been blacklisted by the kernel due to its lack of security (something that can still be reversed), or in this case the embedded Intel video chipset in my old, trusty HP D530 SFF PC that defaults to 16 bit colour.

Rather than throw £15 away on an AGP graphics card to go in it, the open source community once again comes to the rescue with a simple and effective “hack” to force the Default Screen to use 24 bit colour.

low-color-depth


As root, create a file /usr/share/X11/xorg.conf.d/00-xorg.conf that contains the following lines…

Section “Screen”

    Identifier “Default Screen”

    DefaultDepth 24

EndSection

Then reboot.  After logon you’ll notice the wallpaper is not so blocky.  £15 saved.  Parents happy.

Did you like this?
Tip cyberfella with Cryptocurrency

Donate Bitcoin to cyberfella

Scan to Donate Bitcoin to cyberfella
Scan the QR code or copy the address below into your wallet to send some bitcoin:

Donate Bitcoin Cash to cyberfella

Scan to Donate Bitcoin Cash to cyberfella
Scan the QR code or copy the address below into your wallet to send bitcoin:

Donate Ethereum to cyberfella

Scan to Donate Ethereum to cyberfella
Scan the QR code or copy the address below into your wallet to send some Ether:

Donate Litecoin to cyberfella

Scan to Donate Litecoin to cyberfella
Scan the QR code or copy the address below into your wallet to send some Litecoin:

Donate Monero to cyberfella

Scan to Donate Monero to cyberfella
Scan the QR code or copy the address below into your wallet to send some Monero:

Donate ZCash to cyberfella

Scan to Donate ZCash to cyberfella
Scan the QR code or copy the address below into your wallet to send some ZCash:

Whats filled up my filesystem?

If df -h reveals that one of your linux filesystems is full, you’ll be asking yourself whats filled it.

find /myfs -mtime +1 -type f -size +1000000 -exec ls -al {} \;
Replace /myfs with the the name of the filesystem thats filled according to df -h
Knock a zero off -size and repeat to drill down into the largest files
Add 1 to -mtime to go back 1, 2, 3 days etc to see the largest files written to in the last 1, 2, 3 days.
If you’re lucky enough to have a GUI and internet connectivity (highly unlikely on a linux server in the datacenter), install a tree mapper such as baobab (equivalent to sequoia view for Windows).
baobab
Did you like this?
Tip cyberfella with Cryptocurrency

Donate Bitcoin to cyberfella

Scan to Donate Bitcoin to cyberfella
Scan the QR code or copy the address below into your wallet to send some bitcoin:

Donate Bitcoin Cash to cyberfella

Scan to Donate Bitcoin Cash to cyberfella
Scan the QR code or copy the address below into your wallet to send bitcoin:

Donate Ethereum to cyberfella

Scan to Donate Ethereum to cyberfella
Scan the QR code or copy the address below into your wallet to send some Ether:

Donate Litecoin to cyberfella

Scan to Donate Litecoin to cyberfella
Scan the QR code or copy the address below into your wallet to send some Litecoin:

Donate Monero to cyberfella

Scan to Donate Monero to cyberfella
Scan the QR code or copy the address below into your wallet to send some Monero:

Donate ZCash to cyberfella

Scan to Donate ZCash to cyberfella
Scan the QR code or copy the address below into your wallet to send some ZCash:

Add Google to Firefox Search in Linux Mint

The first thing you’ll notice after installing Linux Mint is that Google is missing from the search engine list in Firefox.  The second thing you’ll notice is how it’s not obvious how to put it back, and searching the web for an answer is a frustratingly fruitless experience.

So click on this link

http://mycroftproject.com/google-search-plugins.html

And scroll down the list, clicking on the search engines you’d want to add to your Firefox search engine list in Linux Mint.  I chose SSL Google UK (18 up from the bottom in the list of 209 different engines).

Once you’ve clicked on it, you’ll notice that it will be back in the list.  You can then Manage Your Search Engines in Firefox and change the order to move Google to the top.


Did you like this?
Tip cyberfella with Cryptocurrency

Donate Bitcoin to cyberfella

Scan to Donate Bitcoin to cyberfella
Scan the QR code or copy the address below into your wallet to send some bitcoin:

Donate Bitcoin Cash to cyberfella

Scan to Donate Bitcoin Cash to cyberfella
Scan the QR code or copy the address below into your wallet to send bitcoin:

Donate Ethereum to cyberfella

Scan to Donate Ethereum to cyberfella
Scan the QR code or copy the address below into your wallet to send some Ether:

Donate Litecoin to cyberfella

Scan to Donate Litecoin to cyberfella
Scan the QR code or copy the address below into your wallet to send some Litecoin:

Donate Monero to cyberfella

Scan to Donate Monero to cyberfella
Scan the QR code or copy the address below into your wallet to send some Monero:

Donate ZCash to cyberfella

Scan to Donate ZCash to cyberfella
Scan the QR code or copy the address below into your wallet to send some ZCash:

Making a bootable Crunchbang Linux USB Stick

My new android tablet came with a complimentary 45GB of Dropbox space.  Liking that.  A lot.

Using Dropbox means I’m no longer tied to Ubuntu because of their more generous offering of 5GB of free Ubuntu One space as opposed to Dropbox’s 2GB.

So, with that in mind, it’s time to take a trip back to the minimalist Linux wonderland that is Crunchbang.  In this age of Android spoon fed, touch screen effortlessness, sometimes you just need to write your  own system monitor conky script, and write your own menu items for launching your favourite apps.  It’s not really that tough, because your backed up with the debian apt package management system so installing apps is still a breeze.  You don’t have to ./configure && make && make -install source code, but I suppose you could if you really wanted to.

Anyway, the point of this post, is to remind myself, and other interested parties, that using unetbootin to create a bootable usb stick from the crunchbang .iso image is not going to work.  Instead you have to dd the .iso to your usb stick.  Here’s how…

Insert the stick in the computer (running linux) and mount it so you can see the files/free space.  back up any important stuff since dd will copy at a block level, not file system level, destroying the filesystem currently on there.

Identify the device name assigned to your usb stick

sudo ls -l /dev/disk/by-id/*usb*

e.g. /dev/sdd1

Copy the blocks in the .iso onto your usb storage device
sudo dd if=crunchbang-11-20130506-amd64.iso of=/dev/sdd bs=4M;sync

Did you like this?
Tip cyberfella with Cryptocurrency

Donate Bitcoin to cyberfella

Scan to Donate Bitcoin to cyberfella
Scan the QR code or copy the address below into your wallet to send some bitcoin:

Donate Bitcoin Cash to cyberfella

Scan to Donate Bitcoin Cash to cyberfella
Scan the QR code or copy the address below into your wallet to send bitcoin:

Donate Ethereum to cyberfella

Scan to Donate Ethereum to cyberfella
Scan the QR code or copy the address below into your wallet to send some Ether:

Donate Litecoin to cyberfella

Scan to Donate Litecoin to cyberfella
Scan the QR code or copy the address below into your wallet to send some Litecoin:

Donate Monero to cyberfella

Scan to Donate Monero to cyberfella
Scan the QR code or copy the address below into your wallet to send some Monero:

Donate ZCash to cyberfella

Scan to Donate ZCash to cyberfella
Scan the QR code or copy the address below into your wallet to send some ZCash:

Pausing multiple IO’s to USB storage devices

Something I find frustrating when performing more than one simultaneous copy operation to a USB stick is the terrible slowness.  Copying one file at a time works a treat, as does copying multiple files in one go, but dare to ask it to do some real IO (such as copying a handful of movies and a handful of TV programmes at the same time) and you’re in for a wait.  A long wait.

It doesn’t matter whether you use the GUI or the command line, it’s going to take a long time to perform the copy of all those files if you’re asking it do do it all in parallel.

In my opinion, Linux should make exception for this and force sequential copying of single files until the two (or more) jobs are done.  Queue them up and perform each individual request before moving on to the next one.  It may as well, it’s ultimately faster, and I personally resent every surplus minute spent sat in front of a computer waiting for something to complete before I can kick off the next job.

By using the command line, you can CTRL-Z the cp command to pause it, then fg or bg the process again once the running one has completed, but copying multiple files from different directories IS easier using a GUI file manager.

Enter dolphin – The KDE File Manager and my file manager of choice.  It supports split screen a’la Midnight Commander for those who remember it, as well as immediate access to a terminal if required, each time you open a new folder.  It’s finest hour though, is when you select two or more batches of files and start copying them to a single USB device.  Unlike every other file manager on the planet which just presents you with a Cancel option and the afore mentioned long wait, dolphin has a pause button on each copy progress dialog and as each copy completes, so it’ll automatically resume the next one – so you can pause them all (bar one) and walk away too!

dolphin

You can use dolphin irrespective of desktop environment.  I use it on XFCE for a delightful experience combining overall simplicity but with the functionality I need.

Install it with sudo apt-get install dolphin


Did you like this?
Tip cyberfella with Cryptocurrency

Donate Bitcoin to cyberfella

Scan to Donate Bitcoin to cyberfella
Scan the QR code or copy the address below into your wallet to send some bitcoin:

Donate Bitcoin Cash to cyberfella

Scan to Donate Bitcoin Cash to cyberfella
Scan the QR code or copy the address below into your wallet to send bitcoin:

Donate Ethereum to cyberfella

Scan to Donate Ethereum to cyberfella
Scan the QR code or copy the address below into your wallet to send some Ether:

Donate Litecoin to cyberfella

Scan to Donate Litecoin to cyberfella
Scan the QR code or copy the address below into your wallet to send some Litecoin:

Donate Monero to cyberfella

Scan to Donate Monero to cyberfella
Scan the QR code or copy the address below into your wallet to send some Monero:

Donate ZCash to cyberfella

Scan to Donate ZCash to cyberfella
Scan the QR code or copy the address below into your wallet to send some ZCash:

nohup and disown your long running jobs

Ever started a job and thought “this is running on a bit longer than I expected”, then wondered whats going to happen when you go home and come back in to work tomorrow morning to find your remote session gone, which leaves you wondering “did that job complete?”.


Mmm, me too, which is where the nohup or disown commands come in.  nohup (no hangup) is a well known job control utility which will prevent a process from reacting to the hangup signal when a shell is disconnected.  Usually you’d preceed your actual command with it, e.g.

nohup rsync -auvc /Source/* /Destination/

but if your command is already running, you’re left wishing you’d nohup‘d it to start with – unless you’re running Solaris or AIX in which case the nohup command has a convenient -p switch to specify the process id (use ps -ef | grep rsync to obtain the PID of that long running data migration process, then nohup -p 9675 (or whatever the PID is of your running job).

If you’re not running Solaris or AIX, then pray you started the command in the bash shell (Linux default shell so more likely than not).  If you did, then you can

CTRL-Z

to pause the current job running in the foreground, then use the

jobs

command to determine its job number (most likely 1 if there’s no other sysadmins running backgrounded jobs), then background the process with

bg 1 

then finally

disown %1

to disconnect the process from the current shell.  Running

jobs 

again will show that your job is no longer in the list, but

ps -ef

will reveal that it is in fact still running.

Your shell can now be closed without the fear of your running job being killed with it.  Yay.

[paypal-donation]

Did you like this?
Tip cyberfella with Cryptocurrency

Donate Bitcoin to cyberfella

Scan to Donate Bitcoin to cyberfella
Scan the QR code or copy the address below into your wallet to send some bitcoin:

Donate Bitcoin Cash to cyberfella

Scan to Donate Bitcoin Cash to cyberfella
Scan the QR code or copy the address below into your wallet to send bitcoin:

Donate Ethereum to cyberfella

Scan to Donate Ethereum to cyberfella
Scan the QR code or copy the address below into your wallet to send some Ether:

Donate Litecoin to cyberfella

Scan to Donate Litecoin to cyberfella
Scan the QR code or copy the address below into your wallet to send some Litecoin:

Donate Monero to cyberfella

Scan to Donate Monero to cyberfella
Scan the QR code or copy the address below into your wallet to send some Monero:

Donate ZCash to cyberfella

Scan to Donate ZCash to cyberfella
Scan the QR code or copy the address below into your wallet to send some ZCash:

Quick surface plots using GNUPlot

GNUPlot is a free and very neat little graphing tool.  Upon installing it and running gnuplot you’ll be presented with a flashing command line prompt gnuplot>_ at which point you’ll be asking yourself “now what?”

gnuplot either plots data using plot or plots 3D surfaces using splot.

In this example, I’ll plot a surface plot (3D splot) of weekday (x), hour (y), number of jobs running (z).

gnuplot likes to be fed its data in text column format, separated with spaces or tabs but not commas e.g.

#day #hour #jobs
1 1 5
1 2 5
1 3 5
1 4 5
1 5 5
1 6 5
1 7 5
1 8 5
1 9 5
1 10 5

To create a surface plot of this data (my sample data used has values for all 24 hours in all 7 days), simply type

splot ‘path_to_data.dat’ to point to your text file containing your columns of numbers.

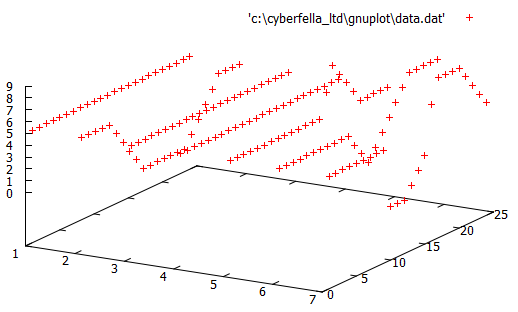
The results will be something like this.  Good, but not quite there yet.

gnuplot1


Some extra commands in the gnuplot command line window will improve the visual representation of the data, giving us the surface plot we’re ultimately after.

set dgrid3d

set grid

set view 50

set style data lines

set contour base

set hidden3d trianglepattern 7

set autoscale

Finally, use the command replot to update the graph.  The results are now much more usable, with contour lines on the base of the 3D graph to further highlight the “hot spots”, i.e. the hours of what day the most jobs are running (in my example).

gnuplot3


There’s much more fun to be had tweaking GNUPlot but I’ll leave that up to you and your imagination.  It’s worth finally mentioning  that the commands entered into gnuplot can be scripted and saved as a .plt file to compliment your .dat data file.  Then, to plot the surface maps again, you just need to load the script using…

load ‘path_to_script.plt’

Remember, the final line in your script should be

splot ‘path_to_data.dat’

so that the graph is actually generated, with all the options preceeding it.  e.g.

#My GNUPlot surface map script surf-map.plt

set dgrid3d

set grid

set view 50

set style data lines

set contour base

set hidden3d trianglepattern 7

set autoscale

splot ‘data.dat’

How you generate your actual data to be plotted is up to you.  A scheduled task/cron job which collects the data and appends it to the data.dat file is generally run as a separate shell script, e.g.

#!/bin/sh

#Insert newline into data.dat
HOURVAL=`date | awk {‘print $4’} | cut -d: -f1`
DAYVAL=`date | awk {‘print $1’}
RUNNINGGROUPSVAL=`ps -ef | grep savegrp | wc -1`

echo “${HOURVAL} ${DAYVAL} ${RUNNINGGROUPSVAL}” >> ~/data.dat

and the graphs generated at will using gnuplot.

Depending on the shapes generated by the surface map, it’s a nice touch that GNUPlot allows you to left-click on the graph and drag it around in 3 dimensions to achieve the best possible viewing angle, prior to saving the .png file, conveniently colouring the underside of the surface a different colour to the upper, visible side of the surface.

Did you like this?
Tip cyberfella with Cryptocurrency

Donate Bitcoin to cyberfella

Scan to Donate Bitcoin to cyberfella
Scan the QR code or copy the address below into your wallet to send some bitcoin:

Donate Bitcoin Cash to cyberfella

Scan to Donate Bitcoin Cash to cyberfella
Scan the QR code or copy the address below into your wallet to send bitcoin:

Donate Ethereum to cyberfella

Scan to Donate Ethereum to cyberfella
Scan the QR code or copy the address below into your wallet to send some Ether:

Donate Litecoin to cyberfella

Scan to Donate Litecoin to cyberfella
Scan the QR code or copy the address below into your wallet to send some Litecoin:

Donate Monero to cyberfella

Scan to Donate Monero to cyberfella
Scan the QR code or copy the address below into your wallet to send some Monero:

Donate ZCash to cyberfella

Scan to Donate ZCash to cyberfella
Scan the QR code or copy the address below into your wallet to send some ZCash:

Improve Laptop Battery Life

If you’re running ubuntu or xubuntu then you can improve battery life by running the following script.

Read the tweaks carefully as they prompt you for a y/n answer since answering yes to all will render your usb sockets useless when on battery.  You’ll get an icon in the tray that will allow setting of multiple performance modes, namely Conservative, On Demand, Powersave and Performance as well as a list of possible CPU frequencies.

To Install and Enable it…

cd && wget -O .laptop-mode.sh http://goo.gl/7SPJWP

chmod +x .laptop-mode.sh && ./.laptop-mode.sh

To Remove it..

cd && wget -O .laptop-mode-uninstall.sh http://goo.gl/IGVK8e

chmod +x .laptop-mode-uninstall.sh && ./.laptop-mode-uninstall.sh


Did you like this?
Tip cyberfella with Cryptocurrency

Donate Bitcoin to cyberfella

Scan to Donate Bitcoin to cyberfella
Scan the QR code or copy the address below into your wallet to send some bitcoin:

Donate Bitcoin Cash to cyberfella

Scan to Donate Bitcoin Cash to cyberfella
Scan the QR code or copy the address below into your wallet to send bitcoin:

Donate Ethereum to cyberfella

Scan to Donate Ethereum to cyberfella
Scan the QR code or copy the address below into your wallet to send some Ether:

Donate Litecoin to cyberfella

Scan to Donate Litecoin to cyberfella
Scan the QR code or copy the address below into your wallet to send some Litecoin:

Donate Monero to cyberfella

Scan to Donate Monero to cyberfella
Scan the QR code or copy the address below into your wallet to send some Monero:

Donate ZCash to cyberfella

Scan to Donate ZCash to cyberfella
Scan the QR code or copy the address below into your wallet to send some ZCash:

Linux Commands A-Z

I can’t take credit for this one –  that goes to Rahul Nag http://techosolutions.wordpress.com/2013/10/10/a-z-linux-commands/ but it’s just too useful to not have in my notes.  I’ve also added some extras and will continue to do so as I think of them/use them myself.

Command Description
alias Create an alias opposite of unalias
apropos Search manual for keyword
at Schedule a job to run in the future.
awk Find and Replace text within file(s) or show specific columns only

basename Opposite of dirname

break Exit from a loop
builtin Run a shell builtin
bunzip2 Decompress file from bzip2 format
bzip2 Compress file to bzip2 format
cal Display a calendar
case Conditionally perform a command
cat Concatenate files to standard output opposite of tac
cd Change Directory
cfdisk Partition table manipulator for Linux
chgrp Change group ownership
chmod Change access permissions
chown Change file owner and group
chroot Run a command with a different root directory
chvt Change the virtual Terminal
cksum Print CRC checksum and byte counts
clear Clear terminal screen
cmp Compare two files
comm Compare two sorted files line by line
command Run a command – ignoring shell functions
compress Compress file(s) to old Unix compress format
continue Resume the next iteration of a loop
convmv A perl script that converts filenames from one encoding to another
cp Copy one or more files to another location

cpio Copy files to and from archives

cron Daemon to execute scheduled commands at predefined time
crontab Schedule a command to run at a later time
csplit Split a file into context-determined pieces
cut Divide a file into several parts
date Display or change the date & time
dc Desk Calculator
dd Data Dump – Convert and copy a file
declare Declare variables and give them attributes
df Display free disk space
diff Display the differences between two files
diff3 Show differences among three files
dir Briefly list directory contents
dircolors Colour setup for `ls’
dirname Convert a full pathname to just a path
dirs Display list of remembered directories

df  Disk space free stats.

du Estimate file space usage
echo Display message on screen
ed A line-oriented text editor (edlin)
egrep Search file(s) for lines that match an extended expression
eject Eject CD-ROM
enable Enable and disable builtin shell commands
env Disp, set, or remove environment variables
eval Evaluate several commands/arguments
exec Execute a command (used with find)
exit Exit the shell
expand Convert tabs to spaces opposite of unexpand
export Set an environment variable
expr Evaluate expressions
factor Print prime factors
false Do nothing, unsuccessfully opposite of true
fdformat Low-level format a floppy disk
fdisk Partition table manipulator for Linux
fgrep Search file(s) for lines that match a fixed string
file Determine type of file
find Search for files that meet a desired criteria
fmt Reformat paragraph text
fold Wrap text to fit a specified width.
for Expand words, and execute commands
format Format disks or tapes
free Disp, s memory usage
fsck Filesystem consistency check and repair.
fstat List open files
function Define Function Macros
fuser Identify process using file
gawk Find and Replace text within file(s)
getopts Parse positional parameters
grep Search file(s) for lines that match a given pattern
groups Print group names a user is in
gunzip Decompress file(s) from GNU zip format
gzcat Show contents of compressed file(s)
gzip Compress file(s) to GNU zip format
hash Remember the full pathname of a name argument
head Output the first part of file(s)
history Command History
hostname Print or set system name
iconv Converts the encoding of characters from one code page encoding scheme to another.
id Print user and group id’s
if Conditionally perform a command
import Capture an X server screen and save the image to file
info Help info
install Copy files and set attributes
join Join lines on a common field
kill Stop a process from running
less Display output one screen at a time
let Perform arithmetic on shell variables
ln Make links between files
local Create variables
locate Find files
logname Print current login name
logout Exit a login shell
lpc Line printer control program
lpr Off line print
lprint Print a file
lprintd Abort a print job
lprintq List the print queue
lprm Remove jobs from the print queue
ls List information about file(s)
ll #ls -l List information about file(s)
lsof List open files
m4 Macro processor
makewhatis Rebuild whatis database
man Print manual pages
mkdir Create new folder(s)
mkfifo Make FIFOs (named pipes)
mknod Make block or character special files
more Display output one screen at a time
mount Mount a file system
mtools Manipulate MS-DOS files
mv Move or rename files or directories
netconfig Configure your network
nice Set the priority of a command or job
nl Number lines and write files
nohup Run a command immune to hangup
od View binary files
passwd Modify a user password
paste Merge lines of files
pathchk Check file name portability
popd Restore the previous value of the current directory opposite of pushd
pr Convert text files for printing
printcap Printer capability database
printenv Print environment variables
printf Format and print data
ps Process status
pushd Save and then change the current directory
pwd Print Working Directory
quota Display disk usage and limits
quotacheck Scan a file system for disk usage
quotactl Set disk quotas
pax Archive file(s)
ram ram disk device
rcp Copy files between two machines.
read read a line from standard input
readonly Mark variables/functions as readonly
remsync Synchronize remote files via email
return Exit a shell function
rm Remove (delete) files
rmdir Remove folder(s)
rpm RPM Package Manager (was RedHat Package Manager)
rsync Remote file copy (Synchronize file trees)
screen Terminal window manager
sdiff Merge two files interactively
sed Stream Editor used to perform search and replace
select Accept keyboard input
seq Print numeric sequences
set Manipulate shell variables and functions opposite of unset
shift Shift positional parameters
shopt Shell Options
shutdown Shutdown or restart linux
sleep Delay for a specified time
sort Sort text files often used with | uniq but can just sort -u
source Run commands from a file `.’
split Split a file into fixed-size pieces
strings print the strings of printable characters in (binary) files.
su Substitute user identity
sum Print a checksum for a file
symlink Make a new name for a file
sync Synchronize data on disk with memory
tac Print files out in reverse line order opposite of cat
tail Output the last part of files
tar Tape ARchiver
tee Redirect output to multiple files as well as to the screen -better than just using > or >>(tee -a)
test Evaluate a conditional expression
time Measure Program Resource Use
times User and system times

timex preceed a command to show how long it ran for upon completion

timidity Play midi files and set up software synth to play midi files with other commands.
touch Change file timestamps
top List processes running on the system
traceroute Trace Route to Host
trap Run a command when a signal is set(bourne)
tr Translate, squeeze, and/or delete characters change uppercase to lowercase
true Do nothing, successfully opposite of false
tsort Topological sort
tty Print filename of terminal on stdin
type Describe a command
ulimit Limit user resources
umask Users file creation mask
umount Unmount a filesystem
unalias Remove an alias opposite of alias
uname Print system information
unexpand Convert spaces to tabs opposite of expand
uniq Uniquify files (remove all duplicate lines) can also use sort -u to sort | uniq
units Convert units from one scale to another
unset Remove variable or function names opposite of set
unshar Unpack shell archive scripts
until Execute commands (until error)
useradd Create new user account
usermod Modify user account
users List users currently logged in
uuencode Encode a binary file into 7-bit ASCII characters
uudecode Decode a file created by uuencode
v Verbosely list directory contents (`ls -l -b’)
vdir Verbosely list directory contents (`ls -l -b’)

vi  The greatest shell text editor ever

vim The greatest shell text editor ever – improved

watch Execute/display a program periodically
whatis List manual pages by name
wc Print byte, word, and line counts of a file
whereis Report all known instances of a command
which Locate a program file in the user’s path.
while Execute commands
who Print all usernames currently logged in
whoami Print the current user id and name (`id -un’)
xargs Execute utility, passing constructed argument list(s)
yes Print a string until interrupted
zcat Show contents of compressed file(s)
zip Compress and archive file(s) to zip format

Did you like this?
Tip cyberfella with Cryptocurrency

Donate Bitcoin to cyberfella

Scan to Donate Bitcoin to cyberfella
Scan the QR code or copy the address below into your wallet to send some bitcoin:

Donate Bitcoin Cash to cyberfella

Scan to Donate Bitcoin Cash to cyberfella
Scan the QR code or copy the address below into your wallet to send bitcoin:

Donate Ethereum to cyberfella

Scan to Donate Ethereum to cyberfella
Scan the QR code or copy the address below into your wallet to send some Ether:

Donate Litecoin to cyberfella

Scan to Donate Litecoin to cyberfella
Scan the QR code or copy the address below into your wallet to send some Litecoin:

Donate Monero to cyberfella

Scan to Donate Monero to cyberfella
Scan the QR code or copy the address below into your wallet to send some Monero:

Donate ZCash to cyberfella

Scan to Donate ZCash to cyberfella
Scan the QR code or copy the address below into your wallet to send some ZCash: