Mounting Samsung Galaxy Note 3 via USB on Linux

There are two players in the modern smartphone arena as I see it.  Apple and Samsung.  I’d like to say Apple IOS and Google Android but it’s really only the very top end Android handsets that can honesty compete with the bespoke slickness of Apple’s IOS for one very good reason – the consistent hardware platform underneath IOS makes it easier for Apple to “get it right”.


I don’t buy into Apple’s walled garden because I choose to operate my devices one layer down from the top Application layer whenever possible.  By that I mean that I use the command line in preference to an over simplified or over complicated and wholly unnecessary graphical user interfaces, and not for some kind of geek badge of honour but purely for speed of results.  In fact the only gui I can’t live without is a decent file manager such as KDE’s Dolphin.  I say can’t live without.  I could live without it actually.  Hmm.

Anyway, the reason for this post is to provide an answer to the one annoying feature of Samsungs Android phones when connecting them to a PC running Linux via the USB cable.  I don’t expect it of Apple, but I do expect it of Samsung and that is automatic mounting of the internal storage devices using standard protocols.  Android is Linux, Linux is Linux.  When I plug in my Note 3, I absolutely do not expect to be given a choice of presenting the storage via Microsofts MTP protocol or as a camera whereby only jpg files show up.  Grrrr.  That really grips my, well you can see why right?  Just mount the damn thing like a USB storage device for goodness sake!  Microsoft protocols have absolutely no place here.

The open source community has already come to the rescue with the requisite packages to mount an MTP device into the Linux filesystem – mtpfs and mtp-tools.  It’s a little bit back to front but it gets the job done without having to mess about with the phone’s functionality.

1. Install mtp filesystem support and tools using the commands numbered 39 through 43 in my history shown below…

2. Connect the phone via the usb cable and run mtp-detect

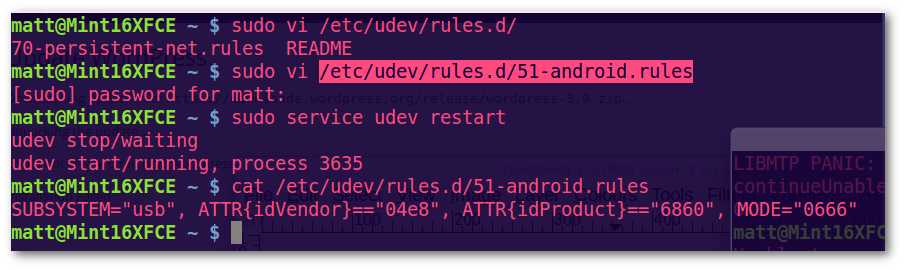
3. Write a udev rule to handle mounting of the phone’s specific MTP device automatically when connected via USB in future.

4. Relax and enjoy automatic mounting of the phones MTP device as if it were mounting the internal storage as a regular USB storage device!

install-mtpsupport


mtp-detect


Use the VID and PID (Vendor and Product ID) to construct the udev rule /etc/udev/rules.d/51-android.rules as shown below, then restart udev.

udev_rule


[paypal-donation]

Did you like this?
Tip cyberfella with Cryptocurrency

Donate Bitcoin to cyberfella

Scan to Donate Bitcoin to cyberfella
Scan the QR code or copy the address below into your wallet to send some bitcoin:

Donate Bitcoin Cash to cyberfella

Scan to Donate Bitcoin Cash to cyberfella
Scan the QR code or copy the address below into your wallet to send bitcoin:

Donate Ethereum to cyberfella

Scan to Donate Ethereum to cyberfella
Scan the QR code or copy the address below into your wallet to send some Ether:

Donate Litecoin to cyberfella

Scan to Donate Litecoin to cyberfella
Scan the QR code or copy the address below into your wallet to send some Litecoin:

Donate Monero to cyberfella

Scan to Donate Monero to cyberfella
Scan the QR code or copy the address below into your wallet to send some Monero:

Donate ZCash to cyberfella

Scan to Donate ZCash to cyberfella
Scan the QR code or copy the address below into your wallet to send some ZCash:

Printing PDF’s in Ubuntu/Xubuntu/Mint

Nobody likes that sinking feeling when your favourite OS lets you down, but the truth of the matter is Linux, Printing and PDF’s don’t get on.  A vanilla install of Linux Mint on a Dell XPS laptop and Xubuntu on a hp desktop confirms that out of the box you could well find yourself having problems printing – especially PDF’s.  What really annoys me is that I specifically bought an hp Laserjet printer for it’s simplicity and supposed compatibility with Ubuntu (albeit via the hplip – HP Linux Printing Libraries package conveniently available in the Ubuntu Repositories).

hplip on it’s own isn’t enough though.  You’ll get your test page out but thats about it.  Anything else is a lottery and with PDF’s you’re out of luck.  This frustration will be accentuated by the reasons for printing a PDF in the first place – in this day and age of electronic communication, its usually a rare requirement in order to sign a form prior to scanning it and sending it back to someone.  Yep, printing pdf’s is usually for something really important and thats exactly when “favourite OS” will let you down.  Grr.

So, this is how to sort it (if you find yourself having problems).

sudo apt-get install hplip hplip-gui

sudo apt-get install cups-pdf

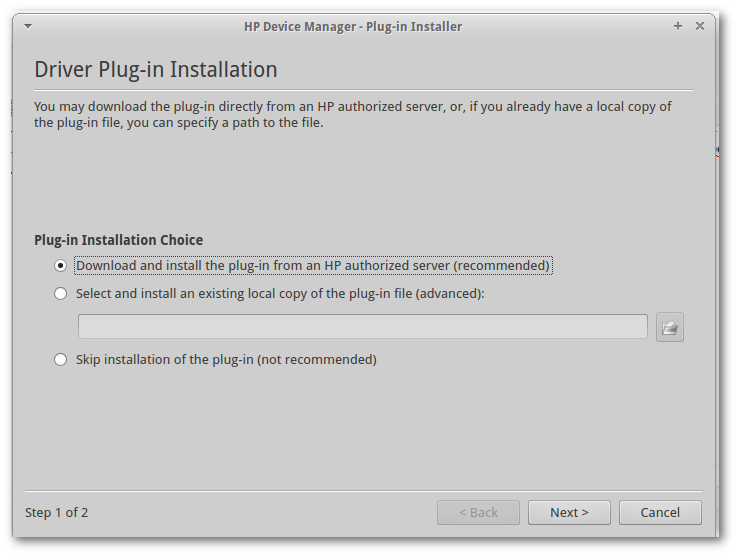
sudo hp-plugin

hp-plugin


Note that the cups-pdf package isn’t actually for printing PDF’s via CUPS (Common Unix Printing System) as such.  It’s actually for printing a file to a PDF (as opposed to paper).  Irrespective of this, I can assure you that printing PDF’s (PDF files to paper) did not work until this package was installed.  Being able to print to a PDF file instead of paper is also a great feature to add to your linux desktop.  It should be installed as part of the base install.  Folks shouldn’t be expected to figure this stuff out.  It’s the sort of non-functionality that drives people away from Linux, sadly sending them running back to Windows with their tails between their legs.

hp-plugin provides a convenient GUI to download a mysterious binary package from HP that once installed, everything works beautifully.

Be aware of this apparent bug in Xubuntu though http://www.cyberfella.co.uk/2014/05/02/ubuntu-admin-users/ whereby any users other than the first user cannot run sudo hp-plugin to fix their own printing woes, even if they appear to be an admin user according to the Settings Manager, Users and Groups utility.

Did you like this?
Tip cyberfella with Cryptocurrency

Donate Bitcoin to cyberfella

Scan to Donate Bitcoin to cyberfella
Scan the QR code or copy the address below into your wallet to send some bitcoin:

Donate Bitcoin Cash to cyberfella

Scan to Donate Bitcoin Cash to cyberfella
Scan the QR code or copy the address below into your wallet to send bitcoin:

Donate Ethereum to cyberfella

Scan to Donate Ethereum to cyberfella
Scan the QR code or copy the address below into your wallet to send some Ether:

Donate Litecoin to cyberfella

Scan to Donate Litecoin to cyberfella
Scan the QR code or copy the address below into your wallet to send some Litecoin:

Donate Monero to cyberfella

Scan to Donate Monero to cyberfella
Scan the QR code or copy the address below into your wallet to send some Monero:

Donate ZCash to cyberfella

Scan to Donate ZCash to cyberfella
Scan the QR code or copy the address below into your wallet to send some ZCash:

Low Colour Depth running Xubuntu on HP D530 SFF PC

I prefer to buy old hardware, fix it up a little, install and tune my preferred Linux desktop OS (can’t help but keep coming back to Xubuntu), then run my desktop PC’s into the ground.  Even when I do finally replace them, it’s usually with something I picked up from ebay for under £100.  I don’t send the old ones to the dumpster though.  They get a fresh rebuild and are gifted to the parents, who despite their unhealthy obsession with purchasing technology (a trait they didn’t inherit from me), love the rapid performance, simple looks, and “it just works” nature of Xubuntu.  Despite consulting in I.T. and knowing far more than any mortal should have to know just to get my stuff working well, I find as I get older and busier, I get less and less tolerant to tech that doesn’t work.  Especially when I’ve paid good money for it.  Luckily Xubuntu is free, so when I hit a snag, I am a little more tolerant and the open source community always provides some quick, convenient, command line solution.

Since Apple is proprietary hardware and software, consumers would be right to expect it to work perfectly.  Most hardware is made with Windows PC’s in mind so once the drivers are installed, consumers would be right to expect a half way decent level of performance too.  Many people are quick to blame Linux when something doesn’t quite work properly, but I never see Linux itself being the root cause of the problem.  It’s either the Broadcom wireless chipset that’s the problem, as it’s been blacklisted by the kernel due to its lack of security (something that can still be reversed), or in this case the embedded Intel video chipset in my old, trusty HP D530 SFF PC that defaults to 16 bit colour.

Rather than throw £15 away on an AGP graphics card to go in it, the open source community once again comes to the rescue with a simple and effective “hack” to force the Default Screen to use 24 bit colour.

low-color-depth


As root, create a file /usr/share/X11/xorg.conf.d/00-xorg.conf that contains the following lines…

Section “Screen”

    Identifier “Default Screen”

    DefaultDepth 24

EndSection

Then reboot.  After logon you’ll notice the wallpaper is not so blocky.  £15 saved.  Parents happy.

Did you like this?
Tip cyberfella with Cryptocurrency

Donate Bitcoin to cyberfella

Scan to Donate Bitcoin to cyberfella
Scan the QR code or copy the address below into your wallet to send some bitcoin:

Donate Bitcoin Cash to cyberfella

Scan to Donate Bitcoin Cash to cyberfella
Scan the QR code or copy the address below into your wallet to send bitcoin:

Donate Ethereum to cyberfella

Scan to Donate Ethereum to cyberfella
Scan the QR code or copy the address below into your wallet to send some Ether:

Donate Litecoin to cyberfella

Scan to Donate Litecoin to cyberfella
Scan the QR code or copy the address below into your wallet to send some Litecoin:

Donate Monero to cyberfella

Scan to Donate Monero to cyberfella
Scan the QR code or copy the address below into your wallet to send some Monero:

Donate ZCash to cyberfella

Scan to Donate ZCash to cyberfella
Scan the QR code or copy the address below into your wallet to send some ZCash:

Whats filled up my filesystem?

If df -h reveals that one of your linux filesystems is full, you’ll be asking yourself whats filled it.

find /myfs -mtime +1 -type f -size +1000000 -exec ls -al {} \;
Replace /myfs with the the name of the filesystem thats filled according to df -h
Knock a zero off -size and repeat to drill down into the largest files
Add 1 to -mtime to go back 1, 2, 3 days etc to see the largest files written to in the last 1, 2, 3 days.
If you’re lucky enough to have a GUI and internet connectivity (highly unlikely on a linux server in the datacenter), install a tree mapper such as baobab (equivalent to sequoia view for Windows).
baobab
Did you like this?
Tip cyberfella with Cryptocurrency

Donate Bitcoin to cyberfella

Scan to Donate Bitcoin to cyberfella
Scan the QR code or copy the address below into your wallet to send some bitcoin:

Donate Bitcoin Cash to cyberfella

Scan to Donate Bitcoin Cash to cyberfella
Scan the QR code or copy the address below into your wallet to send bitcoin:

Donate Ethereum to cyberfella

Scan to Donate Ethereum to cyberfella
Scan the QR code or copy the address below into your wallet to send some Ether:

Donate Litecoin to cyberfella

Scan to Donate Litecoin to cyberfella
Scan the QR code or copy the address below into your wallet to send some Litecoin:

Donate Monero to cyberfella

Scan to Donate Monero to cyberfella
Scan the QR code or copy the address below into your wallet to send some Monero:

Donate ZCash to cyberfella

Scan to Donate ZCash to cyberfella
Scan the QR code or copy the address below into your wallet to send some ZCash:

RHEL Server using Powerpath won’t boot

If you have a Red Hat Enterprise Linux server with the emc Powerpath driver installed, and find it won’t boot due to the LVM subsystem not being able to find the volume group, it may be because the Powerpath driver hasn’t finished loading and scanning for block storage before the LVM subsystem has started.  There are two ways around it, one if to set the dump and fsck order numbers in /etc/fstab to 0 and 0 respectively, but that means the filesystem will never be checked for errors during boot time.  The other is the correct way around it, as recommended by emc in the Powerpath guide, and involves using the _netdev option in the /etc/fstab file so that the OS know to give it some time.  It works too!

Use the _netdev option in /etc/fstab instead of defaults

Use a higher number than 1 for the fsck check order too.

The emc Powerpath guide states…

For RHEL 5, PowerPath devices should be mounted with the _netdev
option instead of the defaults option in the /etc/fstab file. This will
ensure that fsck is run later in the boot sequence.

Did you like this?
Tip cyberfella with Cryptocurrency

Donate Bitcoin to cyberfella

Scan to Donate Bitcoin to cyberfella
Scan the QR code or copy the address below into your wallet to send some bitcoin:

Donate Bitcoin Cash to cyberfella

Scan to Donate Bitcoin Cash to cyberfella
Scan the QR code or copy the address below into your wallet to send bitcoin:

Donate Ethereum to cyberfella

Scan to Donate Ethereum to cyberfella
Scan the QR code or copy the address below into your wallet to send some Ether:

Donate Litecoin to cyberfella

Scan to Donate Litecoin to cyberfella
Scan the QR code or copy the address below into your wallet to send some Litecoin:

Donate Monero to cyberfella

Scan to Donate Monero to cyberfella
Scan the QR code or copy the address below into your wallet to send some Monero:

Donate ZCash to cyberfella

Scan to Donate ZCash to cyberfella
Scan the QR code or copy the address below into your wallet to send some ZCash:

Add Google to Firefox Search in Linux Mint

The first thing you’ll notice after installing Linux Mint is that Google is missing from the search engine list in Firefox.  The second thing you’ll notice is how it’s not obvious how to put it back, and searching the web for an answer is a frustratingly fruitless experience.

So click on this link

http://mycroftproject.com/google-search-plugins.html

And scroll down the list, clicking on the search engines you’d want to add to your Firefox search engine list in Linux Mint.  I chose SSL Google UK (18 up from the bottom in the list of 209 different engines).

Once you’ve clicked on it, you’ll notice that it will be back in the list.  You can then Manage Your Search Engines in Firefox and change the order to move Google to the top.


Did you like this?
Tip cyberfella with Cryptocurrency

Donate Bitcoin to cyberfella

Scan to Donate Bitcoin to cyberfella
Scan the QR code or copy the address below into your wallet to send some bitcoin:

Donate Bitcoin Cash to cyberfella

Scan to Donate Bitcoin Cash to cyberfella
Scan the QR code or copy the address below into your wallet to send bitcoin:

Donate Ethereum to cyberfella

Scan to Donate Ethereum to cyberfella
Scan the QR code or copy the address below into your wallet to send some Ether:

Donate Litecoin to cyberfella

Scan to Donate Litecoin to cyberfella
Scan the QR code or copy the address below into your wallet to send some Litecoin:

Donate Monero to cyberfella

Scan to Donate Monero to cyberfella
Scan the QR code or copy the address below into your wallet to send some Monero:

Donate ZCash to cyberfella

Scan to Donate ZCash to cyberfella
Scan the QR code or copy the address below into your wallet to send some ZCash:

Making a bootable Crunchbang Linux USB Stick

My new android tablet came with a complimentary 45GB of Dropbox space.  Liking that.  A lot.

Using Dropbox means I’m no longer tied to Ubuntu because of their more generous offering of 5GB of free Ubuntu One space as opposed to Dropbox’s 2GB.

So, with that in mind, it’s time to take a trip back to the minimalist Linux wonderland that is Crunchbang.  In this age of Android spoon fed, touch screen effortlessness, sometimes you just need to write your  own system monitor conky script, and write your own menu items for launching your favourite apps.  It’s not really that tough, because your backed up with the debian apt package management system so installing apps is still a breeze.  You don’t have to ./configure && make && make -install source code, but I suppose you could if you really wanted to.

Anyway, the point of this post, is to remind myself, and other interested parties, that using unetbootin to create a bootable usb stick from the crunchbang .iso image is not going to work.  Instead you have to dd the .iso to your usb stick.  Here’s how…

Insert the stick in the computer (running linux) and mount it so you can see the files/free space.  back up any important stuff since dd will copy at a block level, not file system level, destroying the filesystem currently on there.

Identify the device name assigned to your usb stick

sudo ls -l /dev/disk/by-id/*usb*

e.g. /dev/sdd1

Copy the blocks in the .iso onto your usb storage device
sudo dd if=crunchbang-11-20130506-amd64.iso of=/dev/sdd bs=4M;sync

Did you like this?
Tip cyberfella with Cryptocurrency

Donate Bitcoin to cyberfella

Scan to Donate Bitcoin to cyberfella
Scan the QR code or copy the address below into your wallet to send some bitcoin:

Donate Bitcoin Cash to cyberfella

Scan to Donate Bitcoin Cash to cyberfella
Scan the QR code or copy the address below into your wallet to send bitcoin:

Donate Ethereum to cyberfella

Scan to Donate Ethereum to cyberfella
Scan the QR code or copy the address below into your wallet to send some Ether:

Donate Litecoin to cyberfella

Scan to Donate Litecoin to cyberfella
Scan the QR code or copy the address below into your wallet to send some Litecoin:

Donate Monero to cyberfella

Scan to Donate Monero to cyberfella
Scan the QR code or copy the address below into your wallet to send some Monero:

Donate ZCash to cyberfella

Scan to Donate ZCash to cyberfella
Scan the QR code or copy the address below into your wallet to send some ZCash:

Is that VMWare task still running?

So, you’ve told vmware to create a fairly large disk out of one of the datastores, and it’s been ticking along nicely, then bam, an IO latency spike on your SAN has caused vmware to throw an error.  You can see your .vmdk file on the datastore, but the vm can’t see it, and you can’t delete it.  You’re left wondering whether “it’s doing anything or not” with no apparent way to tell in vSphere.   Grr.  You need information about vmware tasks.

ssh to the ESXi host

List all tasks running on host for all VMs

vim-cmd vimsvc/task_list

Obtain vmid of your VM

vim-cmd vmsvc/getallvms

Make a note of vmid

vim-cmd vmsvc/get.tasklist

Make a note of the task identifier – this is the number on the end of the task, i.e. ..sometask-3360′]

View task information

vim-cmd vimsvc/task_info 

Look for the state=”running” field.

My blog posts are intended to be as concise as possible, since they are only intended to serve as a quick reminder on how I once did so-and-so.  Official instructions for this particular topic are available from vmware’s knowledge base here…

http://kb.vmware.com/selfservice/microsites/search.do?language=en_US&cmd=displayKC&externalId=1013003

Did you like this?
Tip cyberfella with Cryptocurrency

Donate Bitcoin to cyberfella

Scan to Donate Bitcoin to cyberfella
Scan the QR code or copy the address below into your wallet to send some bitcoin:

Donate Bitcoin Cash to cyberfella

Scan to Donate Bitcoin Cash to cyberfella
Scan the QR code or copy the address below into your wallet to send bitcoin:

Donate Ethereum to cyberfella

Scan to Donate Ethereum to cyberfella
Scan the QR code or copy the address below into your wallet to send some Ether:

Donate Litecoin to cyberfella

Scan to Donate Litecoin to cyberfella
Scan the QR code or copy the address below into your wallet to send some Litecoin:

Donate Monero to cyberfella

Scan to Donate Monero to cyberfella
Scan the QR code or copy the address below into your wallet to send some Monero:

Donate ZCash to cyberfella

Scan to Donate ZCash to cyberfella
Scan the QR code or copy the address below into your wallet to send some ZCash:

Anti-virus on VNX CIFS Servers

To scan viruses on your Windows File Servers using local or block (SAN) storage is easy – you just install an AV agent on the Windows Server and voila.  But what if your Windows File Server is replaced by an emc VNX CIFS Server?

The VNX uses an optional agent called CAVA (Common Anti-virus Agent) that enables a filter driver on the CIFS Server that sends  the file off to a third party AV server for scanning.  If a virus signature is found, the VNX subsequently deletes the file.

Here’s everything you need to set it up…   (Note that versions described below may change over time).

emc CAVA for VNX Installation, Configuration and Administration

Create a Windows Server, preferably 2 or a couple of VMs and add to the domain.

Download VNX Common Event Enabler from here (291MB)…

You’ll need to register an account on support.emc.com if you don’t already have one (Powerlink account).

https://download.emc.com/downloads/DL48037_Common-Event-Enabler-6.3.1-for-Windows.iso

Install VNX Common Event Event Enabler 6.3.1 (includes CAVA) and a 3rd party AV product of your choice.
emc_VEE_Pack_x64_6.3.1.exe

You will also need to install <vnx nas version>_VNXFileCifsMgmt.exe which sadly is only available on CD2 of the Tools Pack that came with your VNX.  If you’ve subsequently upgraded the NAS to a more recent version, you’ll need to obtain the latest software from EMC.  I was able to download the elusive software from a link sent to me by EMC support, even though I couldn’t find it or search for it on Powerlink.  The links below may work for you, it may not.  Try it.

https://support.emc.com/search/?text=”cifs%20tools”&facetResource=ST

or try this one…

https://support.emc.com/search/?text=Dl48750%20DL32448

Start, Administrative Tools, Celerra Management,
Expand Data Mover Management (you’ll need to point it at the IP address of your CIFS interface)
Expand Anti-virus
Set file masks (don’t use *.*), and exclude files that don’t harbor viruses, configure CAVA CIFS Server name to exactly match that on the VNX CIFS Server name (may need to be in caps!), and IP addresses of CAVA AV Servers.  Example viruschecker.conf shown below.  How you get this into your viruschecker.conf is your problem.  Personally, I’d take the easy option of using the gui, then manually edit the viruschecker.conf file using vi to fix any problems, remove square brackets and stuff.  To edit the viruschecker.conf file manually on the datamover over ssh, log on as nasadmin, su to root and use these commands…

server_file server_2 -get viruschecker.conf viruschecker.conf

vi viruschecker.conf (and tidy it up)

server_file server_2 -put viruschecker.conf viruschecker.conf

CIFSserver=globalcifsserver  -Note that this CIFS Server must reside on physical DM, not your CIFS Server on VDM
Addr=<IP addresses of AV engines separated by semi colons> eg 10.1.1.1:10.1.1.2
shutdown=viruschecking

excl=*.dwl:*.edb:*.fmb:*.fmt:*.fmx:*.frm:*.inp:*.ldb:*.ldf:*.mad:*.maf:*.mam:*.maq:*.mar:*.mat:*.mda:*.mdb:*.mde:*.mdf:*.mdn:*.mdw:*.mdz:*.ndf:*.ora:*.orc:*.ost:*.pst:*.sc:*.sqc:*.sql:*.sqr:*.stm:*.tar:*.tmp:*.zip:????????:*RECYCLER*

masks=*.386:*.ace:*.acm:*.acv:*.acx:*.add:*.ade:*.adp:*.adt:*.app:*.asd:*.asp:*.asx:*.avb:*.ax:*.ax?:*.bas:*.bat:*.bin:*.bo?:*.btm:*.cbt:*.cdr:*.cer:*.cfm:*.chm:*.cla:*.class:*.cmd:*.cnv:*.com:*.cpl:*.cpy:*.crt:*.csc:*.csh:*.css:*.dat:*.dbx:*.der:*.dev:*.dl?:*.dll:*.do?:*.do??:*.doc:*.docx:*.dot:*.drv:*.dvb:*.dwg:*.eml:*.exe:*.fon:*.fxp:*.gadget:*.gms:*.gvb:*.hlp:*.hta:*.htm:*.html:*.htt:*.htw:*.htx:*.im?:*.inf:*.ini:*.ins:*.ins:*.isp:*.its:*.js:*.js?:*.jse:*.jtd:*.lgp:*.lib:*.lnk:*.lnk:*.mad:*.maf:*.mag:*.mam:*.maq:*.mar:*.mas:*.mat:*.mau:*.mav:*.maw:*.mb?:*.mda:*.mdb:*.mde:*.mdt:*.mdw:*.mdz:*.mht:*.mhtm:*.mhtml:*.mod:*.mp?:*.mpd:*.mpp:*.mpt:*.mrc:*.ms?:*.msc:*.msg:*.msh:*.msh1:*.ksh:*.msh1xml:*.msh2:*.msh2xml:*.mshxml:*.msi:*.mso:*.msp:*.mst:*.nch:*.nws:*.obd:*.obj:*.obz:*.ocx:*.oft:*.olb:*.ole:*.ops:*.otm:*.ov?:*.pcd:*.pcd:*.pci:*.pdb:*.pdf:*.pdr:*.php:*.pif:*.pl:*.plg:*.pm:*.pnf:*.pnp:*.pot:*.pot:*.pp?:*.pp??:*.ppa:*.pps:*.pps:*.ppt:*.prc:*.prf:*.prg:*.ps1:*.ps1xml:*.ps2:*.ps2xml:*.psc2:*.pwz:*.qlb:*.qpw:*.reg:*.rtf:*.sbf:*.scf:*.sco:*.scr:*.sct:*.sh:*.shb:*.shs:*.sht:*.shtml:*.shw:*.sis:*.smm:*.swf:*.sys:*.td0:*.tlb:*.tmp:*.tsk:*.tsp:*.tt6:*.url:*.vb:*.vb?:*.vba:*.vbe:*.vbs:*.vbx:*.vom:*.vs?:*.vsd:*.vsmacros:*.vss:*.vst:*.vsw:*.vwp:*.vxd:*.vxe:*.wbk:*.wbt:*.wiz:*.wk?:*.wml:*.wms:*.wpc:*.wpd:*.ws:*.ws?:*.wsc:*.wsf:*.wsh:*.xl?:*.xl??:*.xla:*.xls:*.xlt:*.xlw:*.xml:*.xnk:*.xtp

Create a service account in the domain and check the user rights

Create a local group viruscheckers on the CIFS Server using the local users and groups snap-in, and add your service account in.

Make your service account a local admin on the CAVA Servers and double check that the debug programs right in group policy has local administrators in it (windows default setting) or put the cava service account in it.  This is needed for the CAVA service to query the OS on the VM to determine the AV engine.

GPO_name\Computer Configuration\Windows Settings\Security Settings\Local Policies\User Rights Assignment        Debug Programs

Restart the EMC CAVA service on the CAVA Vm’s using this service account – note: it’ll get assigned Log On As A Service rights automatically.

If you need to re-add rights to the CAVA service account in group policy for any reason (they’ve been stripped out in an update), then you’ll need to also restart the CAVA Service on the VM before the CAVA Agent on the Datamover will re-recognise the AV engine.

In the EMC Celerra Management snap-in

Expand User Rights Assignment
Expand EMC Virus Check
Add
Select the service account in the Domain to give virus checking right to, Add, OK, OK

PuTTY/SSH to VNX Control Station
Login as nasadmin
server_viruschk server_2
You should see ONLINE, plus details of file masks and AV server used.

If you get Unknown AV Engine or Third Party AV engine, even though you’re using McAfee or Sophos or one of the other supported AV engines, then something is up – HP Protect Tools can get in the way of the DM authenticating to the CAVA VM’s.  I’m using McAfee and although mcshield.exe is a known av engine and its running, it didn’t pick it up because the password was getting scrambled by ProtectTools.  Check your AV policy being applied to the AV engine includes Network Drives.  It may not.  Until you solve this problem, set shutdown=viruschecking in your viruschecker.conf to shutdown=no to prevent it from stopping all the time.  Use the snap-in to adjust this setting.  Also make sure your viruschecker.conf is pointing as a global cifs server permanently resident on the physical datamover and not your cifs server on a virtual data mover thats actually sharing your filesystems.

server_viruschk server_2 -audit
Should see details of viruses caught. This can be tested using EICAR test virus and dropping the file into the CIFS Share on the CIFS Server.
The file should get automatically deleted by your anti-virus software.

Reboot everything once it’s all set up (CAVA Vm’s).  A reboot can cure most problems.

Common Commands via the CLI

Replace server_x with the data mover you are accessing eg server_2

server_viruschk server_x Shows if virus checking is running and scanning rules
server_viruschk server_x -audit Shows CAVA scanning stats and scan queue. Very useful to see if the CAVA queue is blocked
server_log server_x To see if there are any errors on the data movers
server_setup server_x –P viruschk –o start=64 Start the virus checker service on the data mover
server_setup server_x –P viruschk –o stop Stop the virus checker service on the data mover
server_viruschk server_x –fsscan fs1 –create Starts a virus scanning job a on file system
server_viruschk server_x –fsscan fs1 –delete Stops a virus scanning job on a file system
server_viruschk server_x –fsscan fs1 –list Show the scanning status

Debugging CAVA

You can set debug logging on the data mover

.server_config server_2 “param viruschk Traces=0x00000004” #turns on debug for AV in the server_log
.server_config server_2 “param viruschk Traces=0x00000000” #turns off debug for AV in the server_log

server_log server_x To see if there are any errors logged on the data movers.

[paypal-donation]

Did you like this?
Tip cyberfella with Cryptocurrency

Donate Bitcoin to cyberfella

Scan to Donate Bitcoin to cyberfella
Scan the QR code or copy the address below into your wallet to send some bitcoin:

Donate Bitcoin Cash to cyberfella

Scan to Donate Bitcoin Cash to cyberfella
Scan the QR code or copy the address below into your wallet to send bitcoin:

Donate Ethereum to cyberfella

Scan to Donate Ethereum to cyberfella
Scan the QR code or copy the address below into your wallet to send some Ether:

Donate Litecoin to cyberfella

Scan to Donate Litecoin to cyberfella
Scan the QR code or copy the address below into your wallet to send some Litecoin:

Donate Monero to cyberfella

Scan to Donate Monero to cyberfella
Scan the QR code or copy the address below into your wallet to send some Monero:

Donate ZCash to cyberfella

Scan to Donate ZCash to cyberfella
Scan the QR code or copy the address below into your wallet to send some ZCash:

Pausing multiple IO’s to USB storage devices

Something I find frustrating when performing more than one simultaneous copy operation to a USB stick is the terrible slowness.  Copying one file at a time works a treat, as does copying multiple files in one go, but dare to ask it to do some real IO (such as copying a handful of movies and a handful of TV programmes at the same time) and you’re in for a wait.  A long wait.

It doesn’t matter whether you use the GUI or the command line, it’s going to take a long time to perform the copy of all those files if you’re asking it do do it all in parallel.

In my opinion, Linux should make exception for this and force sequential copying of single files until the two (or more) jobs are done.  Queue them up and perform each individual request before moving on to the next one.  It may as well, it’s ultimately faster, and I personally resent every surplus minute spent sat in front of a computer waiting for something to complete before I can kick off the next job.

By using the command line, you can CTRL-Z the cp command to pause it, then fg or bg the process again once the running one has completed, but copying multiple files from different directories IS easier using a GUI file manager.

Enter dolphin – The KDE File Manager and my file manager of choice.  It supports split screen a’la Midnight Commander for those who remember it, as well as immediate access to a terminal if required, each time you open a new folder.  It’s finest hour though, is when you select two or more batches of files and start copying them to a single USB device.  Unlike every other file manager on the planet which just presents you with a Cancel option and the afore mentioned long wait, dolphin has a pause button on each copy progress dialog and as each copy completes, so it’ll automatically resume the next one – so you can pause them all (bar one) and walk away too!

dolphin

You can use dolphin irrespective of desktop environment.  I use it on XFCE for a delightful experience combining overall simplicity but with the functionality I need.

Install it with sudo apt-get install dolphin


Did you like this?
Tip cyberfella with Cryptocurrency

Donate Bitcoin to cyberfella

Scan to Donate Bitcoin to cyberfella
Scan the QR code or copy the address below into your wallet to send some bitcoin:

Donate Bitcoin Cash to cyberfella

Scan to Donate Bitcoin Cash to cyberfella
Scan the QR code or copy the address below into your wallet to send bitcoin:

Donate Ethereum to cyberfella

Scan to Donate Ethereum to cyberfella
Scan the QR code or copy the address below into your wallet to send some Ether:

Donate Litecoin to cyberfella

Scan to Donate Litecoin to cyberfella
Scan the QR code or copy the address below into your wallet to send some Litecoin:

Donate Monero to cyberfella

Scan to Donate Monero to cyberfella
Scan the QR code or copy the address below into your wallet to send some Monero:

Donate ZCash to cyberfella

Scan to Donate ZCash to cyberfella
Scan the QR code or copy the address below into your wallet to send some ZCash: