Using Ubuntu One on Linux Mint

If you want to use one of Linux Mint’s various distributions (XFCE would be my choice), but feel locked into Ubuntu due to it’s free 5GB of Ubuntu One cloud storage, you can install Ubuntu One client on Linux Mint too, taking advantage of both.

sudo add-apt-repository ppa:noobslab/apps
sudo apt-get update
sudo apt-get install ubuntuone-client ubuntuone-control-panel ubuntuone-client-proxy ubuntuone-control-panel-qt

Finally, just configure Ubuntu One client with your account username and password just as you would in Ubuntu/Kubuntu/Xubuntu/Lubuntu/Ubuntu Studio..

Did you like this?
Tip cyberfella with Cryptocurrency

Donate Bitcoin to cyberfella

Scan to Donate Bitcoin to cyberfella
Scan the QR code or copy the address below into your wallet to send some bitcoin:

Donate Bitcoin Cash to cyberfella

Scan to Donate Bitcoin Cash to cyberfella
Scan the QR code or copy the address below into your wallet to send bitcoin:

Donate Ethereum to cyberfella

Scan to Donate Ethereum to cyberfella
Scan the QR code or copy the address below into your wallet to send some Ether:

Donate Litecoin to cyberfella

Scan to Donate Litecoin to cyberfella
Scan the QR code or copy the address below into your wallet to send some Litecoin:

Donate Monero to cyberfella

Scan to Donate Monero to cyberfella
Scan the QR code or copy the address below into your wallet to send some Monero:

Donate ZCash to cyberfella

Scan to Donate ZCash to cyberfella
Scan the QR code or copy the address below into your wallet to send some ZCash:

Shell Scripting “test”

Here’s a quick reference guide to the tests performed on a variable as part of a shell script.

test expr or [ expr ]


Example (if $var is not set to any value)

if [[ -z $var ]]; then

echo “variable has no value”

fi


-n file                true if variable has a value set

-z file                true if variable is empty

-L                      true if file is symbolic link

file1 -nt file2      true if file1 newer than file2

file1 -ot file2      true if file1 older than file2

file1 -ef file2      true if file1 and file2 are same device and inode number.

-e file                true if file exists (NOT ON HPUX use f instead)

-x file                true if file is executable

-r file                true if file is readable

-w file               true if file is writable

-f file                 true if file is a regular file

-d directory       true if directory is a directory

-c file                true if character special file

-b file                true if block special file

-p file                true if a named pipe

-u file                true if set UID bit is set

-g file                true if set GID bit is set

-k file                true if sticky bit is set

-s file                true if filesize > 0

Did you like this?
Tip cyberfella with Cryptocurrency

Donate Bitcoin to cyberfella

Scan to Donate Bitcoin to cyberfella
Scan the QR code or copy the address below into your wallet to send some bitcoin:

Donate Bitcoin Cash to cyberfella

Scan to Donate Bitcoin Cash to cyberfella
Scan the QR code or copy the address below into your wallet to send bitcoin:

Donate Ethereum to cyberfella

Scan to Donate Ethereum to cyberfella
Scan the QR code or copy the address below into your wallet to send some Ether:

Donate Litecoin to cyberfella

Scan to Donate Litecoin to cyberfella
Scan the QR code or copy the address below into your wallet to send some Litecoin:

Donate Monero to cyberfella

Scan to Donate Monero to cyberfella
Scan the QR code or copy the address below into your wallet to send some Monero:

Donate ZCash to cyberfella

Scan to Donate ZCash to cyberfella
Scan the QR code or copy the address below into your wallet to send some ZCash:

Data Migration Shell Script Example

A nice little script written around the rsync command used to successfully migrate large amounts of data between NFS filesystems, avoiding .snapshot folders in the process.  A simple script in essence but a nice reference example nonetheless on the use of variables, functions, if statements, case statements, patterns and some useful commands, e.g. using sed to remove whitespace at the front of a variable returned by wc.

A simple but proper shell script that can almost certainly be built/improved upon using tee to write std output to a log file as well as the screen for instance, and using find to subsequently count the number of files afterwards because df is unlikely match to the nearest megabyte across different filesystems served by different NAS’s for comparison/verification.

#!/usr/bin/bash

#Generic script for migrating file systems.
#Variables Section
  SOURCE=$1
  DEST=$2

#Functions section
  function migratenonhiddenfolders(){

    echo “Re-Synchronising non-hidden top level folders only…”

  #Synchronise the data
    ls -l $SOURCE | grep ^d | awk {‘print $9’} | while read EACHDIR; do
      echo “Syncing ${SOURCE}/${EACHDIR} with ${DEST}/${EACHDIR}”
      timex /usr/local/bin/rsync -au ${SOURCE}/${EACHDIR}/* ${DEST}/${EACHDIR}
  done
  }

#Code section
  if [[ -z $1 ]];then
    echo “No Source or Destination specified”
    echo “Usage: migrate.sh /<source_fs> /<destination_fs>”
    exit
  fi
  if [[ -z $2 ]];then
    echo “No Destination specified”
    echo “Usage: migrate.sh /source_fs> /<destination_fs>”
    exit
  fi

#Source and Destination filesystems have been specified
  echo “Source filesystem: $SOURCE”
  FOLDERCOUNT=`ls -l $SOURCE | grep ^d | wc -l | sed -e ‘s/^[ \t]*//’`
  echo “The $FOLDERCOUNT source folders are…”
  ls -l $SOURCE | grep ^d | awk {‘print $9’}
  echo
  echo “Destination filesystem: $DEST”
  echo
  echo -n “Please confirm the details are correct [Yes/No] > “
  read CONFIRM
    case $CONFIRM in
        [Yy] | [Yy][Ee][Ss])
          migratenonhiddenfolders
          ;;

       *)
        echo
        echo “User aborted.”
        exit
       ;;
    esac

#Clean exit
exit

Improved version (with logging) shown below.

#!/usr/bin/bash

#Generic script for migrating file systems.
#Variables Section
  SOURCE=$1
  DEST=$2

#Functions section
  function migratenonhiddenfolders(){

    echo “Migrating ${SOURCE} to ${DEST} at `date`” >> ~/migration.log
    echo “Re-Synchronising non-hidden top level folders only…” | tee -a ~/migration.log
    #Synchronise the data
    ls -l $SOURCE | grep ^d | awk {‘print $9’} | while read EACHDIR; do
    echo “Syncing ${SOURCE}/${EACHDIR} with ${DEST}/${EACHDIR} at `date`” | tee -a ~/${DEST}_${EACHDIR}.log ~/${DEST}.log ~/migration.log
    timex /usr/local/bin/rsync -au ${SOURCE}/${EACHDIR}/* ${DEST}/${EACHDIR} | tee -a ~/${DEST}_${EACHDIR}.log ~/${DEST}.log ~/migration.log
    echo “Completed migrating to ${DEST}/${EACHDIR} at `date`” | tee -a ~/${DEST}_${EACHDIR}.log ~/${DEST}.log ~/migration.log
    done
  }

#Code section
  if [[ -z $1 ]];then
    echo “No Source or Destination specified”
    echo “Usage: migrate.sh /<source_fs> /<destination_fs>”
    exit
  fi
  if [[ -z $2 ]];then
    echo “No Destination specified”
    echo “Usage: migrate.sh /source_fs> /<destination_fs>”
    exit
  fi

#Source and Destination filesystems have been specified
  echo “Source filesystem: $SOURCE”
  FOLDERCOUNT=`ls -l $SOURCE | grep ^d | wc -l | sed -e ‘s/^[ \t]*//’`
  echo “The $FOLDERCOUNT source folders are…”
  ls -l $SOURCE | grep ^d | awk {‘print $9’}
  echo
  echo “Destination filesystem: $DEST”
  echo
  echo -n “Please confirm the details are correct [Yes/No] > “
  read CONFIRM
  case $CONFIRM in
    [Yy] | [Yy][Ee][Ss])
      migratenonhiddenfolders
     ;;
  *)
      echo
      echo “User aborted.”
      exit
      ;;
  esac

#Clean exit
  exit

###########################################################
##
## Data Migration script by M.D.Bradley, Cyberfella Ltd
## http://www.cyberfella.co.uk/2013/08/09/data-migration/
##
## Version 1.0 9th August 2013
###########################################################

Did you like this?
Tip cyberfella with Cryptocurrency

Donate Bitcoin to cyberfella

Scan to Donate Bitcoin to cyberfella
Scan the QR code or copy the address below into your wallet to send some bitcoin:

Donate Bitcoin Cash to cyberfella

Scan to Donate Bitcoin Cash to cyberfella
Scan the QR code or copy the address below into your wallet to send bitcoin:

Donate Ethereum to cyberfella

Scan to Donate Ethereum to cyberfella
Scan the QR code or copy the address below into your wallet to send some Ether:

Donate Litecoin to cyberfella

Scan to Donate Litecoin to cyberfella
Scan the QR code or copy the address below into your wallet to send some Litecoin:

Donate Monero to cyberfella

Scan to Donate Monero to cyberfella
Scan the QR code or copy the address below into your wallet to send some Monero:

Donate ZCash to cyberfella

Scan to Donate ZCash to cyberfella
Scan the QR code or copy the address below into your wallet to send some ZCash:

Translate text from lowercase to uppercase

When comparing files on Linux, there are a bunch of tools available to you, which are covered in separate posts on my blog.  This neat trick deserves its own post though -namely converting between upper and lowercase.

Before comparing two text files that have been sorted, duplicates removed with uniq and grepped etc, remember to convert to lower or upper case prior to making final comparison with another file.

tr ‘[:lower:]’ ‘[:upper:]’ <input-file > output-file

My preferred way to compare files isn’t using diff or comm but to use grep…  More often than not it gives me the result I want.

grep -Fxv -f first-file second-file

This returns lines in the second file that are not in the first file.

When comparing files, remember to remove any BLANK LINES.


Did you like this?
Tip cyberfella with Cryptocurrency

Donate Bitcoin to cyberfella

Scan to Donate Bitcoin to cyberfella
Scan the QR code or copy the address below into your wallet to send some bitcoin:

Donate Bitcoin Cash to cyberfella

Scan to Donate Bitcoin Cash to cyberfella
Scan the QR code or copy the address below into your wallet to send bitcoin:

Donate Ethereum to cyberfella

Scan to Donate Ethereum to cyberfella
Scan the QR code or copy the address below into your wallet to send some Ether:

Donate Litecoin to cyberfella

Scan to Donate Litecoin to cyberfella
Scan the QR code or copy the address below into your wallet to send some Litecoin:

Donate Monero to cyberfella

Scan to Donate Monero to cyberfella
Scan the QR code or copy the address below into your wallet to send some Monero:

Donate ZCash to cyberfella

Scan to Donate ZCash to cyberfella
Scan the QR code or copy the address below into your wallet to send some ZCash:

Ubuntu 13.04 Nvidia driver fix

Ubuntu 13.04 is here and is being hailed as the best Ubuntu yet.

Being an advocate I wish I could agree, however this release is the first one in years that hasn’t “just worked” for me.

If that isn’t disappointing enough, the reason it doesn’t work are, in my opinion downright unforgiveable – The Nvidia driver has been replaced with the open-source equivalent effort, namely Nouveau.  I think I spelled that right. If not Google will conveniently correct me anyway when I go searching for ways to fix my new screen resolution of 640×480 pixels.

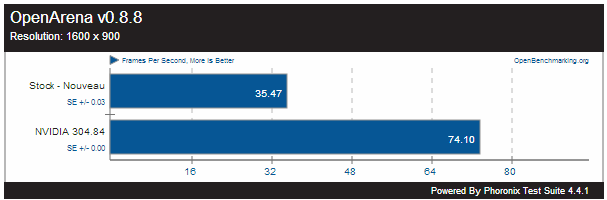
Forcing this upon people when the performance comparison are as follows (see below) is just plain stooopid.  Especially as you’ve already spent money on the nvidia card in the first place – why get all “open source” about driving it when nvidia provides the drivers for free?  Duhhhh.  It doesn’t help push the use of Steam either (the PC gaming platform for Linux) when the resultant performance is half what it could be.  Whilst I admire the open source communitys desire to do-it-yourself, the rest of the world ain’t that bovvered.

nouveau-vs-nvidia


A pet hate of mine is when people make a fantastic effort to post a solution to a problem using the GUI instead of the command line.  So if you use the most unpopular Ubuntu desktop of all time (Unity) then you’re in luck, but if you use one of the other desktops, then you’re out of luck.

Hopefully those of you using Ubuntu Studio like you should, will find this and correct your nvidia issues by installing the proprietary drivers using the command prompt.

sudo apt-add-repository ppa:xorg-edgers/ppa -y; sudo apt-get update; sudo apt-get upgrade -y; sudo apt-get install nvidia-316 nvidia-settings-316 -y


Did you like this?
Tip cyberfella with Cryptocurrency

Donate Bitcoin to cyberfella

Scan to Donate Bitcoin to cyberfella
Scan the QR code or copy the address below into your wallet to send some bitcoin:

Donate Bitcoin Cash to cyberfella

Scan to Donate Bitcoin Cash to cyberfella
Scan the QR code or copy the address below into your wallet to send bitcoin:

Donate Ethereum to cyberfella

Scan to Donate Ethereum to cyberfella
Scan the QR code or copy the address below into your wallet to send some Ether:

Donate Litecoin to cyberfella

Scan to Donate Litecoin to cyberfella
Scan the QR code or copy the address below into your wallet to send some Litecoin:

Donate Monero to cyberfella

Scan to Donate Monero to cyberfella
Scan the QR code or copy the address below into your wallet to send some Monero:

Donate ZCash to cyberfella

Scan to Donate ZCash to cyberfella
Scan the QR code or copy the address below into your wallet to send some ZCash:

Comparing two lists in Linux/UNIX

Deserves its own blog post this one.  A new favourite of mine, that seems more reliable than using diff or comm on account of its being easy to understand, and thus less likely to get wrong (matter of opinion).

grep -Fxv -f masterlist backupclients which would list any lines in a list of backupclients that were not found in the master list.

Note:  This lists any lines in the second file that are not matched in the first file (not the other way around).

-F pattern to match is a list of fixed strings

-x select only matches that match the whole line

-v reverses it, i.e. does not match the whole line

-f list of strings to (not) match are in this file

Result: filename output entire lines from the file specified that are not in the file specified by –f


It can be useful to convert all text to UPPERCASE and don’t forget to REMOVE EMPTY LINES in files.

Text can be converted to uppercase with tr ‘[:lower:] [:upper:]’ <infile >outfile

If you want to list only the lines that appear in two files, then comm -12 firstfile secondfile works well.

Did you like this?
Tip cyberfella with Cryptocurrency

Donate Bitcoin to cyberfella

Scan to Donate Bitcoin to cyberfella
Scan the QR code or copy the address below into your wallet to send some bitcoin:

Donate Bitcoin Cash to cyberfella

Scan to Donate Bitcoin Cash to cyberfella
Scan the QR code or copy the address below into your wallet to send bitcoin:

Donate Ethereum to cyberfella

Scan to Donate Ethereum to cyberfella
Scan the QR code or copy the address below into your wallet to send some Ether:

Donate Litecoin to cyberfella

Scan to Donate Litecoin to cyberfella
Scan the QR code or copy the address below into your wallet to send some Litecoin:

Donate Monero to cyberfella

Scan to Donate Monero to cyberfella
Scan the QR code or copy the address below into your wallet to send some Monero:

Donate ZCash to cyberfella

Scan to Donate ZCash to cyberfella
Scan the QR code or copy the address below into your wallet to send some ZCash:

Subnet mask quick reference

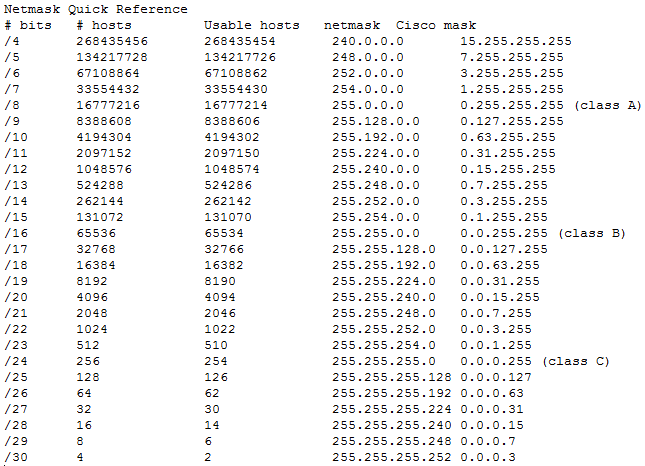
A quick and convenient reference for netmask values.

netmasks

Did you like this?
Tip cyberfella with Cryptocurrency

Donate Bitcoin to cyberfella

Scan to Donate Bitcoin to cyberfella
Scan the QR code or copy the address below into your wallet to send some bitcoin:

Donate Bitcoin Cash to cyberfella

Scan to Donate Bitcoin Cash to cyberfella
Scan the QR code or copy the address below into your wallet to send bitcoin:

Donate Ethereum to cyberfella

Scan to Donate Ethereum to cyberfella
Scan the QR code or copy the address below into your wallet to send some Ether:

Donate Litecoin to cyberfella

Scan to Donate Litecoin to cyberfella
Scan the QR code or copy the address below into your wallet to send some Litecoin:

Donate Monero to cyberfella

Scan to Donate Monero to cyberfella
Scan the QR code or copy the address below into your wallet to send some Monero:

Donate ZCash to cyberfella

Scan to Donate ZCash to cyberfella
Scan the QR code or copy the address below into your wallet to send some ZCash:

Passwordless authentication to remote systems

Sometimes, you’ll be faced with writing a script that goes off, collects some information from a remote system, and copies that information to another remote system for off-site storage.  Such an example would be the configuration information of remote unix systems, a backup server or the configuration of a san/nas storage device on your network.

In order to run this job as an automated task, you need to be able to connect securely to the remote systems before copying configuration data over the network, but don’t want to have to enter passwords manually, and shouldn’t include passwords in your scripts either (for security reasons), so how do you do it?

You can use ssh keys to do it.

ssh keys are a pair of keys that can be generated for any given user account (called public key and private key), and the private key is then securely copied to the remote system, so that when a connection attempt is made to that remote system by the user offering their public key, the two keys are put together on the remote system to form a successful means of authenticating to that remote system, just like a normal password, but it’s all done by the systems with no interaction required by the user.

If that sounded complicated, it wasn’t meant to.  And it isn’t.  In summary, setting this passwordless authentication mechanism up goes like this…

1. Generate keys for my user using ssh-keygen

2. Copy the keys to the remote system using ssh-copy-id

3. ssh to the remote system to test.  Voila!

A real-world working example of copying the contents of someuser‘s ~/.ssh/id-rsa.pub public key to a remote nas device’s /home/someuser/.ssh/authorized-keys file is shown below with the input required from the sysadmin shown in bold.

myuser@myserver.cyberfella.co.uk 5$ su – someuser
Password:
[someuser@myserver ~]$ pwd
/local/home/someuser
[someuser@myserver ~]$ ssh-keygen
Generating public/private rsa key pair.
Enter file in which to save the key (/local/home/someuser/.ssh/id_rsa):
Created directory ‘/local/home/someuser/.ssh’.
Enter passphrase (empty for no passphrase):
Enter same passphrase again:
Your identification has been saved in /local/home/someuser/.ssh/id_rsa.
Your public key has been saved in /local/home/someuser/.ssh/id_rsa.pub.
The key fingerprint is:
d2:4b:53:80:4e:17:32:b1:1b:d3:d3:5c:9c:41:6a:94 someuser@myserver.cyberfella.co.uk
[someuser@myserver ~]$ cd .ssh
[someuser@myserver ~/.ssh]$ ls
id_rsa  id_rsa.pub
[someuser@myserver ~/.ssh]$ ssh-copy-id -i ~/.ssh/id_rsa.pub mynas
36
Warning: Permanently added ‘mynas,192.168.0.69’ (RSA) to the list of known hosts.
A customized version of the Linux operating system is used on the
EMC(R) VNX(TM) Control Station.  The operating system is
copyrighted and licensed pursuant to the GNU General Public License
(“GPL”), a copy of which can be found in the accompanying
documentation.  Please read the GPL carefully, because by using the
Linux operating system on the EMC Celerra you agree to the terms
and conditions listed therein.

EXCEPT FOR ANY WARRANTIES WHICH MAY BE PROVIDED UNDER THE TERMS AND
CONDITIONS OF THE APPLICABLE WRITTEN AGREEMENTS BETWEEN YOU AND EMC,
THE SOFTWARE PROGRAMS ARE PROVIDED AND LICENSED “AS IS” WITHOUT
WARRANTY OF ANY KIND, EITHER EXPRESSED OR IMPLIED, INCLUDING, BUT
NOT LIMITED TO, THE IMPLIED MERCHANTABILITY AND FITNESS FOR A
PARTICULAR PURPOSE.  In no event will EMC Corporation be liable to
you or any other person or entity for (a) incidental, indirect,
special, exemplary or consequential damages or (b) any damages
whatsoever resulting from the loss of use, data or profits,
arising out of or in connection with the agreements between you
and EMC, the GPL, or your use of this software, even if advised
of the possibility of such damages.

EMC, VNX, Celerra, and CLARiiON are registered trademarks or trademarks of
EMC Corporation in the United States and/or other countries. All
other trademarks used herein are the property of their respective
owners.

EMC VNX Control Station Linux release 3.0 (NAS 7.0.53)
someuser@mynas’s password:
Warning: No xauth data; using fake authentication data for X11 forwarding.
Now try logging into the machine, with “ssh ‘mynas'”, and check in:

.ssh/authorized_keys

to make sure we haven’t added extra keys that you weren’t expecting.

[someuser@myserver ~/.ssh]$

myserver.cyberfella.co.uk 102# cd /etc
myserver.cyberfella.co.uk 103# vi cron.allow
myserver.cyberfella.co.uk 104# su – someuser
[someuser@myserver ~]$ crontab -e
no crontab for someuser – using an empty one

crontab: installing new crontab
[someuser@myserver ~]$ crontab -l
45 23 * * * /local/home/someuser/myscript.sh >/dev/null 2>&1
[someuser@myserver ~]$


Example commands in myscript.sh that work due to the passwordless authentication mechanism being in place are…

Backup myNAS information…

/usr/bin/scp -p -o ConnectTimeout=300 someuser@mynas:/celerra/backup/nasdb_backup.1.tar.gz /home/someuser/nasdb_backup.1.tar.gz

/usr/bin/ssh -q someuser@mynas “export NAS_DB=/nas;/nas/bin/server_mount mydatamover ” | grep rw | grep -v “^root_fs_” >> ~/mynas_db_backup

/usr/bin/ssh -q someuser@mynas “export NAS_DB=/nas;/nas/bin/server_export  ALL ” >> ~/mynas_db_backup

/usr/bin/ssh -q someuser@mynas “export NAS_DB=/nas;/nas/bin/nas_replicate -list ” >> ~/mynas_db_backup

Backup myNAS Network Information…

/usr/bin/ssh -q someuser@mynas “export NAS_DB=/nas;/nas/bin/server_ifconfig server_2 -all ” >> ~/mynas_db_backup

Backup myNAS Quota information…

/usr/bin/ssh -q someuser@mynas “export NAS_DB=/nas;/nas/bin/nas_quotas -list -mover mydatamover” >> ~/mynas_db_backup

/usr/bin/ssh -q someuser@mynas “export NAS_DB=/nas;/nas/bin/nas_quotas -report -mover mydatamover” >> ~/mynas_db_backup

/usr/bin/ssh -q someuser@mynas “export NAS_DB=/nas;/nas/bin/server_df ALL | grep -iv CKPT” >> ~/mynas_db_backup


Adding SSH Key to Cisco MDS Switch

If you have a script that goes off to a Cisco MDS switch, retreives some information and writes it back to a server, then you’d need to copy the ssh key to the switch, just like you would to a remote unix server for the purpose of passwordless authentication during the initial ssh connection.  Adding a public key to a cisco switch is done like this…

config t

username admin sshkey ssh-rsa <contents of id-rsa.pub here>

It’ll tell you if the key has been added successfully or not.

Deleting a SSH Key from Cisco MDS Switch

To subsequently remove an ssh public key from the switch, use…

no username admin sshkey ssh-rsa <contents of id-rsa.pub here>


Troubleshooting SSH connections

You may find yourself having issues with connecting as root or any other user for that matter.  Despite having created and copied you public keys to the remote systems, you’re still being prompted for passphrases or passwords for the user, defeating the whole point of setting up passwordless authentication.

Here’s a quick checklist of things to look out for and ways to troubleshoot the connection.

service stop sshd && /usr/sbin/sshd -d  (restart sshd in debug mode on the remote machine)

ssh -vv <remote-host> (connect to the remote host using ssh in verbose mode)

Before Googling the errors, make sure you can confirm the following:

When you generated the public keys using ssh-keygen you left the passphrase blank.

When you copied the keys over to the remote machine using ssh-copy-id you used the full path to the id_rsa.pub file.  If you’re root, it’s quite probable you copied another users ssh keys over instead of your own!

The .ssh directory in the users home directory has 700 permissions and the authorized-keys file has 600 permissions.

Did you like this?
Tip cyberfella with Cryptocurrency

Donate Bitcoin to cyberfella

Scan to Donate Bitcoin to cyberfella
Scan the QR code or copy the address below into your wallet to send some bitcoin:

Donate Bitcoin Cash to cyberfella

Scan to Donate Bitcoin Cash to cyberfella
Scan the QR code or copy the address below into your wallet to send bitcoin:

Donate Ethereum to cyberfella

Scan to Donate Ethereum to cyberfella
Scan the QR code or copy the address below into your wallet to send some Ether:

Donate Litecoin to cyberfella

Scan to Donate Litecoin to cyberfella
Scan the QR code or copy the address below into your wallet to send some Litecoin:

Donate Monero to cyberfella

Scan to Donate Monero to cyberfella
Scan the QR code or copy the address below into your wallet to send some Monero:

Donate ZCash to cyberfella

Scan to Donate ZCash to cyberfella
Scan the QR code or copy the address below into your wallet to send some ZCash:

Manipulating Files in Linux

RHCE 2: Manipulating files in Linux.  The following blog post is a concise summary of how one can interact with files on a Linux system.  In fact the information contained herein applies to all Linux and UNIX.  By my own admission, if you learn everything contained in this one post of the many posts on my blog, you’ll be well on your way when it comes to turning your hand to any UNIX or Linux system.  Basic but essential knowledge.

Creating a file

“Everything is a file”.  You’ll hear that said about UNIX and/or Linux.  Unlike Windows, there is no registry, just the filesystem.  As such, everything is represented by a file somewhere in the filesystem.  More on the different types of file later.

cat, touch, vi, vim, nano, tee and > (after a command) are all used to create files.    tee is special since when you pipe a command into tee, it will write standard input to standard output as well as displaying the results on screen (using > would hide output to the screen as it redirects it to a file instead).

Listing files

ls, ll, ll -i (displays inode of the file) commands are used with many possible switches to display directory listings.  e.g. ls -al (long listing showing permissions, including hidden files)  ls -lart (same but sorted in reverse date order too) are common uses of the ls command.

Display contents of a file

cat, more, less, head, tail, view, vi, vim, nano, uniq and strings are all commands used to display files in similar but slightly different ways, i.e. in their entirety, a page at a time, the top lines, the bottom lines, in an editor, just unique lines of the file and just ascii text (not binary information) contained within a file.

Copy or Rename a file

cp, rsync, tar, cpio, mv   -can all be used to copy files, move files or rename files.  In Linux, you don’t rename a file, you move it.

Remove a file

rm, erase, rmdir (if it’s a directory, though rm -r will recurse through the tree removing subdirectories as well as files contained beneath the specified starting point.  This is dangerous, especially when used with rm -rf to force it.)

Ownership and Permissions

Like Windows, files have an owning user, they also have an owning group attribute as well as permissions that dictate what level of access the owning user, owning group and everyone else has to the file (or directory).  This is slightly different to Windows, whereby permissions can be set on multiple groups added to the ACL (access control list) of a file (or directory) and takes some getting used to.

To change owner or group use the chown and chgrp commands, or just the chown user:group command to do both in one go.

To change the permissions, use the chmod command.

-rwxrwxrwx    where – means regular file (more on different file types later), then the first rwx is read, write, execute permissions of the owner, the second rwx is the same for the group and the third rwx is everyone else.  Each permission bit has a value

– 421 421 421

So to set permissions of owner full access, group read, everyone read i.e. rwxr–r– would be 4+2+1, 4, 4 i.e. 744 so chmod 744 filenameFull access for everyone would be chmod 777 filename.

Types of file

Regular   (ascii or binary)

Executable   (allowed to execute)

Directory   (contains one or more files)

Symlink   (hard or soft link to another file – hard has it’s own inode but is still linked, soft shares the inode of the linked file.  ln -s realfile linkfile is a common use.  It’s common to get the order the wrong way around.)

Device   (character/raw or block special files are used to send streams of data to kernel modules which controls the sending of the data stream to hardware, e.g. a volume group has a character special file, a disk device has a block special file)

Named Pipe (fifo – first in first out used to send one-way streams of data to other processes (inter-process communication or IPC).

Socket    -a two-way named pipe.  Used for system services for example, whereby information is received and transmitted.

File attributes

Besides permissions that control access to a file, files on a Linux system can also have attributes applied to them that controls what can and can’t be done to the file – even by the root user.

stat   -Display statistics about a file.

wc    -Word count a file (can also be used with wc -l to count lines in a file, or wc -c to count characters)

lsattr    -List attributes of a file.

chattr     -Change attributes of a file.

a   -Can only be appended to

A   -Access time not updated

c    -Auto compress

d    -cannot be backed up by the dump command

D   -contents of the directory are written synchronously to disk

i    -is immutable (cannot be changed or deleted)

j    -is added to the journal before being written to disk on journalling file systems

s    -is securely deleted, i.e. actual data blocks are wiped too

S   -file is synchronously written to disk

u   -undeletable

Pattern matching

The famous grep command is used to simply match lines of text contained in a file, or more cleverly lines containing patterns of text (defined by regular expressions) in a file or files.  More on Regular Expressions will be covered later.

grep -l pattern file1 file2 file3   -finds lines containing pattern in files file1, file2 and file3

grep -n pattern file1    -find the pattern and displays the line numbers where the matches occur.

grep -v     -anything but the pattern matches

grep ^pattern   or    grep pattern$  matches the patterns when they occur at the beginning or the end of the line only.

grep -i   ignores case (because Linux is case sensitive of course)

egrep or grep -E ‘pattern1|pattern2’ file1    -displays either pattern matched

Comparing files

diff, comm and grep are used to compare two files and print matching lines and differing lines, e.g. diff -c file1 file2   displays the output in 3 sections.   comm 123 file1 file2 very similar to diff -c whereby section 1, 2 and/or 3 are suppressed instead of displayed.  Section 1 contains lines unique to file1, section2 contains lines unique to file2 and section3 contains lines in both.  Use of comm takes some getting used to, so read the man page to be sure you’re getting the results you’re after and not something else, or just use diff -c.  comm is very cool tool though, and I find myself using it more than diff.  A new favourite is grep -Fxv -f decommissioned backupclients which would list any lines in a list of backupclients that were not found in the decommissioned list.

Finding files

The find command in UNIX/Linux is fantastic, but like Linux itself, it has a reputation for having a steep learning curve.  I’ll try to make it easy by keeping this short and sweet.

find path option action   where option and action have values and commands specifed respectively, i.e. find path option value action command

e.g. find ./ -size -1G -exec ls -al {} \;     find     ./      -size -1G      -exec ls -al {} \;   will find files from the present working directory down that are less than 1Gb and will long list any matches

other options are

-name     match names (can also use regular expressions like grep)

-atime     last accessed time

-user       owning user is

-mtime    last modified time

-ctime     change time

-group     owning group

-perm     permissions are e.g. 744

-inum     inode number is

-exec can be replaced with -ok or -print to keep the command simpler for simpler finding requirements.  -exec can execute any command upon the files found that match the specified matched conditions, e.g. ls, cp, mv or rm (very dangerous).

the locate command can also be used to find files.  for executable binary commands, it might be quicker to use which or whereis to display the path of the binary that would be executed if the full path was not specified (relying upon the PATH environment variable to locate and prioritise.  Also check for any command aliases in your ~/.profile and ~/.bashrc if whereis or which turns nothing up as a command alias by one name may be calling a binary by another name.  I begin to digress!

Sorting files

sort

sort -k2 -n    -sort on column 2, numerically (useful if the file contains columns of data).  Can also be used to sort by month, e.g. ls -al | sort -k 6M  and use -o outputfile to write results to a file rather than > or >>

Extracting data from a file

cut and awk can be used to extract delimited lines of data from a file or columns of data from a file respectively, e.g.

cat filename | cut -d, -f3 filename     -displays the third key in a comma delimited file

cat filename | awk {‘print $3’}    -displays the third column in a file

Translating data in a file

sed and tr are stream editors for filtering and transforming text and translating or deleting characters respectively.  many great examples of sed are to be found on the internet.

a simple example of sed would be echo day | sed s/day/night/ to convert all occurrences of the word day into night.

a similar, simple example of tr would be tr “day” “night” < input.txt > output.txt


Did you like this?
Tip cyberfella with Cryptocurrency

Donate Bitcoin to cyberfella

Scan to Donate Bitcoin to cyberfella
Scan the QR code or copy the address below into your wallet to send some bitcoin:

Donate Bitcoin Cash to cyberfella

Scan to Donate Bitcoin Cash to cyberfella
Scan the QR code or copy the address below into your wallet to send bitcoin:

Donate Ethereum to cyberfella

Scan to Donate Ethereum to cyberfella
Scan the QR code or copy the address below into your wallet to send some Ether:

Donate Litecoin to cyberfella

Scan to Donate Litecoin to cyberfella
Scan the QR code or copy the address below into your wallet to send some Litecoin:

Donate Monero to cyberfella

Scan to Donate Monero to cyberfella
Scan the QR code or copy the address below into your wallet to send some Monero:

Donate ZCash to cyberfella

Scan to Donate ZCash to cyberfella
Scan the QR code or copy the address below into your wallet to send some ZCash:

Linux Essentials

RHCE 1:  Linux Essentials.  The following are the basic commands every newcomer to Linux should understand before building their repertoire on the way to becoming a Linux systems admin.

This post is logically the first in a series of posts to come, walking right around Linux, focussing on RedHat Enterprise Linux.

Connecting to a remote Linux System

telnet, ssh, rlogin

Listing the contents of a filesystem

ls -a     Show hidden files also

ls -F     Show file types i.e. / is a directory, * is a binary and @ is a symbolic link

ls -lh     Show a long listing (contains permissions etc in a human friendly format)

ls -ld     Show a long listing of directorys only (ignore files)

ls -R     Show listing, recursing into subdirectories (large output can be expected)

ls -t     Sort listing with newest first

ls -tr     Sort listing with oldest first (reverse)

List users on the system

w     The what command.  Displays detailed user info like a combination of who and top for the specified user account

who     Display logged in users

who am i     Display info about your logged in user account who executed the command

whoami     Display your username

logname     Show the real username of logged in user (e.g. is su or sudo to another user account)

tty     Display pseudo terminal that you’re logged into e.g /dev/pts/1

id     Display UID for your user account (and gid)

groups     Display groups your user account is a member of

Display information about the system

uname     Display information about the operating system

-a -s -n -r -v -m -p -i -o

hostname     Display hostname of the system (also used to set hostname)

date     Displays time and date

/sbin/hwclock     Display and set hardware clock

cal     Display month calendar

uptime     Display current time elapsed since initial booting, number of users logged in and load averages

top     Display top running processes, Shift + M to sort my memory instead of CPU

Display information about commands

which     Display the absolute path to the specified binary executed, e.g. which cat gives /bin/cat

whereis     Display location of binary and location of man pages for specified binary

man     Display manual page for specified command

man 1     Display user commands section of man page for specified command

man 4     Display special files section of man page for specified command

man 5    Display system configuration files section of man page for a given command

man -k or apropos     Displays man pages sections pertinent to specified search keyword

passwd –help or passwd -?     Displays quick help for passwd command or other command

whatis  or man -f   Displays description for config file or binary, e.g. whatis yum.conf gives Config file for yum package mgmt system


Did you like this?
Tip cyberfella with Cryptocurrency

Donate Bitcoin to cyberfella

Scan to Donate Bitcoin to cyberfella
Scan the QR code or copy the address below into your wallet to send some bitcoin:

Donate Bitcoin Cash to cyberfella

Scan to Donate Bitcoin Cash to cyberfella
Scan the QR code or copy the address below into your wallet to send bitcoin:

Donate Ethereum to cyberfella

Scan to Donate Ethereum to cyberfella
Scan the QR code or copy the address below into your wallet to send some Ether:

Donate Litecoin to cyberfella

Scan to Donate Litecoin to cyberfella
Scan the QR code or copy the address below into your wallet to send some Litecoin:

Donate Monero to cyberfella

Scan to Donate Monero to cyberfella
Scan the QR code or copy the address below into your wallet to send some Monero:

Donate ZCash to cyberfella

Scan to Donate ZCash to cyberfella
Scan the QR code or copy the address below into your wallet to send some ZCash: