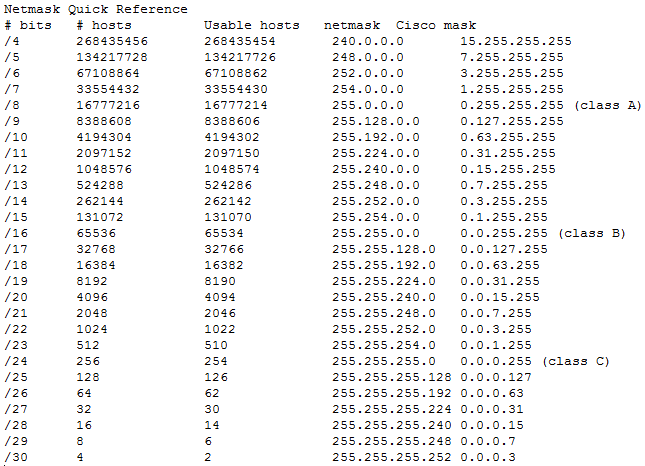
Subnet mask quick reference

A quick and convenient reference for netmask values.

netmasks

Did you like this?
Tip cyberfella with Cryptocurrency

Donate Bitcoin to cyberfella

Scan to Donate Bitcoin to cyberfella
Scan the QR code or copy the address below into your wallet to send some bitcoin:

Donate Bitcoin Cash to cyberfella

Scan to Donate Bitcoin Cash to cyberfella
Scan the QR code or copy the address below into your wallet to send bitcoin:

Donate Ethereum to cyberfella

Scan to Donate Ethereum to cyberfella
Scan the QR code or copy the address below into your wallet to send some Ether:

Donate Litecoin to cyberfella

Scan to Donate Litecoin to cyberfella
Scan the QR code or copy the address below into your wallet to send some Litecoin:

Donate Monero to cyberfella

Scan to Donate Monero to cyberfella
Scan the QR code or copy the address below into your wallet to send some Monero:

Donate ZCash to cyberfella

Scan to Donate ZCash to cyberfella
Scan the QR code or copy the address below into your wallet to send some ZCash:

Passwordless authentication to remote systems

Sometimes, you’ll be faced with writing a script that goes off, collects some information from a remote system, and copies that information to another remote system for off-site storage.  Such an example would be the configuration information of remote unix systems, a backup server or the configuration of a san/nas storage device on your network.

In order to run this job as an automated task, you need to be able to connect securely to the remote systems before copying configuration data over the network, but don’t want to have to enter passwords manually, and shouldn’t include passwords in your scripts either (for security reasons), so how do you do it?

You can use ssh keys to do it.

ssh keys are a pair of keys that can be generated for any given user account (called public key and private key), and the private key is then securely copied to the remote system, so that when a connection attempt is made to that remote system by the user offering their public key, the two keys are put together on the remote system to form a successful means of authenticating to that remote system, just like a normal password, but it’s all done by the systems with no interaction required by the user.

If that sounded complicated, it wasn’t meant to.  And it isn’t.  In summary, setting this passwordless authentication mechanism up goes like this…

1. Generate keys for my user using ssh-keygen

2. Copy the keys to the remote system using ssh-copy-id

3. ssh to the remote system to test.  Voila!

A real-world working example of copying the contents of someuser‘s ~/.ssh/id-rsa.pub public key to a remote nas device’s /home/someuser/.ssh/authorized-keys file is shown below with the input required from the sysadmin shown in bold.

myuser@myserver.cyberfella.co.uk 5$ su – someuser
Password:
[someuser@myserver ~]$ pwd
/local/home/someuser
[someuser@myserver ~]$ ssh-keygen
Generating public/private rsa key pair.
Enter file in which to save the key (/local/home/someuser/.ssh/id_rsa):
Created directory ‘/local/home/someuser/.ssh’.
Enter passphrase (empty for no passphrase):
Enter same passphrase again:
Your identification has been saved in /local/home/someuser/.ssh/id_rsa.
Your public key has been saved in /local/home/someuser/.ssh/id_rsa.pub.
The key fingerprint is:
d2:4b:53:80:4e:17:32:b1:1b:d3:d3:5c:9c:41:6a:94 someuser@myserver.cyberfella.co.uk
[someuser@myserver ~]$ cd .ssh
[someuser@myserver ~/.ssh]$ ls
id_rsa  id_rsa.pub
[someuser@myserver ~/.ssh]$ ssh-copy-id -i ~/.ssh/id_rsa.pub mynas
36
Warning: Permanently added ‘mynas,192.168.0.69’ (RSA) to the list of known hosts.
A customized version of the Linux operating system is used on the
EMC(R) VNX(TM) Control Station.  The operating system is
copyrighted and licensed pursuant to the GNU General Public License
(“GPL”), a copy of which can be found in the accompanying
documentation.  Please read the GPL carefully, because by using the
Linux operating system on the EMC Celerra you agree to the terms
and conditions listed therein.

EXCEPT FOR ANY WARRANTIES WHICH MAY BE PROVIDED UNDER THE TERMS AND
CONDITIONS OF THE APPLICABLE WRITTEN AGREEMENTS BETWEEN YOU AND EMC,
THE SOFTWARE PROGRAMS ARE PROVIDED AND LICENSED “AS IS” WITHOUT
WARRANTY OF ANY KIND, EITHER EXPRESSED OR IMPLIED, INCLUDING, BUT
NOT LIMITED TO, THE IMPLIED MERCHANTABILITY AND FITNESS FOR A
PARTICULAR PURPOSE.  In no event will EMC Corporation be liable to
you or any other person or entity for (a) incidental, indirect,
special, exemplary or consequential damages or (b) any damages
whatsoever resulting from the loss of use, data or profits,
arising out of or in connection with the agreements between you
and EMC, the GPL, or your use of this software, even if advised
of the possibility of such damages.

EMC, VNX, Celerra, and CLARiiON are registered trademarks or trademarks of
EMC Corporation in the United States and/or other countries. All
other trademarks used herein are the property of their respective
owners.

EMC VNX Control Station Linux release 3.0 (NAS 7.0.53)
someuser@mynas’s password:
Warning: No xauth data; using fake authentication data for X11 forwarding.
Now try logging into the machine, with “ssh ‘mynas'”, and check in:

.ssh/authorized_keys

to make sure we haven’t added extra keys that you weren’t expecting.

[someuser@myserver ~/.ssh]$

myserver.cyberfella.co.uk 102# cd /etc
myserver.cyberfella.co.uk 103# vi cron.allow
myserver.cyberfella.co.uk 104# su – someuser
[someuser@myserver ~]$ crontab -e
no crontab for someuser – using an empty one

crontab: installing new crontab
[someuser@myserver ~]$ crontab -l
45 23 * * * /local/home/someuser/myscript.sh >/dev/null 2>&1
[someuser@myserver ~]$


Example commands in myscript.sh that work due to the passwordless authentication mechanism being in place are…

Backup myNAS information…

/usr/bin/scp -p -o ConnectTimeout=300 someuser@mynas:/celerra/backup/nasdb_backup.1.tar.gz /home/someuser/nasdb_backup.1.tar.gz

/usr/bin/ssh -q someuser@mynas “export NAS_DB=/nas;/nas/bin/server_mount mydatamover ” | grep rw | grep -v “^root_fs_” >> ~/mynas_db_backup

/usr/bin/ssh -q someuser@mynas “export NAS_DB=/nas;/nas/bin/server_export  ALL ” >> ~/mynas_db_backup

/usr/bin/ssh -q someuser@mynas “export NAS_DB=/nas;/nas/bin/nas_replicate -list ” >> ~/mynas_db_backup

Backup myNAS Network Information…

/usr/bin/ssh -q someuser@mynas “export NAS_DB=/nas;/nas/bin/server_ifconfig server_2 -all ” >> ~/mynas_db_backup

Backup myNAS Quota information…

/usr/bin/ssh -q someuser@mynas “export NAS_DB=/nas;/nas/bin/nas_quotas -list -mover mydatamover” >> ~/mynas_db_backup

/usr/bin/ssh -q someuser@mynas “export NAS_DB=/nas;/nas/bin/nas_quotas -report -mover mydatamover” >> ~/mynas_db_backup

/usr/bin/ssh -q someuser@mynas “export NAS_DB=/nas;/nas/bin/server_df ALL | grep -iv CKPT” >> ~/mynas_db_backup


Adding SSH Key to Cisco MDS Switch

If you have a script that goes off to a Cisco MDS switch, retreives some information and writes it back to a server, then you’d need to copy the ssh key to the switch, just like you would to a remote unix server for the purpose of passwordless authentication during the initial ssh connection.  Adding a public key to a cisco switch is done like this…

config t

username admin sshkey ssh-rsa <contents of id-rsa.pub here>

It’ll tell you if the key has been added successfully or not.

Deleting a SSH Key from Cisco MDS Switch

To subsequently remove an ssh public key from the switch, use…

no username admin sshkey ssh-rsa <contents of id-rsa.pub here>


Troubleshooting SSH connections

You may find yourself having issues with connecting as root or any other user for that matter.  Despite having created and copied you public keys to the remote systems, you’re still being prompted for passphrases or passwords for the user, defeating the whole point of setting up passwordless authentication.

Here’s a quick checklist of things to look out for and ways to troubleshoot the connection.

service stop sshd && /usr/sbin/sshd -d  (restart sshd in debug mode on the remote machine)

ssh -vv <remote-host> (connect to the remote host using ssh in verbose mode)

Before Googling the errors, make sure you can confirm the following:

When you generated the public keys using ssh-keygen you left the passphrase blank.

When you copied the keys over to the remote machine using ssh-copy-id you used the full path to the id_rsa.pub file.  If you’re root, it’s quite probable you copied another users ssh keys over instead of your own!

The .ssh directory in the users home directory has 700 permissions and the authorized-keys file has 600 permissions.

Did you like this?
Tip cyberfella with Cryptocurrency

Donate Bitcoin to cyberfella

Scan to Donate Bitcoin to cyberfella
Scan the QR code or copy the address below into your wallet to send some bitcoin:

Donate Bitcoin Cash to cyberfella

Scan to Donate Bitcoin Cash to cyberfella
Scan the QR code or copy the address below into your wallet to send bitcoin:

Donate Ethereum to cyberfella

Scan to Donate Ethereum to cyberfella
Scan the QR code or copy the address below into your wallet to send some Ether:

Donate Litecoin to cyberfella

Scan to Donate Litecoin to cyberfella
Scan the QR code or copy the address below into your wallet to send some Litecoin:

Donate Monero to cyberfella

Scan to Donate Monero to cyberfella
Scan the QR code or copy the address below into your wallet to send some Monero:

Donate ZCash to cyberfella

Scan to Donate ZCash to cyberfella
Scan the QR code or copy the address below into your wallet to send some ZCash:

Solaris, nohup and bash

There’s a nasty little surprise in store for anyone running a script using nohup in bash (Bourne Again Shell) on Solaris (to prevent hangup signals from killing their script/processes in the event their ssh session gets disconnected).

The Solaris default shell is csh (C Shell) in /bin/sh and even if the script has #!/bin/sh at the top, if its run from bash with nohup, it won’t survive in the event the ssh session is disconnected.  Be warned.

This is because of bash’s built in job control apparently.  I haven’t delved any deeper than that, but i’m guessing the process isn’t immune to sighups so aren’t protected from termination by nohup.

scripts must be executed from within a regular csh shell, i.e.

root@solarisbox ~ $ nohup /full/path/to/myscript.sh &

if they are to survive a disconnected puTTY session.

In summary, if you’re working remotely, and kick off scripts over a remote session that will run for a long time on solaris servers, don’t use bash.

To determine whether your script is still running when you manage to reconnect, use ps -ef | grep myscript.sh

Did you like this?
Tip cyberfella with Cryptocurrency

Donate Bitcoin to cyberfella

Scan to Donate Bitcoin to cyberfella
Scan the QR code or copy the address below into your wallet to send some bitcoin:

Donate Bitcoin Cash to cyberfella

Scan to Donate Bitcoin Cash to cyberfella
Scan the QR code or copy the address below into your wallet to send bitcoin:

Donate Ethereum to cyberfella

Scan to Donate Ethereum to cyberfella
Scan the QR code or copy the address below into your wallet to send some Ether:

Donate Litecoin to cyberfella

Scan to Donate Litecoin to cyberfella
Scan the QR code or copy the address below into your wallet to send some Litecoin:

Donate Monero to cyberfella

Scan to Donate Monero to cyberfella
Scan the QR code or copy the address below into your wallet to send some Monero:

Donate ZCash to cyberfella

Scan to Donate ZCash to cyberfella
Scan the QR code or copy the address below into your wallet to send some ZCash:

Mounting a CDROM on Solaris

If the Volume Manager (vold) is running on your system, the disc is automatically mounted as /cdrom/cd_label if the CD or DVD has a label or /cdrom/unnamed_cdrom if it is unlabeled.

If the Volume Manager is not running on your system, complete the following steps to mount the CD or DVD:

Determine the name of the device by entering the following command:

  ls -al /dev/sr* |awk ‘{print “/” $11}’

This command returns the name of the CD or DVD device. In this example, the command returns the string /dev/dsk/c0t6d0s2.
Enter the following commands to mount the CD or DVD:

mkdir -p /cdrom/unnamed_cdrom
    mount -F hsfs -o ro /dev/dsk/c0t6d0s2 /cdrom/unnamed_cdrom

where /dev/dsk/c0t6d0s2 represents the name of the device that was returned in the preceding step and /cdrom/unnamed_cdrom represents the CD or DVD mount directory.

Did you like this?
Tip cyberfella with Cryptocurrency

Donate Bitcoin to cyberfella

Scan to Donate Bitcoin to cyberfella
Scan the QR code or copy the address below into your wallet to send some bitcoin:

Donate Bitcoin Cash to cyberfella

Scan to Donate Bitcoin Cash to cyberfella
Scan the QR code or copy the address below into your wallet to send bitcoin:

Donate Ethereum to cyberfella

Scan to Donate Ethereum to cyberfella
Scan the QR code or copy the address below into your wallet to send some Ether:

Donate Litecoin to cyberfella

Scan to Donate Litecoin to cyberfella
Scan the QR code or copy the address below into your wallet to send some Litecoin:

Donate Monero to cyberfella

Scan to Donate Monero to cyberfella
Scan the QR code or copy the address below into your wallet to send some Monero:

Donate ZCash to cyberfella

Scan to Donate ZCash to cyberfella
Scan the QR code or copy the address below into your wallet to send some ZCash:

Manipulating Files in Linux

RHCE 2: Manipulating files in Linux.  The following blog post is a concise summary of how one can interact with files on a Linux system.  In fact the information contained herein applies to all Linux and UNIX.  By my own admission, if you learn everything contained in this one post of the many posts on my blog, you’ll be well on your way when it comes to turning your hand to any UNIX or Linux system.  Basic but essential knowledge.

Creating a file

“Everything is a file”.  You’ll hear that said about UNIX and/or Linux.  Unlike Windows, there is no registry, just the filesystem.  As such, everything is represented by a file somewhere in the filesystem.  More on the different types of file later.

cat, touch, vi, vim, nano, tee and > (after a command) are all used to create files.    tee is special since when you pipe a command into tee, it will write standard input to standard output as well as displaying the results on screen (using > would hide output to the screen as it redirects it to a file instead).

Listing files

ls, ll, ll -i (displays inode of the file) commands are used with many possible switches to display directory listings.  e.g. ls -al (long listing showing permissions, including hidden files)  ls -lart (same but sorted in reverse date order too) are common uses of the ls command.

Display contents of a file

cat, more, less, head, tail, view, vi, vim, nano, uniq and strings are all commands used to display files in similar but slightly different ways, i.e. in their entirety, a page at a time, the top lines, the bottom lines, in an editor, just unique lines of the file and just ascii text (not binary information) contained within a file.

Copy or Rename a file

cp, rsync, tar, cpio, mv   -can all be used to copy files, move files or rename files.  In Linux, you don’t rename a file, you move it.

Remove a file

rm, erase, rmdir (if it’s a directory, though rm -r will recurse through the tree removing subdirectories as well as files contained beneath the specified starting point.  This is dangerous, especially when used with rm -rf to force it.)

Ownership and Permissions

Like Windows, files have an owning user, they also have an owning group attribute as well as permissions that dictate what level of access the owning user, owning group and everyone else has to the file (or directory).  This is slightly different to Windows, whereby permissions can be set on multiple groups added to the ACL (access control list) of a file (or directory) and takes some getting used to.

To change owner or group use the chown and chgrp commands, or just the chown user:group command to do both in one go.

To change the permissions, use the chmod command.

-rwxrwxrwx    where – means regular file (more on different file types later), then the first rwx is read, write, execute permissions of the owner, the second rwx is the same for the group and the third rwx is everyone else.  Each permission bit has a value

– 421 421 421

So to set permissions of owner full access, group read, everyone read i.e. rwxr–r– would be 4+2+1, 4, 4 i.e. 744 so chmod 744 filenameFull access for everyone would be chmod 777 filename.

Types of file

Regular   (ascii or binary)

Executable   (allowed to execute)

Directory   (contains one or more files)

Symlink   (hard or soft link to another file – hard has it’s own inode but is still linked, soft shares the inode of the linked file.  ln -s realfile linkfile is a common use.  It’s common to get the order the wrong way around.)

Device   (character/raw or block special files are used to send streams of data to kernel modules which controls the sending of the data stream to hardware, e.g. a volume group has a character special file, a disk device has a block special file)

Named Pipe (fifo – first in first out used to send one-way streams of data to other processes (inter-process communication or IPC).

Socket    -a two-way named pipe.  Used for system services for example, whereby information is received and transmitted.

File attributes

Besides permissions that control access to a file, files on a Linux system can also have attributes applied to them that controls what can and can’t be done to the file – even by the root user.

stat   -Display statistics about a file.

wc    -Word count a file (can also be used with wc -l to count lines in a file, or wc -c to count characters)

lsattr    -List attributes of a file.

chattr     -Change attributes of a file.

a   -Can only be appended to

A   -Access time not updated

c    -Auto compress

d    -cannot be backed up by the dump command

D   -contents of the directory are written synchronously to disk

i    -is immutable (cannot be changed or deleted)

j    -is added to the journal before being written to disk on journalling file systems

s    -is securely deleted, i.e. actual data blocks are wiped too

S   -file is synchronously written to disk

u   -undeletable

Pattern matching

The famous grep command is used to simply match lines of text contained in a file, or more cleverly lines containing patterns of text (defined by regular expressions) in a file or files.  More on Regular Expressions will be covered later.

grep -l pattern file1 file2 file3   -finds lines containing pattern in files file1, file2 and file3

grep -n pattern file1    -find the pattern and displays the line numbers where the matches occur.

grep -v     -anything but the pattern matches

grep ^pattern   or    grep pattern$  matches the patterns when they occur at the beginning or the end of the line only.

grep -i   ignores case (because Linux is case sensitive of course)

egrep or grep -E ‘pattern1|pattern2’ file1    -displays either pattern matched

Comparing files

diff, comm and grep are used to compare two files and print matching lines and differing lines, e.g. diff -c file1 file2   displays the output in 3 sections.   comm 123 file1 file2 very similar to diff -c whereby section 1, 2 and/or 3 are suppressed instead of displayed.  Section 1 contains lines unique to file1, section2 contains lines unique to file2 and section3 contains lines in both.  Use of comm takes some getting used to, so read the man page to be sure you’re getting the results you’re after and not something else, or just use diff -c.  comm is very cool tool though, and I find myself using it more than diff.  A new favourite is grep -Fxv -f decommissioned backupclients which would list any lines in a list of backupclients that were not found in the decommissioned list.

Finding files

The find command in UNIX/Linux is fantastic, but like Linux itself, it has a reputation for having a steep learning curve.  I’ll try to make it easy by keeping this short and sweet.

find path option action   where option and action have values and commands specifed respectively, i.e. find path option value action command

e.g. find ./ -size -1G -exec ls -al {} \;     find     ./      -size -1G      -exec ls -al {} \;   will find files from the present working directory down that are less than 1Gb and will long list any matches

other options are

-name     match names (can also use regular expressions like grep)

-atime     last accessed time

-user       owning user is

-mtime    last modified time

-ctime     change time

-group     owning group

-perm     permissions are e.g. 744

-inum     inode number is

-exec can be replaced with -ok or -print to keep the command simpler for simpler finding requirements.  -exec can execute any command upon the files found that match the specified matched conditions, e.g. ls, cp, mv or rm (very dangerous).

the locate command can also be used to find files.  for executable binary commands, it might be quicker to use which or whereis to display the path of the binary that would be executed if the full path was not specified (relying upon the PATH environment variable to locate and prioritise.  Also check for any command aliases in your ~/.profile and ~/.bashrc if whereis or which turns nothing up as a command alias by one name may be calling a binary by another name.  I begin to digress!

Sorting files

sort

sort -k2 -n    -sort on column 2, numerically (useful if the file contains columns of data).  Can also be used to sort by month, e.g. ls -al | sort -k 6M  and use -o outputfile to write results to a file rather than > or >>

Extracting data from a file

cut and awk can be used to extract delimited lines of data from a file or columns of data from a file respectively, e.g.

cat filename | cut -d, -f3 filename     -displays the third key in a comma delimited file

cat filename | awk {‘print $3’}    -displays the third column in a file

Translating data in a file

sed and tr are stream editors for filtering and transforming text and translating or deleting characters respectively.  many great examples of sed are to be found on the internet.

a simple example of sed would be echo day | sed s/day/night/ to convert all occurrences of the word day into night.

a similar, simple example of tr would be tr “day” “night” < input.txt > output.txt


Did you like this?
Tip cyberfella with Cryptocurrency

Donate Bitcoin to cyberfella

Scan to Donate Bitcoin to cyberfella
Scan the QR code or copy the address below into your wallet to send some bitcoin:

Donate Bitcoin Cash to cyberfella

Scan to Donate Bitcoin Cash to cyberfella
Scan the QR code or copy the address below into your wallet to send bitcoin:

Donate Ethereum to cyberfella

Scan to Donate Ethereum to cyberfella
Scan the QR code or copy the address below into your wallet to send some Ether:

Donate Litecoin to cyberfella

Scan to Donate Litecoin to cyberfella
Scan the QR code or copy the address below into your wallet to send some Litecoin:

Donate Monero to cyberfella

Scan to Donate Monero to cyberfella
Scan the QR code or copy the address below into your wallet to send some Monero:

Donate ZCash to cyberfella

Scan to Donate ZCash to cyberfella
Scan the QR code or copy the address below into your wallet to send some ZCash:

Linux Essentials

RHCE 1:  Linux Essentials.  The following are the basic commands every newcomer to Linux should understand before building their repertoire on the way to becoming a Linux systems admin.

This post is logically the first in a series of posts to come, walking right around Linux, focussing on RedHat Enterprise Linux.

Connecting to a remote Linux System

telnet, ssh, rlogin

Listing the contents of a filesystem

ls -a     Show hidden files also

ls -F     Show file types i.e. / is a directory, * is a binary and @ is a symbolic link

ls -lh     Show a long listing (contains permissions etc in a human friendly format)

ls -ld     Show a long listing of directorys only (ignore files)

ls -R     Show listing, recursing into subdirectories (large output can be expected)

ls -t     Sort listing with newest first

ls -tr     Sort listing with oldest first (reverse)

List users on the system

w     The what command.  Displays detailed user info like a combination of who and top for the specified user account

who     Display logged in users

who am i     Display info about your logged in user account who executed the command

whoami     Display your username

logname     Show the real username of logged in user (e.g. is su or sudo to another user account)

tty     Display pseudo terminal that you’re logged into e.g /dev/pts/1

id     Display UID for your user account (and gid)

groups     Display groups your user account is a member of

Display information about the system

uname     Display information about the operating system

-a -s -n -r -v -m -p -i -o

hostname     Display hostname of the system (also used to set hostname)

date     Displays time and date

/sbin/hwclock     Display and set hardware clock

cal     Display month calendar

uptime     Display current time elapsed since initial booting, number of users logged in and load averages

top     Display top running processes, Shift + M to sort my memory instead of CPU

Display information about commands

which     Display the absolute path to the specified binary executed, e.g. which cat gives /bin/cat

whereis     Display location of binary and location of man pages for specified binary

man     Display manual page for specified command

man 1     Display user commands section of man page for specified command

man 4     Display special files section of man page for specified command

man 5    Display system configuration files section of man page for a given command

man -k or apropos     Displays man pages sections pertinent to specified search keyword

passwd –help or passwd -?     Displays quick help for passwd command or other command

whatis  or man -f   Displays description for config file or binary, e.g. whatis yum.conf gives Config file for yum package mgmt system


Did you like this?
Tip cyberfella with Cryptocurrency

Donate Bitcoin to cyberfella

Scan to Donate Bitcoin to cyberfella
Scan the QR code or copy the address below into your wallet to send some bitcoin:

Donate Bitcoin Cash to cyberfella

Scan to Donate Bitcoin Cash to cyberfella
Scan the QR code or copy the address below into your wallet to send bitcoin:

Donate Ethereum to cyberfella

Scan to Donate Ethereum to cyberfella
Scan the QR code or copy the address below into your wallet to send some Ether:

Donate Litecoin to cyberfella

Scan to Donate Litecoin to cyberfella
Scan the QR code or copy the address below into your wallet to send some Litecoin:

Donate Monero to cyberfella

Scan to Donate Monero to cyberfella
Scan the QR code or copy the address below into your wallet to send some Monero:

Donate ZCash to cyberfella

Scan to Donate ZCash to cyberfella
Scan the QR code or copy the address below into your wallet to send some ZCash:

DataDomain Deduplication

Every year there’s a technology that really stands out and impresses me more than any other.  This year, that technology is Data Domain.  In short it’s like a NAS device, but performs de-duplication of common segments of incoming data in real time, massively reducing how many truly unique blocks of data are ultimately written down to the disks.

When used in conjunction with Networker backup solution, the overhead of de-duplicating all the incoming backup data is offloaded to…

Data Domain can also be used as a virtual tape library more on this in my Networker Cheatsheet here http://www.cyberfella.co.uk/2012/08/28/emc-networker/

…a process DDBoost running on the Networker Storage Node receiving the data from the client over the network prior to forwarding on the partially de-duplicated data stream to the DataDomain device.  DDBoost on the storage node performs the first 3 of the 5 stages of de-duplication, with the final 2 stages performed in real-time (as mentioned above) on the DataDomain device itself.

The overhead of all this de-duplication turns out to be insignificant too as it is ultimately less than the overhead of backing up all the data being received from the client in the first place.  Indexing of the backup data occurs at the Networker Backup and Recover Server, usually a separate server to the Storage Node which is blissfully unaware of the fact that the data passing through the storage node on it’s way to the “volume” is being de-duplicated.

You may think that all this makes for fast backups but will make for slow recoveries when the de-duplicated data has to be reconstituted, but in tests, recoveries are very fast, possibly due to the reduced number of seek times reading from the hard disks?.  It’s damn impressive anyhow.  Here’s a real example of just how impressive over 120 days of backing up many Terabytes of data daily…

Yes, you read it right.  It makes for a huge 96.9% reduction in the data ultimately being written to disk as it turns 43Tb of data into just 1Tb on disk.  Like I said, that’s impressive, and should make you realise how expensive and inefficient it is to carry on storing many copies of the same / static data on your expensive SANs as you can use a DataDomain for NFS and CIFS shares too.

Did you like this?
Tip cyberfella with Cryptocurrency

Donate Bitcoin to cyberfella

Scan to Donate Bitcoin to cyberfella
Scan the QR code or copy the address below into your wallet to send some bitcoin:

Donate Bitcoin Cash to cyberfella

Scan to Donate Bitcoin Cash to cyberfella
Scan the QR code or copy the address below into your wallet to send bitcoin:

Donate Ethereum to cyberfella

Scan to Donate Ethereum to cyberfella
Scan the QR code or copy the address below into your wallet to send some Ether:

Donate Litecoin to cyberfella

Scan to Donate Litecoin to cyberfella
Scan the QR code or copy the address below into your wallet to send some Litecoin:

Donate Monero to cyberfella

Scan to Donate Monero to cyberfella
Scan the QR code or copy the address below into your wallet to send some Monero:

Donate ZCash to cyberfella

Scan to Donate ZCash to cyberfella
Scan the QR code or copy the address below into your wallet to send some ZCash:

Default gateways on UNIX/Linux

“UNIX is UNIX isn’t it?”  How many times have I heard that said?  Well, no it isn’t actually, as most vendors have their own ways of configuring things like networking on their now highly evolved individual flavours of UNIX.  Even Linux differs between distro.

Here’s a quick reference to where the  default gateway is set.  Don’t forget to restart networking.  For more advanced routing, configure static routes (link at bottom of post).

AIX

smitty mktcpip

HPUX

set_parms addl_network

Solaris

Edit the /etc/defaultrouter file

Red Hat Linux

Edit the /etc/sysconfig/network file

Add line GATEWAY=192.168.0.1

Debian/Ubuntu

Edit the /etc/network/interfaces file

Add line gateway 192.168.0.1

Restart Networking

You’ll need to restart networking to make these changes take effect.  This can generally be achieved with the

AIX: Performed within smitty mktcpip

HPUX: /etc/init.d/net restart

Solaris: svcadm restart physical

RedHat: /etc/init.d/network restart or service network restart

Debian/Ubuntu: /etc/init.d/networking restart

Configuring Static Routes in multi-homed systems.

For more advanced networking with systems containing multiple NICs connecting to multiple VLANs and subnetworks, you’ll need to configure static routes to effectively send the data destined for a machine in such-and-such a network out through the correct NIC.  More can be found on this here…

Adding a persistent static route

Did you like this?
Tip cyberfella with Cryptocurrency

Donate Bitcoin to cyberfella

Scan to Donate Bitcoin to cyberfella
Scan the QR code or copy the address below into your wallet to send some bitcoin:

Donate Bitcoin Cash to cyberfella

Scan to Donate Bitcoin Cash to cyberfella
Scan the QR code or copy the address below into your wallet to send bitcoin:

Donate Ethereum to cyberfella

Scan to Donate Ethereum to cyberfella
Scan the QR code or copy the address below into your wallet to send some Ether:

Donate Litecoin to cyberfella

Scan to Donate Litecoin to cyberfella
Scan the QR code or copy the address below into your wallet to send some Litecoin:

Donate Monero to cyberfella

Scan to Donate Monero to cyberfella
Scan the QR code or copy the address below into your wallet to send some Monero:

Donate ZCash to cyberfella

Scan to Donate ZCash to cyberfella
Scan the QR code or copy the address below into your wallet to send some ZCash:

Backing up your ageing DVD collection efficiently

This post is basically a follow on from a previous post “Backing up your ageing CD collection efficiently”, so the title is kind of a play on words.

There are two ways to go (or both) when it comes to “backing up” your digital versatile discs, the first is to copy the disc to an .iso image for digital storage.

Being a big fan of efficiency, I am an advocate of command line power (or terminal emulator power if you’re being pedantic).

dd if=/dev/dvd of=~/mydvd.iso

You may need to replace /dev/dvd with /dev/sr0 if your DVDROM drive is USB powered.

You may also need to install libdvdcss2 to read the DVD if it’s encrypted/copy protected.  sudo apt-get install libdvdcss2 should nail that.  If not, google medibuntu and follow the instructions to add the medibuntu repository to your package manager, then install libdvdcss2, amongst other multimedia goodies on offer (such as w32codecs).

So, with your DVD backed up to an ISO file, you’re done.  Well yes, but those ISO files are pretty big at 4GB+, so why not go the extra mile and mount the .iso as a loopback device, then use the wonderfully simple DVDRIP program to re-encode the 4GB video on the mounted .iso file into a less space hungry, compressed video format that weighs in at a mere 700MB?

mkdir ~/myiso

sudo mount -t iso9660 -o loop /path/to/mydvd.iso /home/matt/myiso

If you haven’t already installed dvdrip, then…

sudo apt-get install dvdrip rar

Then run dvdrip and configure it with valid paths where necessary so it can store its files during the rip and re-encoding process.  The paths show as red if they’re invalid and go green when they’re valid.  Type /home/matt/myiso for the DVDROM device (where it says /dev/dvd by default) to rip the video from your mounted .iso file instead of an actual dvdrom device.  dvdrip won’t be able to tell the difference since the kernels loopback module is now presenting the .iso file as a device.

You should now be able to read the table of contents and re-encode the “DVD” into a compressed video format of your choosing, reducing it’s resulting filesize to as low as 700MB before loosing too much in the way of quality provided “2 pass encoding” is checked.  The re-encoding process will take time – how much depends on your CPU.

Above: dvdrip ripping the selected video chapter from a mounted dvd .iso image file


Above: dvdrip re-encoding the ripped chapter to a 700Mb xvid (.avi) compressed video format using 2-pass encoding

Did you like this?
Tip cyberfella with Cryptocurrency

Donate Bitcoin to cyberfella

Scan to Donate Bitcoin to cyberfella
Scan the QR code or copy the address below into your wallet to send some bitcoin:

Donate Bitcoin Cash to cyberfella

Scan to Donate Bitcoin Cash to cyberfella
Scan the QR code or copy the address below into your wallet to send bitcoin:

Donate Ethereum to cyberfella

Scan to Donate Ethereum to cyberfella
Scan the QR code or copy the address below into your wallet to send some Ether:

Donate Litecoin to cyberfella

Scan to Donate Litecoin to cyberfella
Scan the QR code or copy the address below into your wallet to send some Litecoin:

Donate Monero to cyberfella

Scan to Donate Monero to cyberfella
Scan the QR code or copy the address below into your wallet to send some Monero:

Donate ZCash to cyberfella

Scan to Donate ZCash to cyberfella
Scan the QR code or copy the address below into your wallet to send some ZCash:

Tuning an SSD powered Linux PC

So you’ve bought an SSD to give your everyday computing device a performance boost?  Well done.

The good news is, if you’re running Linux, there’s a handful of things you can do to make the most of your new super-powered block storage device.  My results below speak for themselves.  The bad news is, if you’re just a gadget consumer who has to have the latest and greatest, then simply buying it, fitting it and reinstalling the OS / cloning your previous drive is not going to cut it.  It’s more common sense than out-and-out rocket science, but whatever your OS, you can use my guide to give you ideas on what you can do to improve both performance and possibly the longevity of your device.  Being relatively new to the consumer market, the longevity of solid state block storage devices is yet to be seen.  At least you can do your bit to reduce the number of writes going to the device and (one would think) extend its life.

I chose to buy two relatively small capacity Intel SSD’s, connected each one to its own SATA controller on the system board and mount / on one and /home on the other.  I don’t see the point in buying large capacity SSD’s when it’s the performance you’re after rather than huge capacity to store your documents, photos, mp3, movie and software collections on – Thats what relatively cheap 2TB USB HDD’s and Cloud Storage providers like DropBox and Ubuntu One are for.  Oh and buy two of those two external HDD’s too because nobody wants to see 2TB of their data go irretrievably down the pan.

Incidentally, if you do lose data there is a nice previous blog entry on data forensics that will help you get it back. Search for forensics at the top or follow this link for that…

Disk Recovery and Forensics

Anyway, here’s the comparison of HDD performance to whet your appetite.

single hard disk in Lenovo IdeaCentre Q180

New dual SSD’s in HP dc7900 SFF PC

Tuning your SSD powered system…

Make sure the partitions are aligned.  This means that when a block is written to the filesystem, there are far fewer boundaries crossed on the ssd with each block written.

Much is written on the web about how to achieve this, I found the easiest way was to create a small ext2 /boot partition on the front of one drive, swap on the front of the other, and create my big / and /home partitions at the end of the disks (I have two remember) when using the manual partitioning tool gparted during installation.  By doing this, when i divided my starting sector number (returned by fdisk -l) by 512, i found the number was perfectly divisable – which is indicative of properly aligned partitions.  Job done then.

For each ssd in your computer, prepend noatime and discard to the options, leaving errors=remount-ro or defaults on the end.

/dev/sda   /   ext4   noatime,discard,errors=remount-ro 0 1

Change the scheduler from noop to deadline.
Add the following line for each SSD in your system:

echo deadline >/sys/block/sda/queue/scheduler

Make it do this each time you reboot
As root, vi /etc/rc.local and add these above the exit 0 line at the end of the file

echo deadline > /sys/block/sda/queue/scheduler
echo 1 > /sys/block/sda/queue/iosched/fifo_batch

GRUB Boot loader

vi /etc/default/grub    and change the following line…

GRUB_CMDLINE_LINUX_DEFAULT=”elevator=deadline quiet splash”

sudo update-grub

Reduce how aggressive swap is on the system.  A linux system with 2GB or more RAM will hardly ever swap.

echo 0 > /proc/sys/vm/swappiness
sudo vi /etc/sysctl.conf
change vm.swappiness=1

vm.vfs_cache_pressure=50

Move tmp areas to memory instead of ssd.  You’ll lose the contents of these temporary filesystems between boots, but on a desktop that may not be important.
In your /etc/fstab, add the following:

tmpfs   /tmp       tmpfs   defaults,noatime,mode=1777   0  0
tmpfs   /var/spool tmpfs   defaults,noatime,mode=1777   0  0
tmpfs   /var/tmp   tmpfs   defaults,noatime,mode=1777   0  0
tmpfs   /var/log   tmpfs   defaults,noatime,mode=0755   0  0

Move firefox cache (you’ll loose this between boots)
in firefox, type about:config and right click and create a new variable

browser.cache.disk.parent_directory

set it to /tmp

Boot from a live usb stick so the disks aren’t mounted, and as root, deactivate the journals on your ext4 partitions of your internal ssd’s e.g.

sudo tune2fs -O ^has_journal /dev/sda1

Add TRIM command to /etc/rc.local for each SSD i.e.

Above the line exit 0, add the following

fstrim -v /

fstrim -v /home     (only if your /home is mounted on a second SSD)

For computers that are always on, add trim command to /etc/cron.daily/trim

#!/bin/sh

fstrim -v / && fstrim -v /home

chmod +x /etc/cron.daily/trim

BIOS Settings

Set SATA mode to AHCI.  It will probably be set to IDE.  You’ll need to hunt for this setting is it varies between BIOS types.

SSD Firmware

Use lshw to identify your SSD and download the latest firmware from the manufacturer.  For Intel SSDs, go here

https://downloadcenter.intel.com/confirm.aspx?httpDown=http://downloadmirror.intel.com/18363/eng/issdfut_2.0.10.iso&lang=eng&Dwnldid=18363


That’s it.  I’ll add other tips to this list as and when I think of them or see them on the net.  You could reboot using a live usb and delete the residual files left behind in the tmp directories that you’ll be mounting in RAM from here on, but that’s up to you.  If you do, DO NOT remove the directories themselves or the system won’t boot.  If you do remove them, then fix it by booting using a live usb stick, mount the / partition into say, /ssd and mkdir the directories you deleted in /ssd/var/tmp and /ssd/tmp.  Be aware though that /tmp and /var/tmp have special permissions set on them.  chmod 777, followed by chmod +t to set the sticky bit -drwxrwxrwt (sticky bit set – with execution) on them.

Did you like this?
Tip cyberfella with Cryptocurrency

Donate Bitcoin to cyberfella

Scan to Donate Bitcoin to cyberfella
Scan the QR code or copy the address below into your wallet to send some bitcoin:

Donate Bitcoin Cash to cyberfella

Scan to Donate Bitcoin Cash to cyberfella
Scan the QR code or copy the address below into your wallet to send bitcoin:

Donate Ethereum to cyberfella

Scan to Donate Ethereum to cyberfella
Scan the QR code or copy the address below into your wallet to send some Ether:

Donate Litecoin to cyberfella

Scan to Donate Litecoin to cyberfella
Scan the QR code or copy the address below into your wallet to send some Litecoin:

Donate Monero to cyberfella

Scan to Donate Monero to cyberfella
Scan the QR code or copy the address below into your wallet to send some Monero:

Donate ZCash to cyberfella

Scan to Donate ZCash to cyberfella
Scan the QR code or copy the address below into your wallet to send some ZCash: