To display seconds on the Raspberry Pi OS digital clock, you need to modify the clock settings on the taskbar. Here are the steps to achieve that:
Raspberry Pi OS Digital Clock Settings
Accessing the Clock Settings: a. Right-click on the clock at the top-right corner of the Raspberry Pi OS desktop. b. From the context menu, select ‘Digital Clock Settings’ or a similar option (the name might vary slightly based on the version of Raspberry Pi OS you’re using).
Adjusting Clock Format: a. In the Digital Clock Settings window, find the field named ‘Clock Format’ or ‘Format’. b. This field determines how the time is displayed. You’ll typically see some format strings like %H:%M which stands for Hour:Minute in 24-hour format. c. To add seconds, modify the string to %H:%M:%S. The %S denotes seconds. d. Once done, click ‘OK’ or ‘Apply’ to save the changes.
The digital clock on your taskbar should now display hours, minutes, and seconds.
Note: The format strings are based on the strftime function format. You can further customize the time and date format using various codes. If you’re interested, you can look up strftime format codes online for more details.
The strftime function in the C programming language provides a way to format time and date. It’s used in various systems and software, and many programming languages provide similar functionality based on the C’s strftime.
Here’s a list of common strftime codes:
%a : Abbreviated weekday name (e.g., Wed).
%A : Full weekday name (e.g., Wednesday).
%b : Abbreviated month name (e.g., Jan).
%B : Full month name (e.g., January).
%c : Locale’s appropriate date and time representation.
%C : Century (year divided by 100, range 00 to 99).
%d : Day of the month as a zero-padded decimal number (e.g., 01 to 31).
%D : Equivalent to %m/%d/%y (e.g., 04/08/21).
%e : Day of the month as a space-padded number (e.g., 1 to 31).
%F : Equivalent to %Y-%m-%d (e.g., 2021-04-08).
%H : Hour (24-hour clock) as a zero-padded decimal number (e.g., 00 to 23).
%I : Hour (12-hour clock) as a zero-padded decimal number (e.g., 01 to 12).
%j : Day of the year as a zero-padded decimal number (e.g., 001 to 366).
%m : Month as a zero-padded decimal number (e.g., 01 to 12).
%M : Minute as a zero-padded decimal number (e.g., 00 to 59).
%p : Locale’s equivalent of either AM or PM.
%r : Time in AM or PM notation (e.g., 08:08:08 PM).
%R : Equivalent to %H:%M.
%S : Second as a zero-padded decimal number (e.g., 00 to 59).
%T : Equivalent to %H:%M:%S.
%u : Weekday as a number, where Monday is 1 and Sunday is 7.
%U : Week number of the year (Sunday as the first day of the week) as a zero-padded decimal number.
%V : ISO 8601 week number of the year with Monday as the first day of the week.
%w : Weekday as a decimal number, where Sunday is 0 and Saturday is 6.
%W : Week number of the year (Monday as the first day of the week).
%x : Locale’s appropriate date representation.
%X : Locale’s appropriate time representation.
%y : Last two digits of the year (e.g., 21 for 2021).
%Y : Full year (e.g., 2021).
%z : UTC offset in the form +HHMM or -HHMM.
%% : A literal % character.
You can combine these codes in various ways to create custom date and time formats. For example, %A, %B %d, %Y would produce “Wednesday, April 08, 2021”.
Did you like this? Tip cyberfella with Cryptocurrency
Consider this a crash course in working with QR codes on Linux.
A QR code is an image that represents a URL. It can be quickly and conveniently scanned by the camera on a mobile device to open the link, rather than having to type it in manually.
The management infrastructure includes Azure resources and resource groups, subscriptions, and accounts. Understanding the hierarchical organization will help you plan your projects and products within Azure.
Azure resources and resource groups
A resource is the basic building block of Azure. Anything you create, provision, deploy, etc. is a resource. Virtual Machines (VMs), virtual networks, databases, cognitive services, etc. are all considered resources within Azure.
Resource groups are simply groupings of resources. When you create a resource, you’re required to place it into a resource group. While a resource group can contain many resources, a single resource can only be in one resource group at a time. Some resources may be moved between resource groups, but when you move a resource to a new group, it will no longer be associated with the former group. Additionally, resource groups can’t be nested, meaning you can’t put resource group B inside of resource group A.
Resource groups provide a convenient way to group resources together. When you apply an action to a resource group, that action will apply to all the resources within the resource group. If you delete a resource group, all the resources will be deleted. If you grant or deny access to a resource group, you’ve granted or denied access to all the resources within the resource group.
When you’re provisioning resources, it’s good to think about the resource group structure that best suits your needs.
For example, if you’re setting up a temporary dev environment, grouping all the resources together means you can deprovision all of the associated resources at once by deleting the resource group. If you’re provisioning compute resources that will need three different access schemas, it may be best to group resources based on the access schema, and then assign access at the resource group level.
There aren’t hard rules about how you use resource groups, so consider how to set up your resource groups to maximize their usefulness for you.
Azure subscriptions
In Azure, subscriptions are a unit of management, billing, and scale. Similar to how resource groups are a way to logically organize resources, subscriptions allow you to logically organize your resource groups and facilitate billing.
Azure Subscriptions
Using Azure requires an Azure subscription. A subscription provides you with authenticated and authorized access to Azure products and services. It also allows you to provision resources. An Azure subscription links to an Azure account, which is an identity in Azure Active Directory (Azure AD) or in a directory that Azure AD trusts.
An account can have multiple subscriptions, but it’s only required to have one. In a multi-subscription account, you can use the subscriptions to configure different billing models and apply different access-management policies. You can use Azure subscriptions to define boundaries around Azure products, services, and resources. There are two types of subscription boundaries that you can use:
Billing boundary: This subscription type determines how an Azure account is billed for using Azure. You can create multiple subscriptions for different types of billing requirements. Azure generates separate billing reports and invoices for each subscription so that you can organize and manage costs.
Access control boundary: Azure applies access-management policies at the subscription level, and you can create separate subscriptions to reflect different organizational structures. An example is that within a business, you have different departments to which you apply distinct Azure subscription policies. This billing model allows you to manage and control access to the resources that users provision with specific subscriptions.
Create additional Azure subscriptions
Similar to using resource groups to separate resources by function or access, you might want to create additional subscriptions for resource or billing management purposes. For example, you might choose to create additional subscriptions to separate:
Environments: You can choose to create subscriptions to set up separate environments for development and testing, security, or to isolate data for compliance reasons. This design is particularly useful because resource access control occurs at the subscription level.
Organizational structures: You can create subscriptions to reflect different organizational structures. For example, you could limit one team to lower-cost resources, while allowing the IT department a full range. This design allows you to manage and control access to the resources that users provision within each subscription.
Billing: You can create additional subscriptions for billing purposes. Because costs are first aggregated at the subscription level, you might want to create subscriptions to manage and track costs based on your needs. For instance, you might want to create one subscription for your production workloads and another subscription for your development and testing workloads.
Azure management groups
The final piece is the management group. Resources are gathered into resource groups, and resource groups are gathered into subscriptions. If you’re just starting in Azure that might seem like enough hierarchy to keep things organized. But imagine if you’re dealing with multiple applications, multiple development teams, in multiple geographies.
If you have many subscriptions, you might need a way to efficiently manage access, policies, and compliance for those subscriptions. Azure management groups provide a level of scope above subscriptions. You organize subscriptions into containers called management groups and apply governance conditions to the management groups. All subscriptions within a management group automatically inherit the conditions applied to the management group, the same way that resource groups inherit settings from subscriptions and resources inherit from resource groups. Management groups give you enterprise-grade management at a large scale, no matter what type of subscriptions you might have. Management groups can be nested.
Management group, subscriptions, and resource group hierarchy
You can build a flexible structure of management groups and subscriptions to organize your resources into a hierarchy for unified policy and access management. The following diagram shows an example of creating a hierarchy for governance by using management groups.
Nested Management Groups
Some examples of how you could use management groups might be:
Create a hierarchy that applies a policy. You could limit VM locations to the US West Region in a group called Production. This policy will inherit onto all the subscriptions that are descendants of that management group and will apply to all VMs under those subscriptions. This security policy can’t be altered by the resource or subscription owner, which allows for improved governance.
Provide user access to multiple subscriptions. By moving multiple subscriptions under a management group, you can create one Azure role-based access control (Azure RBAC) assignment on the management group. Assigning Azure RBAC at the management group level means that all sub-management groups, subscriptions, resource groups, and resources underneath that management group would also inherit those permissions. One assignment on the management group can enable users to have access to everything they need instead of scripting Azure RBAC over different subscriptions.
Important facts about management groups:
10,000 management groups can be supported in a single directory.
A management group tree can support up to six levels of depth. This limit doesn’t include the root level or the subscription level.
Each management group and subscription can support only one parent.
Did you like this? Tip cyberfella with Cryptocurrency
The physical infrastructure for Azure starts with datacenters. Conceptually, the datacenters are the same as large corporate datacenters. They’re facilities with resources arranged in racks, with dedicated power, cooling, and networking infrastructure.
As a global cloud provider, Azure has datacenters around the world. However, these individual datacenters aren’t directly accessible. Datacenters are grouped into Azure Regions or Azure Availability Zones that are designed to help you achieve resiliency and reliability for your business-critical workloads.
The Global infrastructure site gives you a chance to interactively explore the underlying Azure infrastructure.
Regions
A region is a geographical area on the planet that contains at least one, but potentially multiple datacenters that are nearby and networked together with a low-latency network. Azure intelligently assigns and controls the resources within each region to ensure workloads are appropriately balanced.
When you deploy a resource in Azure, you’ll often need to choose the region where you want your resource deployed.
Some services or virtual machine (VM) features are only available in certain regions, such as specific VM sizes or storage types. There are also some global Azure services that don’t require you to select a particular region, such as Azure Active Directory, Azure Traffic Manager, and Azure DNS.
Availability Zones
Availability zones are physically separate datacenters within an Azure region. Each availability zone is made up of one or more datacenters equipped with independent power, cooling, and networking. An availability zone is set up to be an isolation boundary. If one zone goes down, the other continues working. Availability zones are connected through high-speed, private fiber-optic networks.
Availability Zones in a Region
To ensure resiliency, a minimum of three separate availability zones are present in all availability zone-enabled regions. However, not all Azure Regions currently support availability zones.
Use availability zones in your apps
You want to ensure your services and data are redundant so you can protect your information in case of failure. When you host your infrastructure, setting up your own redundancy requires that you create duplicate hardware environments. Azure can help make your app highly available through availability zones.
You can use availability zones to run mission-critical applications and build high-availability into your application architecture by co-locating your compute, storage, networking, and data resources within an availability zone and replicating in other availability zones. Keep in mind that there could be a cost to duplicating your services and transferring data between availability zones.
Availability zones are primarily for VMs, managed disks, load balancers, and SQL databases. Azure services that support availability zones fall into three categories:
Zonal services: You pin the resource to a specific zone (for example, VMs, managed disks, IP addresses).
Zone-redundant services: The platform replicates automatically across zones (for example, zone-redundant storage, SQL Database).
Non-regional services: Services are always available from Azure geographies and are resilient to zone-wide outages as well as region-wide outages.
Even with the additional resiliency that availability zones provide, it’s possible that an event could be so large that it impacts multiple availability zones in a single region. To provide even further resilience, Azure has Region Pairs.
Region pairs
Most Azure regions are paired with another region within the same geography (such as US, Europe, or Asia) at least 300 miles away. This approach allows for the replication of resources across a geography that helps reduce the likelihood of interruptions because of events such as natural disasters, civil unrest, power outages, or physical network outages that affect an entire region. For example, if a region in a pair was affected by a natural disaster, services would automatically fail over to the other region in its region pair.
Not all Azure services automatically replicate data or automatically fall back from a failed region to cross-replicate to another enabled region. In these scenarios, recovery and replication must be configured by the customer.
Examples of region pairs in Azure are West US paired with East US and South-East Asia paired with East Asia. Because the pair of regions are directly connected and far enough apart to be isolated from regional disasters, you can use them to provide reliable services and data redundancy.
Region Pairs
Additional advantages of region pairs:
If an extensive Azure outage occurs, one region out of every pair is prioritized to make sure at least one is restored as quickly as possible for applications hosted in that region pair.
Planned Azure updates are rolled out to paired regions one region at a time to minimize downtime and risk of application outage.
Data continues to reside within the same geography as its pair (except for Brazil South) for tax- and law-enforcement jurisdiction purposes.
Most directions are paired in two directions, meaning they are the backup for the region that provides a backup for them (West US and East US back each other up). However, some regions, such as West India and Brazil South, are paired in only one direction. In a one-direction pairing, the Primary region does not provide backup for its secondary region. So, even though West India’s secondary region is South India, South India does not rely on West India. West India’s secondary region is South India, but South India’s secondary region is Central India. Brazil South is unique because it’s paired with a region outside of its geography. Brazil South’s secondary region is South Central US. The secondary region of South Central US isn’t Brazil South.
Sovereign Regions
In addition to regular regions, Azure also has sovereign regions. Sovereign regions are instances of Azure that are isolated from the main instance of Azure. You may need to use a sovereign region for compliance or legal purposes.
Azure sovereign regions include:
US DoD Central, US Gov Virginia, US Gov Iowa and more: These regions are physical and logical network-isolated instances of Azure for U.S. government agencies and partners. These datacenters are operated by screened U.S. personnel and include additional compliance certifications.
China East, China North, and more: These regions are available through a unique partnership between Microsoft and 21Vianet, whereby Microsoft doesn’t directly maintain the datacenters.
Did you like this? Tip cyberfella with Cryptocurrency
Free access to popular Azure products for 12 months.
A $200 credit to use for the first 30 days.
Access to more than 25 products that are always free.
The Azure free account is an excellent way for new users to get started and explore. To sign up, you need a phone number, a credit card, and a Microsoft or GitHub account. The credit card information is used for identity verification only. You won’t be charged for any services until you upgrade to a paid subscription.
Many of the Learn exercises use a technology called the sandbox, which creates a temporary subscription that’s added to your Azure account. This temporary subscription allows you to create Azure resources during a Learn module. Learn automatically cleans up the temporary resources for you after you’ve completed the module.
When you’re completing a Learn module, you’re welcome to use your personal subscription to complete the exercises in a module. However, the sandbox is the preferred method to use because it allows you to create and test Azure resources at no cost to you.
Accept permissions to create Azure resources on your behalf on your Azure accountSandbox is created. Use for Educational Purposes Only!
Switch between PowerShell CLi and bash CLI in the Azure Cloud Shell easily.
bash in Azure Cloud Shellpwsh in Azure Cloud Shellaz upgrade works in bash or pwshInteractive Mode 1/2Interactive Mode 2/2
Once initialized, you can use the arrow keys or tab to help complete your commands. Interactive mode is set up specifically for Azure, so you don’t need to enter az to start a command (but you can if you want to or are used to it). Try the upgrade or version commands again, but this time without az in front.
Leave Interactive mode with the exit command.
Create VM in the Sandbox
Any exercise that uses the sandbox will require you to activate the sandbox subscription first. Once activated, you can login to the Azure portal and create resource without being billed for it by choosing the learn subscription during resource creation.
vm resource created using learn subscription in the Microsoft Sandbox Learn Directory in my Azure accountThe resource groups in my Azure accountThe Resources in my “learn” Resource GroupSelect all ResourcesDelete all resources in resource groupConfirm deletedouble confirmation of resource delete operation
Troubleshooting The Sandbox
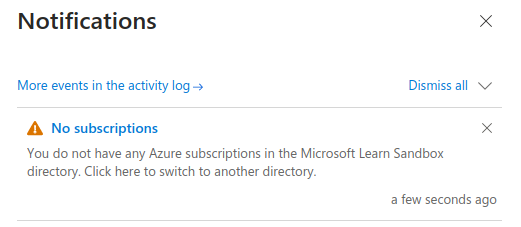
Subscriptions to free resources expire and need re-enabling from the Exercise page
This error occurs when the subscription button on the learn.microsoft.com page either hasn’t been clicked on or has timed out. Re-click the subscription acceptance button, usually at the top of the page for the exercise you’re doing.
Did you like this? Tip cyberfella with Cryptocurrency
When comparing IT infrastructure models, there are two types of expenses to consider. Capital expenditure (CapEx) and operational expenditure (OpEx).
CapEx is typically a one-time, up-front expenditure to purchase or secure tangible resources. A new building, repaving the parking lot, building a datacenter, or buying a company vehicle are examples of CapEx.
In contrast, OpEx is spending money on services or products over time. Renting a convention center, leasing a company vehicle, or signing up for cloud services are all examples of OpEx.
Cloud computing falls under OpEx because cloud computing operates on a consumption-based model. With cloud computing, you don’t pay for the physical infrastructure, the electricity, the security, or anything else associated with maintaining a datacenter. Instead, you pay for the IT resources you use. If you don’t use any IT resources this month, you don’t pay for any IT resources.
This consumption-based model has many benefits, including:
No upfront costs.
No need to purchase and manage costly infrastructure that users might not use to its fullest potential.
The ability to pay for more resources when they’re needed.
The ability to stop paying for resources that are no longer needed.
With a traditional datacenter, you try to estimate the future resource needs. If you overestimate, you spend more on your datacenter than you need to and potentially waste money. If you underestimate, your datacenter will quickly reach capacity and your applications and services may suffer from decreased performance. Fixing an under-provisioned datacenter can take a long time. You may need to order, receive, and install more hardware. You’ll also need to add power, cooling, and networking for the extra hardware.
In a cloud-based model, you don’t have to worry about getting the resource needs just right. If you find that you need more virtual machines, you add more. If the demand drops and you don’t need as many virtual machines, you remove machines as needed. Either way, you’re only paying for the virtual machines that you use, not the “extra capacity” that the cloud provider has on hand.
Compare cloud pricing models
Cloud computing is the delivery of computing services over the internet by using a pay-as-you-go pricing model. You typically pay only for the cloud services you use, which helps you:
Plan and manage your operating costs.
Run your infrastructure more efficiently.
Scale as your business needs change.
To put it another way, cloud computing is a way to rent compute power and storage from someone else’s datacenter. You can treat cloud resources like you would resources in your own datacenter. However, unlike in your own datacenter, when you’re done using cloud resources, you give them back. You’re billed only for what you use.
Instead of maintaining CPUs and storage in your datacenter, you rent them for the time that you need them. The cloud provider takes care of maintaining the underlying infrastructure for you. The cloud enables you to quickly solve your toughest business challenges and bring cutting-edge solutions to your users.
Did you like this? Tip cyberfella with Cryptocurrency
Part or all of the cost and responsibility of hosting and managing your own corporate IT infrastructure can be shared with a Cloud Service Provider.
Whereas On Premise Infrastructure is entirely your own responsibility, Infrastructure, Platform and/or Software can all be hosted in the Cloud and procured as an on-demand, rented service, with shared responsibility.
Hybrid Cloud Shared Service Model
You’ll always be responsible for:
The information and data stored in the cloud
Devices that are allowed to connect to your cloud (cell phones, computers, and so on)
The accounts and identities of the people, services, and devices within your organization
The cloud provider is always responsible for:
The physical datacenter
The physical network
The physical hosts
Your service model will determine responsibility for things like:
Operating systems
Network controls
Applications
Identity and infrastructure
The cloud models define the deployment type of cloud resources. The three main cloud models are: private, public, and hybrid.
Cloud Models
Private cloud
Let’s start with a private cloud. A private cloud is, in some ways, the natural evolution from a corporate datacenter. It’s a cloud (delivering IT services over the internet) that’s used by a single entity. Private cloud provides much greater control for the company and its IT department. However, it also comes with greater cost and fewer of the benefits of a public cloud deployment. Finally, a private cloud may be hosted from your on site datacenter. It may also be hosted in a dedicated datacenter offsite, potentially even by a third party that has dedicated that datacenter to your company.
Public cloud
A public cloud is built, controlled, and maintained by a third-party cloud provider. With a public cloud, anyone that wants to purchase cloud services can access and use resources. The general public availability is a key difference between public and private clouds.
Hybrid cloud
A hybrid cloud is a computing environment that uses both public and private clouds in an inter-connected environment. A hybrid cloud environment can be used to allow a private cloud to surge for increased, temporary demand by deploying public cloud resources. Hybrid cloud can be used to provide an extra layer of security. For example, users can flexibly choose which services to keep in public cloud and which to deploy to their private cloud infrastructure.
Multi-cloud
A fourth, and increasingly likely scenario is a multi-cloud scenario. In a multi-cloud scenario, you use multiple public cloud providers. Maybe you use different features from different cloud providers. Or maybe you started your cloud journey with one provider and are in the process of migrating to a different provider. Regardless, in a multi-cloud environment you deal with two (or more) public cloud providers and manage resources and security in both environments.
Azure Arc
Azure Arc is a set of technologies that helps manage your cloud environment. Azure Arc can help manage your cloud environment, whether it’s a public cloud solely on Azure, a private cloud in your datacenter, a hybrid configuration, or even a multi-cloud environment running on multiple cloud providers at once.
Azure VMware Solution
What if you’re already established with VMware in a private cloud environment but want to migrate to a public or hybrid cloud? Azure VMware Solution lets you run your VMware workloads in Azure with seamless integration and scalability.
Did you like this? Tip cyberfella with Cryptocurrency
Bitcoin adoption is occurring five times faster than Internet adoption in the mid nineties. For most who buy, store, spend and trade their Sats, they use a custodial service such as Coinbase, Binance, Crypto.com etc.
The thing is, those custodians are not actually looking after your bitcoins at all, since the bitcoins are simply UTXOs on a decentralised, distributed blockchain. No bitcoins enter the blockchain from outside and no bitcoins leave it. The blockchain is a closed system, albeit open, permissionless, censorship resistant, and all that good stuff.
So what are they looking after? Well, the private key that accesses the bitcoins that you have purchased. The likelihood is, that your balance is simply a query of a centralised database, sat in a cloud service providers data centre and the private key to the exchanges balance is theirs, not yours. So other than a way of having exposure to the bitcoin digital assets price movement, it’s kind of missing the whole point of bitcoin being a peer to peer digital currency with no intermediaries since you’re not custodian of the private keys to your own bitcoin balance on the blockchain.
Also, in order to transact, you need an intermediary validator node. That maybe the crypto wallet custodian service provider or maybe they themselves use another third party node service provider. The point is, you don’t know and all of a sudden we’ve gone from being “self sovereign bitcoiners” to just being clients of a crypto bank with an unknown number of intermediaries confirming and validating and tracking and approving (or not), our “peer to peer” bitcoin transactions. And bitcoins open and permissionless design just got regulated to require KYC. So you’re handing over all kinds of documentation, most likely to an unregulated foreign corporate who in return lets you query their centralised database of customers bitcoin balances based on how much bitcoin they sold to you. It’s not ideal is it?
The first step in upping ones game (and massively upping the level of responsibility) is to host your own private keys to your non-KYC bitcoin address using a hardware wallet, and very very very securely storing the recovery phrase to the private key such that every kind of natural disaster is accounted for. With bitcoin, its easy to store your wealth in a seizure resistant way, but its also easy to put yourself on the other side of bitcoins security if you lose the ability to access your own wallet over 5, 10, 15 or 50 years. So bear that in mind too.
Even hosting your own private keys still requires you to use software client from a company such as Ledger, Trezor etc to provide the full node needed to validate and confirm your transactions, even though you now verify the transactions yourself using the hardware wallet device.
So the next level of self sovereignty means running your own node. There are two easy ways to do this.
Run bitcoin core software on a linux machine or a windows machine and wait until the full blockchain has been synchronised to your local storage.
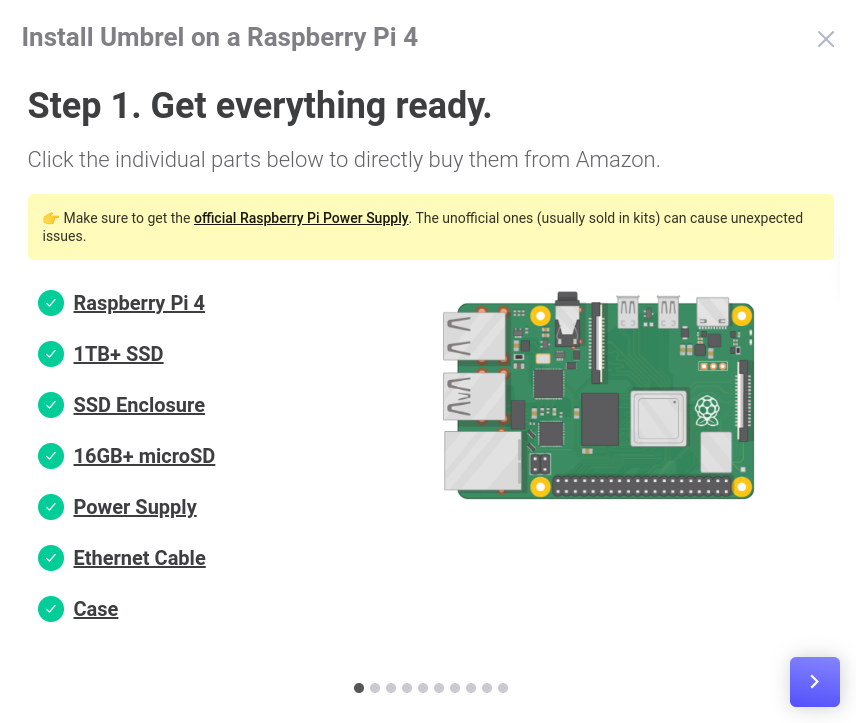
Run Umbrel – a comprehensive suite of “apps” running on a raspberry pi or a linux host, including a bitcoin core node and lightning node (by default).
In order to get umbrel up and running the quickest and easiest way (and lowest power way), I’d recommend a raspberry pi with very fast and large microSD card, at least 4GB RAM (8GB better if you intend to run many of the other apps available in the Umbrel App Store) and a 1TB minimum NVME external storage device to house the 600GB bitcoin blockchain.
I use a raspberry pi 400 with 4GB RAM and run Bitcoin Core and Lightning nodes, Samourai Dojo Server, Tailscale VPN, Pi-Hole and Bitfeed. And it runs very nicely indeed.
Getting up and running was a five minute job – no, it really was I swear, which makes it all the more tragic that people aren’t running their own bitcoin nodes. Plenty of people run their own media centres and nas storage at home, and running your own bitcoin node is no more difficult. Umbrel have made this super easy to do.
Follow the wizard all the way through. I used Raspberry Pi Imager to write the image file to the sc card, same as I would with any other Pi image, but Umbrel recommend a different one. You do you, but I’d recommend one or the other since I know they both work.
Then plug in your 1TB NVME Storage device, pop the sd card in the Pi, connect it to your network with a cable rather than wifi and power it up (use a proper pi power supply).
After a short while, you’ll be able to access http://umbrel.local from a laptop or desktop on your network and watch umbrel getting itself ready, then you can go through the motions of creating the bitcoin core wallet etc using the easy to use GUI. Make a note of all the bitcoin recovery phrase words just as you would with your hardware wallet.
The bitcoin blockchain will start to sync and will take a few days probably since its not just the download of lots of little files, but also the verification that they’re all present and correct (cryptographically verified accordingly).
While the bitcoin blockchain is syncing though, you can enable 2FA in the Setting and Install the other apps available in the app store.
Be sure to enable 2FA in Umbrel’s admin console, just as you would with a custodian cryptocurrency wallet provider!
I’d definitely recommend Tailscale VPN so that you can get to your node using your phone or laptop from anywhere in the world as if its on your local lan. Once installed, log on using a google account (other options available too) and see all the devices on your network and the IP addresses you need to access them by logging into https://login.tailscale.com/admin/machines
You can still run this at the same time as connecting to ExpressVPN if you’re using public Wi-Fi too. It’s “as well as” rather than “instead of”.
I’d also recommend pihole. It replaces the DHCP server and thus your primary DNS server on your LAN so provide Ad protection to your entire network.
Check out the Umbrel App Store from your Umbrel Node’s admin page for the other apps available, such as BTCPay Server to send invoices and receive bitcoin payments and also Samourai Dojo Server so that you can connect your Samourai BTC wallet app on your mobile device to your own bitcoin node if you use Bitcoin’s CoinJoin privacy feature that the Samourai wallet provides.
It’s really quick and easy to get all this up and running. I did it in a couple hours and everything just worked. I have to say, I’m very impressed.
Be sure to take a good solid set of notes as you go along, because you need to know how to recover all of this in the event your Pi or NVME block storage device goes pop!
You should only store enough bitcoin on your Umbrel wallet that you’d be prepared to loose. Your main stack should be kept in cold storage and moved to Umbrel and and when you need to open a lightning channel or make a transaction. Umbrel is considered Beta software, but it’s a very well polished offering already and will only get bigger and better as more products are included in the app store.
Welcome to the new era of the decentralised internet!
Upgrade to version 0.5.0
A new upgrade and the biggest Umbrel upgrade yet has just been released today (7/6/2022). I’ve logged on to my Umbrel node using the Tailscale address, backed up my channels as prompted and clicked on Upgrade…
New containers are initially downloadedOld containers are then removedA new welcome screen welcomes me back to my newly upgraded NodeA new desktop replaces the previous dashboardBitcoin Node app
Everythings running fine.
Update: I discovered this excellent tutorial on setting up Lightning. I highly recommend it, although setting an alias for your lightning node isn’t easy like it once was. I managed to crash my Umbrel node trying to change it -and from 2.5 hours away. D’oh! I Have No Idea What I’m Doing: Lightning on Umbrel⚡️ | Stonly
Running Multiple Lightning nodes on Umbrel
There are a handful of ways of managing a lightning node but two of the most popular ways are using ThunderHub and/or Ride The Lightning.
Each of these two tools runs on a different Lightning Node base however. One using c-Lightning (Core Lightning) and the other using Lightning Network Node (LND), so if you install both these tools, you’ll have two separate lightning nodes running on your Umbrel Personal Server, not one.
Bitcoin and Lightning Node Technology Stack
Whilst this might be slightly irritating, it does come with an advantage that you can create a channel between them and play around with liquidity before venturing out into the bigger lightning network.
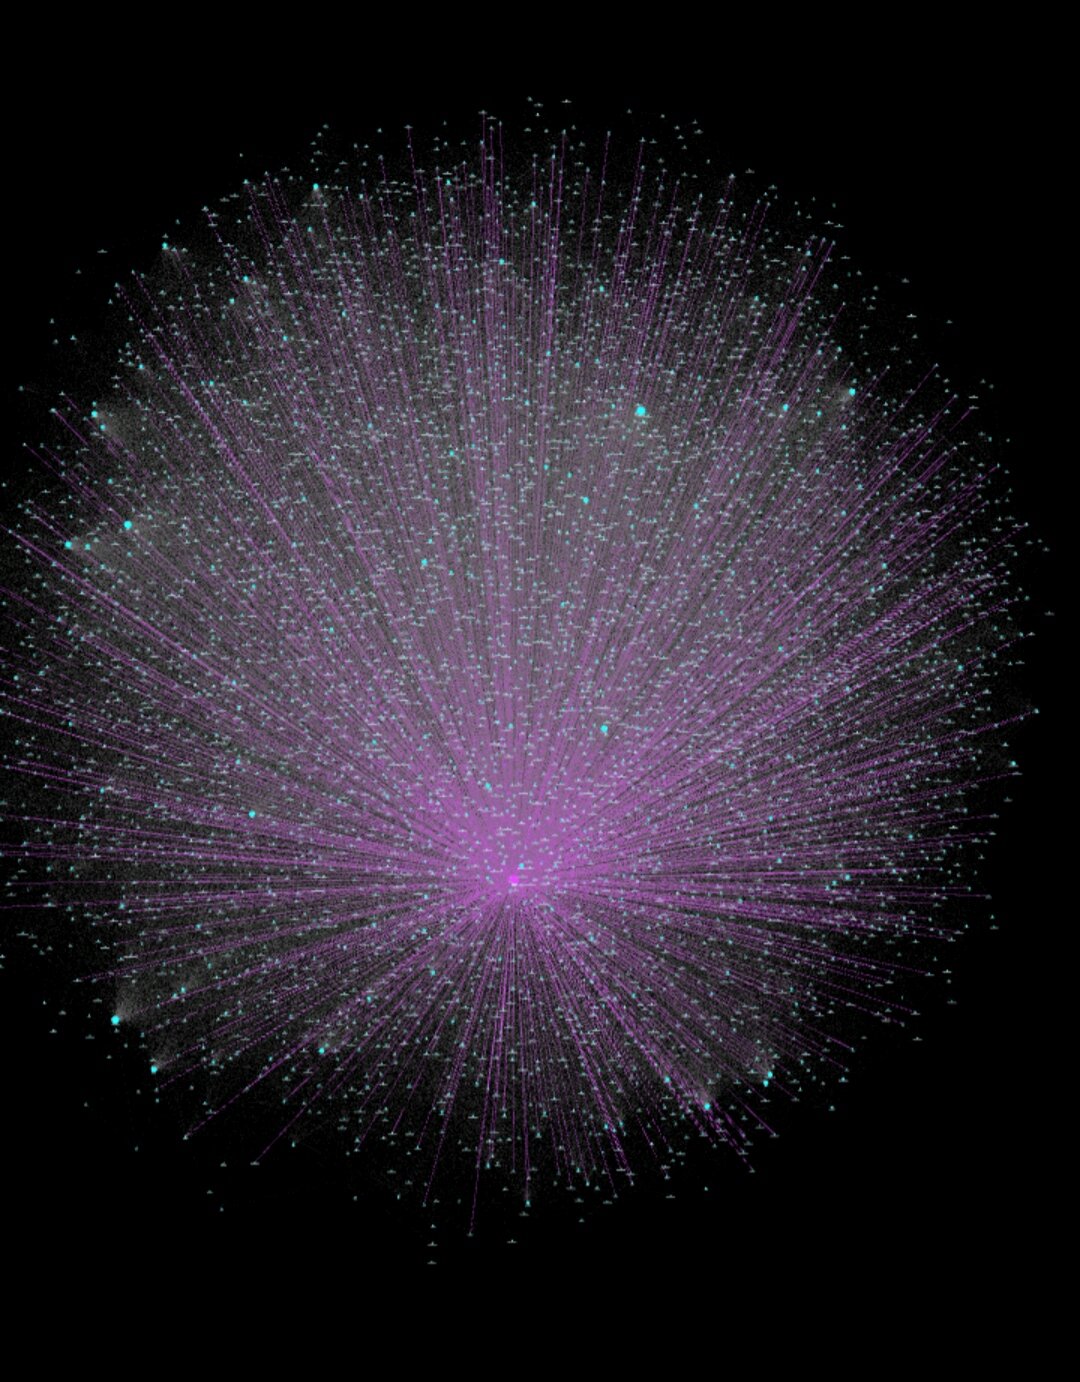
Bitcoin Lightning Network visualisation
Did you like this? Tip cyberfella with Cryptocurrency
Once installed, log in here to see all your tailscale connected devices.
The Umbrel app store also contains Samourai Dojo Server so you can connect your Bitcoin Samourai wallet to your own Dojo Server and perform transactions privately using Bitcoin’s CoinJoin privacy feature.
Did you like this? Tip cyberfella with Cryptocurrency