Scale up the Panel height to increase icon size on Start bar. Move Start bar to top of screen.
Cinnamon dynamic wallpaper extension and tiling window manager extension
Use nala instead of apt-get (sudo apt-get install nala ;; sudo nala install <package>)
install ubuntu-restricted-extras
In software manager install redshift and redshit-manager to configure night light
sudo fstrim -v / #If supported, run the next two commands to optimise SSD speed and lifespan
sudo systemctl enable fstrim.timer
sudo systemctl start fstrim.timer
Enable hot corners, assign actions to moving cursor to screen corners
Enable gestures for touchpad
Enable hardware GPU rendering for web browsers:
Firefox Tweaks:
about:config
layers.acceleration.force-enabled
gfx.webrender.all
Enable GPU Rendering in Brave Browser
1. Check if hardware acceleration is already enabled:
Open the Brave browser.
Click the three-line menu (≡) at the top right and select Settings.
Scroll down and select System from the left-hand menu (or type “System” in the search bar).
Find the “Use hardware acceleration when available” setting.
Toggle it on if it’s disabled.
Restart Brave for the changes to take effect.
2. Force GPU acceleration via Brave’s flags (optional):
Brave also provides access to experimental features via “flags” similar to Chrome. Here’s how you can force GPU rendering:
In the address bar, type brave://flags and press Enter.
In the search bar, type “hardware-accelerated”.
Find the option called “Override software rendering list” and enable it.
Restart Brave for changes to apply.
3. Check GPU acceleration status:
To verify if GPU rendering is active, go to brave://gpu in the address bar.
This page will show detailed information about GPU acceleration. Look for the status of different graphical features (like “Video Decode”, “Rasterization”, and “WebGL”) to confirm that they are hardware-accelerated.
If your GPU supports it and hardware acceleration is correctly enabled, Brave will use the GPU for rendering, similar to how Firefox does it with its own hardware acceleration settings.
Did you like this? Tip cyberfella with Cryptocurrency
Configuring remote event logging on EMC VNX storage systems involves setting up the system to forward its event logs to a remote syslog server. Here are the steps to configure remote event logging on an EMC VNX system:
Prerequisites
1. **Syslog Server**: Ensure you have a syslog server set up and accessible from the VNX storage system.
2. **Network Configuration**: Verify network connectivity between the VNX storage system and the syslog server.
3. **Administrative Access**: You need administrative access to the VNX Control Station.
Steps to Configure Remote Event Logging
1. **Access the VNX Control Station**:
– Use an SSH client to connect to the Control Station of the VNX system. Log in with administrative credentials.
2. **Edit the Syslog Configuration File**:
– Open the syslog configuration file for editing. The configuration file is usually located at `/etc/syslog.conf` or `/etc/rsyslog.conf`, depending on the system configuration.
vi /etc/syslog.conf
Or if using rsyslog:
vi /etc/rsyslog.conf
3. **Add Remote Syslog Server Entry**:
– Add a line to forward the logs to the remote syslog server. The syntax depends on the syslog service in use. Here are examples for both `syslog` and `rsyslog`:
For `syslog`:
*.* @<remote_syslog_server>:514
For `rsyslog`:
*.* @@<remote_syslog_server>:514
Replace `<remote_syslog_server>` with the hostname or IP address of your syslog server.
4. **Restart the Syslog Service**:
– After editing the configuration file, restart the syslog service to apply the changes.
For `syslog`:
service syslog restart
For `rsyslog`:
service rsyslog restart
5. **Verify Configuration**:
– Check if the VNX system is successfully sending logs to the remote syslog server. You can verify this by observing incoming logs on the syslog server or by using network monitoring tools.
Additional Considerations
– **Log Levels and Facilities**: You can customize which log levels and facilities are forwarded to the remote syslog server by specifying them in the configuration file.
– **Firewall Settings**: Ensure that the network firewall allows traffic on the syslog port (default is 514) from the VNX system to the syslog server.
– **Redundancy**: Consider setting up multiple syslog servers for redundancy and load balancing if necessary.
Example Configuration
Here’s an example of a `syslog.conf` entry to forward all logs to a remote server with IP address `192.168.1.100`:
*.* @192.168.1.100:514
And for `rsyslog.conf`:
*.* @@192.168.1.100:514
After editing the configuration file, restart the appropriate service:
service syslog restart
or
service rsyslog restart
By following these steps, you can configure your EMC VNX storage system to forward event logs to a remote syslog server, allowing for centralized log management and monitoring.
Did you like this? Tip cyberfella with Cryptocurrency
Most people inside and outside of I.T. just accept the router their ISP provides them, connect to its Wi-Fi and allow guests in their home to do the same, and when they’re on the move or travelling abroad for work or pleasure, connect to hotel and public wifi or turn on roaming on their smartphone.
This is simply not acceptable opsec going forward.
The solution is affordable, fun to set up and incredibly satisfying to use. It’s also modular. There’s a minimum requirement to get fully set up and there are a few optional extras that can be built into the solution over time, or free services to subscribe to if you want to keep your in-house infrastructure set-up simple.
Reference Diagram so you don’t get lost.
GL.inet provide a host of devices that serve similar but subtly different use cases. They all use the OpenWrt Operating System for a consistent, familiar and intuitive UX/UI.
My personal choice would be a Flint v2 at home, replacing the ISP provided router, and a Slate AX with a M2 5G Development Board plugged into the USB socket, using an Unlimited Data-Only SIM from Smarty Mobile. For constantly-on-the-move, I’d favour using a Mudi V2 over the Slate AX and M2 5G board combo for it’s compactness, flexibility and battery power over the performance and a dependency on mains power of the Slate (or Beryl).
Home/Office Setup (Flint V2)
Confirm the WAN connectivity requirements of your ISP. For UK BT/EE Customers.
Replace the ISP Provided Router with the GL.inet Flint V2.
Connect your laptop over Wi-Fi/cable on the default address of 192.168.8.1 and configure the WAN connection. Confirm ISP connectivity and perform a system update.
If you also have the M2 5G Dev Board and SIM and want to make use of it while not travelling, plug it into the USB on the Flint for hybrid/resilient connectivity. Don’t forget it when you’re travelling with your Slate though. If you’ve opted for the Mudi V2 in preference to the Slate, you don’t need the M2 board but you will likely need the SIM card in it for your Mudi V2 for 4G connectivity. Make sure you have everything you need when travelling.
On the Flint, configure the Private and Guest Wi-fi networks. 2.4GHZ has better reach but lower transfer rates. 5G is faster but the signal falls off faster, the further you are from the router. You can have one or the other or both, so do what you want in that regard.
Configure OpenVPN with a config file from a reputable and performant VPN provider such as ExpressVPN. This will ensure all traffic going out of the router to the ISP will be over a VPN. You can choose to use an OpenVPN configuration for whatever country you want to appear in, whether that is your own resident country or not.
Configure AdGuard to protect your network from malware and adverts.
Configure DNS to use a Secure DNS Provider such as Quad9
Configure Tailscale application to add your GL.inet router to your existing tailnet if applicable. Tailscale is a VPN service that places all your devices in our out of your home/work network, on the same virtual private subnet or tailnet in the easiest way possible. It’s really very good indeed.
Configure Wireguard Server (already installed on the Flint) to allow your Wireguard Clients (Slate AX or Mudi V2 travel routers) inbound connectivity to your LAN from outside of it, while on the move. This will route ALL traffic from your devices back home, and out through your Flint, when travelling. A great video on this end-to-end setup here.
Remote/Travelling (Slate AX or Mudi V2)
The OpenWrt interface for your Slate AX Travel Router or Mudi V2 4G Travel Router are the same as with your Flint, so it’ll look very familiar. You can connect your chosen travel router to the public/hotel Wi-Fi and/or roaming 4G service, then configure the Wireless Access Point to allow your devices a private connection to the travel router. This offloads the responsibility of firewalling and public service connectivity to the travel router, providing a layer of protection for your devices themselves.
You can also configure tailscale on the travel router and on your devices to allow you connectivity to all tailscale devices on your secure tailnet, including your Slate, Mudi and even your Flint back in the home/office and anything else back there that’s running tailscale. Tailscale gives you the confidence that you’ll always be able to connect to the interfaces of all your devices wherever they may be, provided you’re authenticated to your tailscale tailnet (you can use your Google account for this authentication).
You can also configure WireGuard Client using the config downloadable from your WireGuard Server running on your Flint, to optionally connect back to your LAN from your remote location, and any services on it. This is very similar to tailscale in that regard but gives you connectivity to the entire LAN rather than just placing devices running tailscale on a common virtual lan. ExpressVPN, Tailscale and WireGuard are all “VPN” services, but differ slightly in terms of their benefits and use cases. It can be very troublesome to run all three on a client computer but the GL.inet devices seem to take it in their stride, no problem whatsoever – another good reason to offload the responsibility to the GL.inet devices, keeping your client devices config relatively simple. You just connect to the Wi-Fi of the travel router and that’s all you need to do. Travel can be stressful, you don’t need it to be any more complicated that that.
One nice feature on the Slate AX is an easily-overlooked physical toggle switch on the side of the unit next to the power switch, that can be configured to provide a variety of functions. You can configure this to optionally turn any one of your VPN’s on and off. I’d use it to toggle WireGuard on or off, literally giving me a button that will force all my traffic through my connection back at base. ExpressVPN and Tailscale will turn on by default anyway (and you’d likely want them on permanently).
Summary
The Flint forces all internet traffic over ExpressVPN and is accessible from anywhere via Tailscale VPN authenticated devices. It also allows inbound VPN connectivity to the LAN via WireGuard.
The Slate/Mudi provides protection for your devices by removing the requirement to connect devices directly to public/shared wi-fi or foreign mobile networks. It also provides connectivity back to base, forcing all your internet traffic through a trusted ISP and secure VPN provider, instead of through a foreign/customer/adversary’s free, open guest network.
Optional Extras
Cybersecurity threats come in many forms and protection can be proactive or reactive in nature. I’ve already mentioned the use of Quad 9 Secure DNS, whereby your name resolution queries will be encrypted as well as the traffic itself. This masks what sites you’re resolving as well as masking what sites you’re visiting. You should want to mask everything you do, irrespective of what it is. The “I’ve nothing to hide so I’ve nothing to worry about” argument simply doesn’t stack up.
Pi-Hole DNS Filters
Before you use your secure DNS service to provide private name resolution services, you can also filter what DNS names even get resolved at all, using subscriptions to known dynamic lists of threat actors, using Pi-Hole running on a fixed, permanently powered-on SBC such as a Raspberry Pi as your primary DNS server for all clients on your LAN/Tailnet.
If you visit a page of your choosing, that in turn starts sending packets of identification data, metrics, telemetry, analytics to the algorithms of multiple third party advertising agencies, social media companies, intelligence agencies or domestic/foreign adversaries, then it’s best if the IP addresses that correspond to the FQDNs of those undesirable endpoints are never sent to your Secure DNS provider for resolution in the first place and are halted in their tracks.
Pi-Hole comes with it’s own UI and there’s an excellent guide here and accompanying doc here
CrowdSec Dynamic Firewall
If a rogue packet from a malicious actor manages to make it through your many lines of defence (which is very unlikely at this point), then as a last line of defence you should consider installing Crowdsec on your devices. Similarly to Pi-Hole, it subscribes to dynamic lists of bad actors, but instead of filtering a DNS resolution on the way out of your LAN (subsequently allowing re-entry back in), it puts up a firewall preventing any inbound connections from those known bad IP end points). The lists are updated constantly by crowdsec agents running on all crowdsec clients worldwide, so you’re literally being kept safe by everyone, all the time.
Did you like this? Tip cyberfella with Cryptocurrency
This post provides an excellent resource for those wanting to theme their Plasma desktop environments.
Whilst looking for a potential daily-driver distro replacement for ElementaryOS, I found this KDE based distro, “KDE Neon“.
I’m quite hopeful that it could be the answer to my future desktop aspirations and will be giving it a whirl in the coming days. More on KDE Neon here.
KDE Neon running on the KDE Slimbook
Did you like this? Tip cyberfella with Cryptocurrency
Cascadia Code is an open-source monospaced font made by Microsoft first released in 2020 and serves as the default typeface for the official Windows Terminal app.
Similar to Intel’s One Mono, JetBrains’ Mono and IBM’s Plex, Cascadia Code is an clear, legible, modern monospaced font tailored for terminal and code editing and offering a wide range of programming ligatures.
Earlier this month the font received its first update in nearly 3 years and, as per release announcement, it’s a sizeable uplift.
Cascadia
Check out other popular Nerd Fonts here and if you’re a Linux user, maybe try replacing bash with zsh and customise it with oh-my-zsh, p10k and a Nerd font of your choice (MesloLGS NF recommended).
Quite simply, a power law is a mathematical model. Imagine you have two hands and ten fingers. If you had four hands, you’d have twenty fingers. So as the number of hands rises, the number of fingers rises faster with 100% certainty.
The relationship of hands to fingers is F=h * 5 although this is NOT a power law correlation, it’s a linear relationship because hands always have the same number of fingers.
A power law on the other hand (no pun intended), is a relationship often exhibited in nature and in cities. Wealth distribution for example, the number of people who have very little to no wealth is very high and as you progress upwards through levels of wealth held by an individual, the number of individuals who hold exponentially more wealth than the order of magnitude beneath them is the inverse of the square or the cube or ^4 and so on. Only one person can be the richest, and the number of people competing at that top tier of 1 Trillion is very small, compared to the number of people competing for a paid job with a 100 K Salary.
It’s opportune to mention at this point that the number of bitcoin that will ever exist is effectively 20 M since 1 M of Satoshi’s coins will never move. Also, many are lost. There are not enough bitcoin in existence for every millionaire to own just one. Yet priced in bitcoin over time, everything falls in value against it, evidenced here: PricedInBitcoin21 .
Bitcoin’s price in any given fiat currency rises over time and on a linear scale can appear volatile and chaotic, putting a lot of millionaires off buying bitcoin, yet over a long period of time, if you plot the price on a logarithmic price scale on the y axis and logarithmic time scale on the x axis, a 96% correlation to a straight line up can be observed.
Moreover, it has moved through sufficient orders of magnitude that mathematically, a power law is observed and scientifically, it verifies that bitcoin is a system that is extremely unlikely to deviate from its path – even though it is volatile observed over a short time span.
In fact, over the time it’s existed, bitcoin has risen in value faster then anything in human history. This is because in terms of energy (work) input, relative to monetary output, it is the most efficient system ever invented. There is no second best system. I guess the millionaires just haven’t caught up yet. This is due to being too busy to do the 100, then 1000 hours of work required to understand it for yourself, albeit easily summarised in a few paragraphs here. They’re obviously too busy. Busy doing what? Under performing bitcoin, that’s what. Amusing isn’t it, when someone points that out? I think so, anyway.
Follow the work of Former Professor of Astrophysics Giovanni Santostasi for a deeper explanation of Bitcoin’s power law correlation, here and MicroStrategy’s Michael Saylor’s explanation of there being no second best* here.
Price on a Log scale but Time on a Linear Scale, with Power Law Corridor trend indicator
*At the time of writing this post, MicroStrategy stock is the only asset to have outperformed bitcoin over every timescale over the past five years
The Linux shell can be replaced with zsh to open up a world of extra plugins, features and themes. And it’s a pretty nice UX/UI upgrade from bash tbh.
My zsh shown below, has been complimented with oh-my-zsh and the p10k theme with customised prompt elements.
The left-side prompt elements are: battery (86%), os_icon (ElementaryOS), dir, disk_usage (8%).
The right-side prompt elements are: status (exit status 0), load (load average 1.11), time (11:02:59).
There are other prompt elements available and they are listed at the end of this post. Have fun!
Your mileage may vary between different terminals, e.g. blackbox, gnome-terminal etc. Try opening alternative terminal emulators once zsh is set up to see the differences if any, and just stick with the one that works best for you.
Installation
sudo apt-get update && sudo apt-get install zsh git

chsh -s $(which zsh)

sh -c "$(curl -fsSL https://raw.githubusercontent.com/ohmyzsh/ohmyzsh/master/tools/install.sh)"

mkdir -p ~/.local/share/fonts

cd ~/.local/share/fonts

curl -fLo "MesloLGS NF Regular.ttf" https://github.com/romkatv/powerlevel10k-media/raw/master/MesloLGS%20NF%20Regular.ttf

curl -fLo "MesloLGS NF Bold.ttf" https://github.com/romkatv/powerlevel10k-media/raw/master/MesloLGS%20NF%20Bold.ttf

curl -fLo "MesloLGS NF Italic.ttf" https://github.com/romkatv/powerlevel10k-media/raw/master/MesloLGS%20NF%20Italic.ttf

curl -fLo "MesloLGS NF Bold Italic.ttf" https://github.com/romkatv/powerlevel10k-media/raw/master/MesloLGS%20NF%20Bold%20Italic.ttf

fc-cache -fv

In your terminal of choice, replace the default font with "MesloLGS NF"
You could also try Cascadia Code Nerd Font or some of the others listed here
Install oh-my-zsh
Install oh-my-zsh to enable a framework that allows easy customisation of zsh.
sudo apt install curl wget

sh -c "$(curl -fsSL https://raw.github.com/ohmyzsh/ohmyzsh/master/tools/install.sh)"

Use the omz command to administer oh-my-zsh
After modification to the ~/.zshrc file, reload the config with,
source ~/.zshrc
When you first run the shell with the p10k theme installed, there is no config file set up, so a convenient wizard will automatically ask you some questions. More on the wizard here, but it’s fairly self-explanatory.
p10k has a number of customisable prompt elements. You will be prompted by a wizard upon first execution of the theme and it will run through various options/choices to create the .p10k.zsh config file sourced by your .zshrc file.
vi ~/.p10k.zsh and edit the left and right prompt elements contained in the following two sections.
typeset -g POWERLEVEL9K_LEFT_PROMPT_ELEMENTS=(
os_icon
dir
vcs
...
)
typeset -g POWERLEVEL9K_RIGHT_PROMPT_ELEMENTS=(
status
command_execution_time
background_jobs
...
)
After any changes,
source ~/.p10k.zsh
Add syntax-highlighting, auto-suggestion and auto-correction
git clone https://github.com/zsh-users/zsh-autosuggestions ${ZSH_CUSTOM:-~/.oh-my-zsh/custom}/plugins/zsh-autosuggestions
git clone https://github.com/zsh-users/zsh-syntax-highlighting.git ${ZSH_CUSTOM:-~/.oh-my-zsh/custom}/plugins/zsh-syntax-highlighting
Auto-correctionexemptions
If you make a mistake, zsh will offer a correction. If you have certain commands or words that are repeatedly prompted with autocorrection options, you can add them to the exemption list in ~/.oh-my-zsh/lib/correction so those words will be ignored.
Find and edit the load plugins line in ~/.zshrc
plugins=(git zsh-autosuggestions zsh-syntax-highlighting)
source ~/.zshrc
If you're happy everything works, change your default shell in /etc/passwd for your user to /usr/bin/zsh permanently. This will not affect the root user when you sudo su - to elevate your privs to change to the root user for your system.
Prompt Elements
os_icon: Operating system icon.
dir: Current directory.
vcs: Version control system (e.g., Git status).
prompt_char: Prompt character.
status: Exit status of the last command.
command_execution_time: Duration of the last command.
background_jobs: Indicator for background jobs.
history: Command history number.
time: Current time.
date: Current date.
battery: Battery status.
user: Current user.
hostname: Hostname of the machine.
ip: IP address.
load: System load.
disk_usage: Disk usage.
ram: RAM usage.
swap: Swap usage.
cpu: CPU usage.
kubecontext: Kubernetes context.
node_version: Node.js version.
python_version: Python version.
ruby_version: Ruby version.
go_version: Go version.
php_version: PHP version.
java_version: Java version.
aws: AWS profile.
azure: Azure account.
gcloud: Google Cloud account.
terraform: Terraform workspace.
nix_shell: Nix shell.
context: Context (e.g., user@hostname).
Did you like this? Tip cyberfella with Cryptocurrency
Running Kali as a daily driver is doable since it’s Debian Linux, but is it suitable or really necessary. No. Not really. You should have a dedicated laptop for running it and only run it to use the tools when ethical or approved to do so.
But there are some features in the Kali UX that you might want to see in your daily driver distro.
One of these features for me is the zsh prompt. I really like the Kali prompt but I use bash.
To make your Linux bash prompt look like the zsh one in Kali Linux, you need to customize the Bash prompt by modifying the .bashrc file in your home directory. The Kali Linux terminal prompt is typically configured to display the username, hostname, and current working directory with specific colors and formats. Here’s how you can achieve a similar look:
Open the Terminal: Open your terminal on your Linux distribution.
Edit the .bashrc File: Use a text editor to open the .bashrc file in your home directory. You can use nano, vim, or any other text editor you prefer. Here, we will use nano:
nano ~/.bashrc
Modify the PS1 Variable: Find the line that defines the PS1 variable. It might look something like this:
PS1=’${debian_chroot:+($debian_chroot)}\u@\h:\w\$ ‘ Comment it out (never delete anything!) with a hash and replace it with the following configuration to mimic the Kali Linux prompt:
Note: You can limit the number of components in the working directory path by setting the PROMPT_DIRTRIM environment variable in your ~/.bashrc file. This is worth doing if you work with exceptionally deep directory paths.
Here’s what each part of this configuration does:
[\033[01;32m]: Sets the color to green. \u: Displays the username. @: Adds the “@” character. \h: Displays the hostname. [\033[00m]: Resets the color. :: Adds a colon character. [\033[01;34m]: Sets the color to blue. \w: Displays the current working directory. [\033[00m]: Resets the color. \$ : Adds the dollar sign for normal users or a hash for the root user, followed by a space. Save the Changes: Save the changes in nano by pressing Ctrl+O, then Enter, and exit by pressing Ctrl+X.
Apply the Changes: To apply the changes you made to the .bashrc file, either close and reopen the terminal or source the .bashrc file:
source ~/.bashrc After completing these steps, your terminal prompt should look similar to the one in Kali Linux, displaying the username, hostname, and current working directory with the specified colors.
This cool little website allows you to generate custom PS1 prompts for bash that contain just the elements you want. Alternatively, just install zsh and enjoy the additional features that come with it.
Did you like this? Tip cyberfella with Cryptocurrency
This post compliments the Networker Cheat Sheet here that was originally written in 2012 and maintained for a few years before moving on to other things.
This fresh take on checking backups in EMC’s Networker product has been initially generated by ChatGPT 4o and will be maintained manually, going forward.
It compliments the original Cheat Sheet, or rather the Cheat Sheet compliments it, since it contains the finer technical detail surrounding each of the steps described at a high level, below.
Both will continue to be maintained as deemed necessary/valuable.
EMC NetWorker Backup Check Guide This guide provides a detailed process for an engineer to check and verify EMC NetWorker backups, ensuring data protection and recovery readiness.
Prerequisites Access and Permissions:
Ensure you have appropriate permissions to access the EMC NetWorker server and relevant systems. Familiarize yourself with the NetWorker Management Console (NMC) and command-line interface (CLI).
Software Requirements:
EMC NetWorker installed on the server. EMC NetWorker Management Console (NMC). Access to client machines if needed.
Documentation:
Backup schedules and policies. List of critical systems and data to be backed up. Contact information for the IT team and stakeholders.
Steps to Check EMC NetWorker Backups
Backup Clients, Groups, Schedules, Workflows and Policies
1. Verify Backup Schedules and Policies Ensure that the backup schedules and policies are correctly configured:
Open the NMC and navigate to “Configuration.” Check “Groups” for correct scheduling. Review “Policies” and “Workflows” to ensure all critical data is included.
2. Monitor Recent Backup Activities Using NMC:
Go to the “Monitoring” tab. Select “Completed Jobs” to see recent backup activities. Check for any failed or incomplete jobs.
Review the output from mminfo and the live output in nsrwatch for any errors or issues with Uptime (server uptime), Devices (backup data storage devices), Write Completion (save sets completed, writing, 0 bytes, i.e. hung)
In the NMC, navigate to “Monitoring” > “Logs.” Review logs for errors or warnings related to backup jobs. Using CLI:
Use the nsrinfo command to validate backup details for a specific client:
nsrinfo <client_name>
Confirm that all expected files and directories are listed.
4. Test Backup Recovery Perform regular test recoveries to ensure data can be restored when needed:
Identify a non-critical system or a test environment for recovery. In NMC, select “Recover” and follow the wizard to restore data. Verify the integrity and completeness of the recovered data.
5a. Check Storage Utilization Ensure there is sufficient storage space for backups:
In NMC, go to “Media” > “Media Management.” Check the status and available space on storage devices. Monitor tape or disk usage to prevent overflow.
5b. Check DataDomain Health/Capacity
The following list of commands are useful when checking the health of the DataDomain Storage Devices providing the storage media to the Networker backup servers.
enclosure show summary

net show settings

alerts show current

alerts show history

alerts clear alert-id "<alertID>"

user show list

user enable ddboost

disk show hardware

disk show state

disk fail/unfail

filesys show space
6. Review Alerts and Notifications Configure and review alerts to stay informed about backup issues:
In NMC, navigate to “Configuration” > “Alerts.” Set up notifications for backup failures, low storage, and other critical events. Regularly check email or other configured notification channels.
7. Document and Report Findings Create a Backup Status Report:
Summarize the status of recent backups. Highlight any issues, errors, or anomalies. Document actions taken to resolve issues. Share with Stakeholders:
Distribute the report to relevant IT staff and management. Schedule meetings to discuss any significant issues or improvements needed.
8. Perform Regular Maintenance Update Software:
Ensure EMC NetWorker and any related software are up to date with the latest patches and updates.
Review and Adjust Policies:
Periodically review backup policies to adapt to changes in data volume or criticality.
9. Troubleshooting Common Issues Failed Backups:
Check logs for specific error messages. Ensure the client is reachable and has enough resources. Verify network connectivity between the NetWorker server and clients.
Slow Backup Performance:
Monitor network bandwidth and server performance. Optimize backup schedules to avoid peak usage times. Verify that storage devices are functioning correctly.
Storage Space Issues:
Review retention policies to ensure data is not retained longer than necessary. Add additional storage capacity if needed.
Conclusion Regular checks and maintenance of EMC NetWorker backups are crucial for ensuring data integrity and availability. By following this guide, you can systematically verify backup schedules, monitor activities, validate backup completeness, test recovery processes, and maintain overall backup health. Always document findings and communicate with stakeholders to ensure transparency and readiness for data recovery.
For detailed command references and advanced troubleshooting, refer to the EMC NetWorker documentation and support resources.
Troubleshooting Non-Running Backups
The following steps help troubleshoot a non-running backup, including those that use the NMM (Networker Module for Microsoft) to perform snapshot backups of Exchange Server, SQL Server, SharePoint and Hyper-V.
In NMC, run the Backup Group containing Client and observe Failure. Check the Log output detail.
Simultaneously, observe nsrwatch and observe behaviour, checking media is online and mounted.
Ensure the FQDNs are present in the Client Config for all network interfaces, i.e. LAN and BU interface/network connections.
Perform ping and nslookup (forward and reverse lookup) tests on the command line for all the fqdns and IPs of the backup client to ensure DNS has all the requisite A and PTR records for Networker to validate the authenticity of the client.
Correct and re-run the backup, observing any new errors in NMC and using nsrwatch.
Re-test the client backup by using the following command to run the Group.
nsradmin -C "type: NSR client; group: Exchange" | more
Observe the errors and mitigate accordingly if obvious.
Error 21
For Error 21, Check the VSS Writers are healthy. Networker NMM Module for Microsoft Applications uses the VSS Writers to perform point-in-time snapshots of the data. If the VSS Shadow Copy Writers are not healthy, Networkers NMM Module cannot do its job.
vssadmin list writers
Observe any Services using the VSS Shadow Copy Service that are in an error state and restart those services.
Repeat client backup test using the nsradmin command above.
In the event of continued failure, ensure that the RMAgentPS Service is started (“Replication Manager Client for RMAgentPS“)
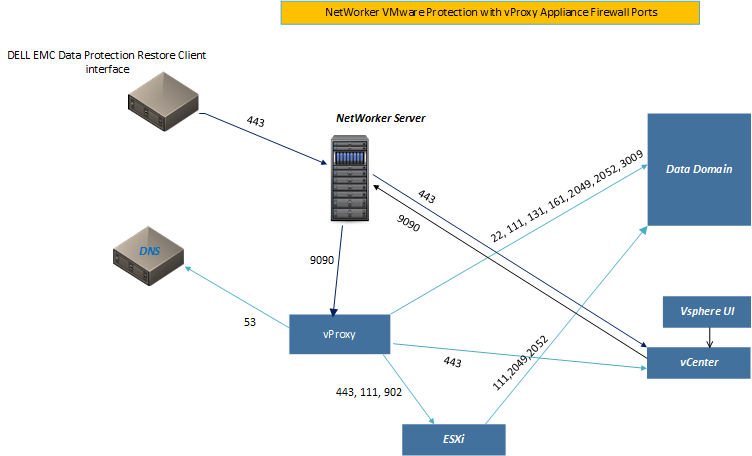
In the event that you’re using Client Direct to bypass the Networker Storage Node by sending block data direct to a DataDomain, ensure that the requisite ports are open to allow the communication on both LAN and BU Networks.
Exchange Backup Topology
Verifying that a Client-Direct backup has taken place
Use the following networker commands to look for flags that indicate client direct backups.
In C:\Program Files\EMC NetWorker\nsr\logs\daemon.raw and nmm.raw, the following entries should be observed if it is running correctly.
Error 500
If an HTTP response code:500 error occurs when attempting to back up a new client, Check the ‘Globals (1 of 2)’ dialog in the client config on the NMC for lower and upper case ALIAS
Firewall Tests
The following commands are useful in troubleshooting firewall issues.
Attempts to connect to the nsrd process
nsradmin -s <backupserver>

Attempts to connect to the nsrexecd process
nsradmin -s <backupserver> -p nsrexecd

Displays listening processes
nsrrpcinfo -p <backupserver>

To display specific listening processes
nsrrpcinfo -t <backupserver> nsrd

To test connectivity to Storage Node
nsrrpcinfo -t <storagenode> nsrsnmd
In a Powershell WIndow, you can test ports are open, e.g. for SQL Server
From backup server: Test-NetConnection -ComputerName <sql-client_name> -Port 1433
Client Connectivity Tests (Linux BuR Servers)
The following commands are useful in verifying backup client connectivity. Be aware that for a backup server to backup a client, the client must allow it. This is done by adding the name of the backup server to the local servers files on the backup client:
From backup server: nsrrpcinfo -p “<client>” From client: nsrrpcinfo -p “<backup_server>”
In a Powershell WIndow, you can test ports are open, e.g. for SQL Server
From backup server: Test-NetConnection -ComputerName <client_name> -Port 1433
NSR Peer Information Reset from Networker Backup Server& Client
This command can be used to reset the peer information on the backup server, effectively starting all communications between the two from a clean point. It can also be run on the backup server to clear out ALL communication between the server and all of its clients.
nsradmin -p nsrexec
print type:nsr peer information; name:client_name
delete
Y
This command can be used to reset the NSR peer information from the client.
nsradmin -p nsrexec
print type:nsr peer information
delete
Y
To reset all communication between the NSR Backup server and all it’s backup clients in one go,
nsradmin -p 390113 -C "NSR peer information"
Unable to obtain the user credentials from the lockbox
Perform the step above to delete nsr peer information from the client,
Edit /etc/hosts on the client and add an alias for the backup interface of the backup server, e.g.
10.200.200.10 backupserver01-b backupserver01
Where backupserver01-b is the hostname of the backup server’s backup interface
Log Render
To view the daemon.log in a human-friendly readable format without disrupting operations, use the following command,
nsr_render_log -empathy daemon.raw > daemon.log
Probe the backup client
Probe the backup client from the backup server, logging the communication.
Check the health of the backups for a client over a given period in history,
List names of all clients backed up over the last 2 weeks (list all clients)
mminfo -q “savetime>2 weeks ago” -r ‘client’ | sort | uniq

List all backups for a specific client
mminfo -q ‘client=client-name, level=full’ -r ‘client,savetime,ssid,name,totalsize’
Add a user to the admin list on a NSR Backup Server
New Backup administrators will need to be added to the NSR console as an admin user.
nsraddadmin -u user=username, host=*
Reset NMC Users password
To reset the password of an NMC user, you will still need to obtain the administrator password. Then you can use this command:
If you run jobkill with no parameters, it enters a more interactive session, listing all jobs. You can identify the clone jobs and kill them without necessarily running jobquery first.
VM Backups are facilitated by a vProxy appliance. Controlled by the Neworker Server (and configured via NMC), the vProxy appliance backs up .vmdk files direct to the DataDomain.
Backup and Recovery of vCenter Server is covered here
Jukeboxes and Tape Drives
If you’re extremely unfortunate, you may find yourself troubleshooting a jukebox with a replacement tape drive, decades after they’ve gone out of vendor support. Good luck with that. Here are some useful Networker nsrjb commands, in any case.
Ensure that any jumpers that control SCSI ID are set accordingly, ideally the same as the previous drive and definitely not the same as any existing drives.
After adding the new drive, open the legacy nwadmin UI and make sure the drive is set to Enable, not in Service Mode.
nsrjb -C            #Identify the jukebox and tape drives present
nsrjb -HEvv         #If the new drive isnt visible, re-initialise the jukebox
nsrjb -v -C         #Verify SCSI ID is assigned and is unique
nsrjb -v -I -S <slot_number>        #Attempt to load a tape from <slot_number>
nsrjb -C            #Verify the drive is Enabled and Ready
nsrjb
nsrjb -u -f <device_name>           #Eject tape from device e.g. /dev/rmt/0cbn
Despite the replacement tape drive looking identical in every way, If the firmware is not compatible then it simply won’t work. Depending on the manufacturer, the following tools can be used to backup and restore firmware to the tape drive. Same goes for the Jukebox.
For IBM Drives, obtain the IBM Tape Diagnostic Tool (ITDT), available for a multitude of operating systems. This post on the Dell KB, goes more in depth on its use.
itdt -f <device_id> firmware --backup #Backs up existing f/w before upgrade
For HP Drives, obtain the HPE Library and Tape Tools (L&TT), also available for a multitude of operating systems including legacy Solaris and OpenVMS systems,
Permission denied. User does not have Operate Networker or Change Application Settings privilege to perform this operation.
This can happen in a variety of situations, including the dedicated oracle backup account attempting to clear down retired backup savesets in networker.
Use the following command on the backup server to add the user as an admin:
nsraddadmin -u <user>@<server_name>
VMWare vProxy Backup Group succeeds but is marked as failed
If VM’s are removed from VMWare the UUID of the VM in Networker is still in the vmware nsrpolicy and so failure messages will still be written to the top of the log when vProxy backups run for the remaining VMs.
These UUIDs require cleaning out to prevent the errors from recurring which marks your otherwise successful backup group with a red X instead of the green tick it deserves.
The following command will remove the UUID from the nsrpolicy.
nsrpolicy group update vmware -g <backup_group> -O <UUID_from_log>
Clones
Savesets or more specifically the changed blocks within a saveset, can be replicated to a target copy or “clone” of that saveset on a remote datadomain.
This is achieved by configuring a target pool on the backup server with a device (or devices) in it on the remote, target datadomain. Also, a “clone” action can be configured to compliment a “backup” action in an existing workflow, so as soon as a saveset is taken, it is cloned to the remote site. This is recommended for the most critical systems as part of a disaster recovery strategy.
The technology “Clone Controlled Replication (CCR)” consists of three systems:
DDboost to manage the file replication between DataDomains,
Recover Pipe to Save (RPS) to parallelise what used to be a single threaded operation of allowing multiple asrrecopy threads in an nsrclone process to talk to a single nsrmmd process on the backup server, and
Automatic Multi-streaming (AMS) to manage the multiple data streams.
RPS is enabled by default in newer versions of Networker. It can be disabled in the Backup Server Properties, Clone, Disable RPS Clone check box. Make sure “Diagnostic Mode” is checked or you won’t see the properties.
On DataDomain
The file replication operation of the clone occurs between datadomains using the DDBoost protocol. You can use the following useful commands to view historic or current file-replication operations started by the asrrecopy thread in the nsrclone process on the backup server (or storage node).
ddboost file-replication show active

ddboost file-replication show history
Manual Clone
You don’t have to configure an automated clone action to clone a backup saveset in the workflow. An alternative would be a manual clone, either of a single, existing saveset, or of a list of savesets.
#Perform Single Clone of Single SaveSet
 nsrclone -b <target-pool> -S <ssid>

#Create list of savesets and clone them to a target media pool (remote DD)
 mminfo -avot -c <client-name> -r ssid > <client-name>_savesets.txt
 nsrclone -b <target-pool> -S -f <client-name>_savesets.txt
Did you like this? Tip cyberfella with Cryptocurrency
To display seconds on the Raspberry Pi OS digital clock, you need to modify the clock settings on the taskbar. Here are the steps to achieve that:
Raspberry Pi OS Digital Clock Settings
Accessing the Clock Settings: a. Right-click on the clock at the top-right corner of the Raspberry Pi OS desktop. b. From the context menu, select ‘Digital Clock Settings’ or a similar option (the name might vary slightly based on the version of Raspberry Pi OS you’re using).
Adjusting Clock Format: a. In the Digital Clock Settings window, find the field named ‘Clock Format’ or ‘Format’. b. This field determines how the time is displayed. You’ll typically see some format strings like %H:%M which stands for Hour:Minute in 24-hour format. c. To add seconds, modify the string to %H:%M:%S. The %S denotes seconds. d. Once done, click ‘OK’ or ‘Apply’ to save the changes.
The digital clock on your taskbar should now display hours, minutes, and seconds.
Note: The format strings are based on the strftime function format. You can further customize the time and date format using various codes. If you’re interested, you can look up strftime format codes online for more details.
The strftime function in the C programming language provides a way to format time and date. It’s used in various systems and software, and many programming languages provide similar functionality based on the C’s strftime.
Here’s a list of common strftime codes:
%a : Abbreviated weekday name (e.g., Wed).
%A : Full weekday name (e.g., Wednesday).
%b : Abbreviated month name (e.g., Jan).
%B : Full month name (e.g., January).
%c : Locale’s appropriate date and time representation.
%C : Century (year divided by 100, range 00 to 99).
%d : Day of the month as a zero-padded decimal number (e.g., 01 to 31).
%D : Equivalent to %m/%d/%y (e.g., 04/08/21).
%e : Day of the month as a space-padded number (e.g., 1 to 31).
%F : Equivalent to %Y-%m-%d (e.g., 2021-04-08).
%H : Hour (24-hour clock) as a zero-padded decimal number (e.g., 00 to 23).
%I : Hour (12-hour clock) as a zero-padded decimal number (e.g., 01 to 12).
%j : Day of the year as a zero-padded decimal number (e.g., 001 to 366).
%m : Month as a zero-padded decimal number (e.g., 01 to 12).
%M : Minute as a zero-padded decimal number (e.g., 00 to 59).
%p : Locale’s equivalent of either AM or PM.
%r : Time in AM or PM notation (e.g., 08:08:08 PM).
%R : Equivalent to %H:%M.
%S : Second as a zero-padded decimal number (e.g., 00 to 59).
%T : Equivalent to %H:%M:%S.
%u : Weekday as a number, where Monday is 1 and Sunday is 7.
%U : Week number of the year (Sunday as the first day of the week) as a zero-padded decimal number.
%V : ISO 8601 week number of the year with Monday as the first day of the week.
%w : Weekday as a decimal number, where Sunday is 0 and Saturday is 6.
%W : Week number of the year (Monday as the first day of the week).
%x : Locale’s appropriate date representation.
%X : Locale’s appropriate time representation.
%y : Last two digits of the year (e.g., 21 for 2021).
%Y : Full year (e.g., 2021).
%z : UTC offset in the form +HHMM or -HHMM.
%% : A literal % character.
You can combine these codes in various ways to create custom date and time formats. For example, %A, %B %d, %Y would produce “Wednesday, April 08, 2021”.
Did you like this? Tip cyberfella with Cryptocurrency